Geofencing -The Difficulty of DJI Drones

On multiple occasions, my intended drone flight was defeated because my DJI drone refused to spin-up the propellers.  Although the flight is authorized by the FAA, the drone refuses to launch.  With proper planning, this problem is avoidable.

DJI drones include a safety feature known as Geofencing, which is intended to prevent flying in areas that are could be unsafe, particularly near airports. There are different systems of understanding the airspace and the DJI system is entirely different that the system employed by the FAA. 

Local airport facility grid

Anywhere around controlled airspace, maximum flight altitude is determined a grid layered across a map; each grid-square indicates maximum altitude.  As this is local to the facility/airport, it is commonly referred to as the facility grid. 

A flight plan that does not exceed the stated maximum altitude can often be approved in seconds by a computer, without need for review by a person. This is made possible by a computerize system called LAANC (low altitude authorization). Submit your flight plan via a mobile app that supports LAANC. If you succeed in receiving authorization, you may need to export that information and then submit it to DJI to unlock your drone.

For years, I used a LAANC-enabled app called AirMap. Recently, that failed (and I found some rumors online why that might be true). Ultimately, I was forced to switch to a different LAANC-enabled app and I now use Aloft (https://www.aloft.ai/), formerly known as Kittyhawk.

If your drone is locked and will not launch, flight authorization from the FAA – by itself – does not unlock a DJI drone.

DJI Geofencing

Based upon the current GPS location, the drone automatically is aware of local flight restrictions. Potentially, it can refuse to take off.  In some cases you may be able to unlock it from your flight controller; this is called self-unlocking.  In other cases, self-unlocking is not allowed and you must request unlocking DJI Fly Safe (https://www.dji.com/flysafe). FAA flight authorization is a prerequisite.

In advance of your flight, always check the DJI Fly-Safe geofencing map.  If you’re flight is either fully or partly in a blue zone or red zone, you will need to manually unlock the drone.  DJI GEO system shows approach paths to airport runways and it is these areas that are likely to be considered no-fly zones. DJI did not invent this system; it is based upon LATAS (Low Altitude Traffic and Airspace Safety), which I have read was pioneered by PrecisionHawk.

Do not wait until you arrive at your launch location before checking that your drone will be able to launch.  Research in advance: weather, FAA controlled-airspace restrictions, NOTAMs, and DJI GEO restrictions. 

In specific geographic locations, your drone controller may display “NFZ”, which means “No-fly Zone”. When locked due to a NFZ, the drone can only be unlocked via the DJI Flysafe website; it cannot be unlocked via self-unlocking. 

(I remember a conversation with a police officer in Boston when he asked to check my flight authorization. When I told him the drone would not launch in a specific location, he suggested that the pilot can simply unlock it and I told him that is not always true.  Clearly this guy does not have personal experience flying DJI drones within the class-B airspace of Boston Logan airport.)

On mobile devices (e.g. smartphone), the Fly-Safe website reports that unlocking is not supported on the mobile website.  The solution is to use a full-screen computer.  Do this at home before you drive off to your launch site.

For custom unlocking via the DJI Flysafe web page, you probably need a computer.

Upon submitting your request, two things happen.  You will receive an email that states “Unlock application is created.”  The web site shows you that the request is “Pending review.”

If all goes well, two things will happen.  You will receive a subsequent email  within less than 10 minutes stating “Unlock application is accepted.”  The website shows you that the request is “Accepted.”

Your login username must match: Flysafe web site & the mobile app.

Import the unlock certificate to the aircraft

What happens next is not entirely obvious and requires a bit of care.  You launch the app for piloting (e.g. DJI Go 4 or DJI Fly) and find the menu item “Unlocking License” (DJI Go 4 app) or “Unlock GEO Zone” (DJI Fly app).  The app retrieves any unlocking authorizations via the Internet.  This requires two things.  You must be connected to Internet data (e.g. Wi-Fi or cellular data network).  Whenever you launch the app, you must be logged-in and the username must match the username that you used when requesting the unlock.  (I have once stumbled because I had inadvertently used a different login, the unlocking license could not be found, and my intended flight did not happen until after I solved the mystery.)

If all goes well, your unlocking authorization will be listed.  You’re not quite done yet; there are two more steps to unlock the drone. Though the license is recognized by the remote controls, the license must be copied to the drone.  Look for “Import to Aircraft”.  Do that and the app will then show that the drone has the license and it appears with a on-screen enable/disable switch.  As the default is “disabled”, you must slide it to “enable” before the drone will finally unlock the NFZ. The display on remote controller will change from “NFZ” to “Ready”.

NOTAMs (Notice to AirMen)

Mobile apps that support LAANC will show you both the boundaries of controlled airspace (class-B, class-C, class-D, class-E ground level) and all local facility grids. However, most of these apps do not show active NOTAMs. To see active NOTAMs, simply look at Skyvector.com. Active NOTAMs appear as red circles.

Hollywood Cinema – DJI Is Coming After You

Hollywood Cinema – DJI Is Coming After You

To stabilize a camera for video filming, we have seen several types of stabilization:
(1) Large Steadycam body-mounted on a vest. (This was invented around 1975.)
(2) Hand-held stabilizers that rely upon counter-balance weight
(3) Computerized gimbal operated with two hands and support cinema cameras such as RED, Sony, Canon, etc
(4) Computerized gimbal that can be held with just one hand and support smaller cameras
(5) Very small devices including camera and gimbal with a total weight of 16 oz or less.
(6) In-camera mechanical techniques for stabilzation, either lens-shift or sensor shift
(7) Digital image stabilization

Computerized gimbals have been a game changer, invented around 2012. The larger 2-handed category has been dominated by Freefly MoVI series and DJI Ronin series of products. These systems do not include camera, video monitoring, or follow-focus.

Today, DJI introduced another game-changer – the new DJI Ronin 4D. This is no longer just a stabilization device, rather it is a complete system, including the camera. Surely many film-makers will not readily abandon their trusted cameras and lenses, but at first glance, Ronin 4D does seem to be a game-changer.

Cost: The complete system is less than $10K. Compare this to assembling a comparable system from separate components. Either a RED Komodo or Canon C300 Mark III will set you back more than $8K and that does not even include any lens.
The built-in ND filters is a pretty big deal; can potentially eliminate need for a bulky matte box.
The LIDAR system looks truly amazing.

The Ronin 4D Cinematic Imaging System includes:

  • Cinema camera: 6K @ 120 FPS, or 8K @ 75 fps, or
  • 10-bit Pro-Res
  • Six built-in ND filters
  • Computerized 6-Axis stabilization gimbal
  • 7″ touchscreen video monitor, detachable and wireless
  • LIDAR focusing system
  • long-range wireless 1080 video transmit (with encryption and frequency hopping)
  • 2.5-hour battery

Schooner at Gloucester Harbor

In addition to visiting Gloucester this weekend, I also ported all my photography and tools to a new computer. As I imported new images from a camera drone, I took the new computer on a test drive to verify that my tools were all in good order.

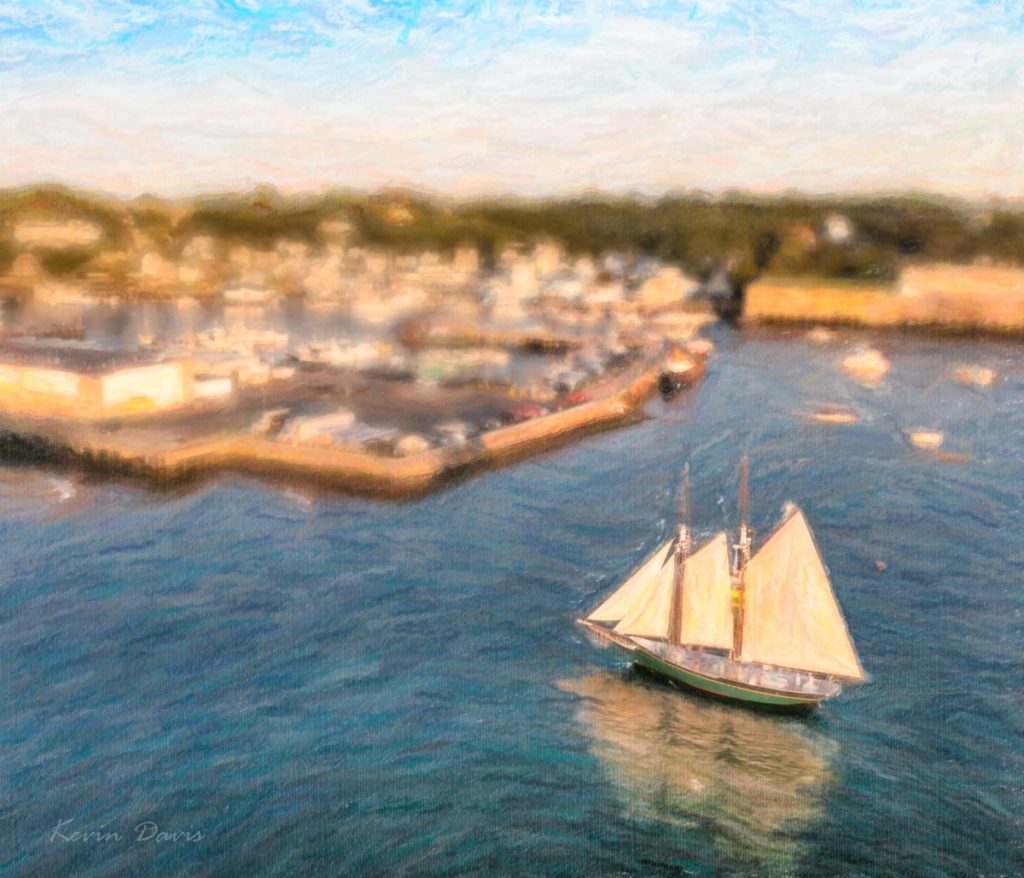
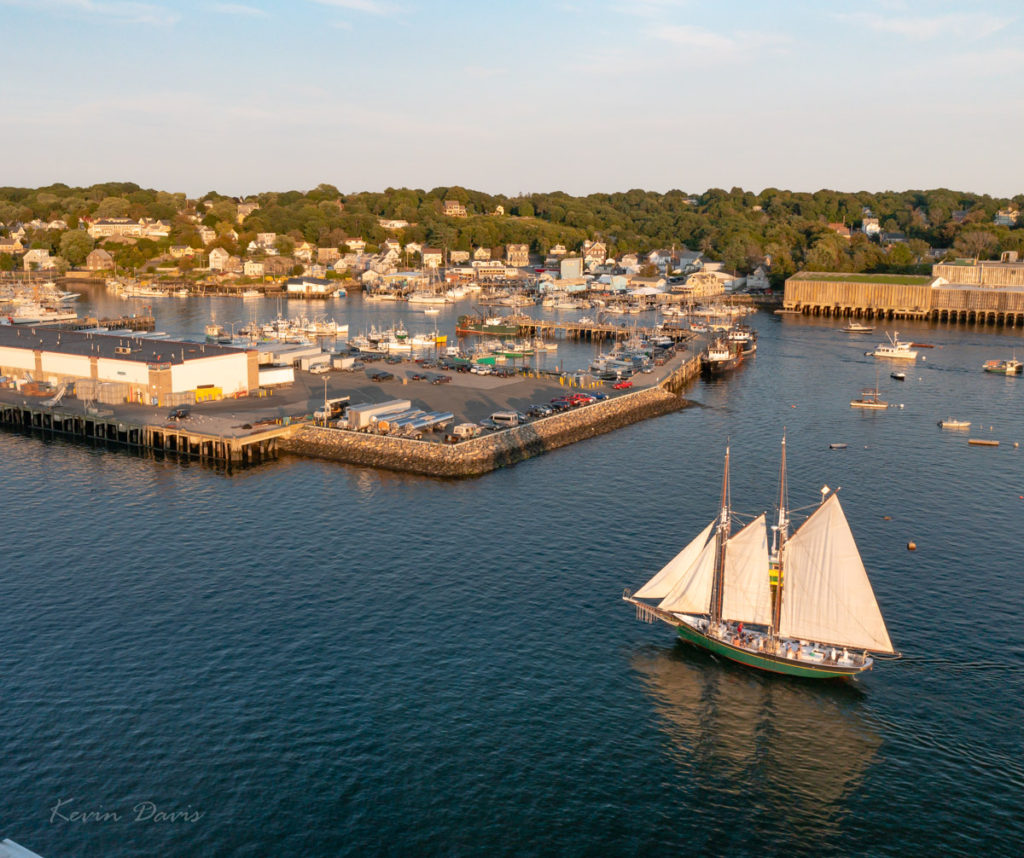
This scene had both very bright highlights and very dark shadows; I doubted that a single exposure could contain both the highlights and shadows. As you likely know, such situations are known as high dynamic range (HDR). I captured a bracket of three exposures. In retrospect, it was a wise choice. The middle exposure was spot on, however the foreground was nearly black and some background highlights were blown out – white boats and white buildings. The darker exposure provided correction for the blown-out highlights. The lightest exposure was used to replace the black foreground water with dark-blue water.

Initially, I processed each of the three in Lightroom and then combined them together using Photoshop. From Lightroom, open the three images using “Edit In” -> “Open As Layers In Photoshop”. Once opened in Photoshop, select all three layers and choose “Edit” -> “Auto-Align layers”. Here, there are six Projection options; I chose “Reposition” because the three images were identical composition that varied only by exposure.

A selection of the highlights was applied as a layer mask on the darkest layer, such that only the highlights are used from that layer. A selection of the foreground dark water was applied as a layer mask to the brightest layer such that the foreground is lightened. The resulting image is shown here on the right.

From there, I applied three image filters by Alien Skin. First was Bokeh, to blur the image – except for the schooner. Then I used two different variations of Snap-Art. All this was done through Photoshop. Upon saving all of this (TIFF file), I was back in Lightroom. Judicious use of brightness, clarity, and color saturation enhanced the simulated brush strokes. The end result is shown here on the left.

Update for Aerial Drone Pilots & Photographers

If you’re using an aerial drone for photo or video (or anything else), the FAA has released new rules for drone pilots. These changes do not take effect immediately but are very significant.

Flying over people

FAA part 107.39 has prohibited flying a drone over people (beyond flight operations staff participating with the pilot in charge) unless the pilot obtains a formal waiver from the FAA.  As a pre-requisite, the applicant must be a certified remote drone pilot in accord with FAA part 107. 

Beginning in 2023, certified Part-107 pilots will be allowed to fly a drone over people and a waiver will not be required.  However, there is no change for recreational pilots (not certified); recreational pilots are not allowed to fly over people and no waiver can be obtained.

This also applies to flying over moving motor-vehicle traffic.   

Specific restrictions require some form of protective guard around spinning propeller blades that might lacerate or otherwise injure a person on contact.

FAA Executive Summary, Dec.28, 2020: https://www.faa.gov/news/media/attachments/OOP_Executive_Summary.pdf

Flying at night

Currently, FAA part 107.26 prohibits flying a drone at night unless the pilot in charge obtains a formal waiver. As a pre-requisite, the applicant must be a certified remote drone pilot in accord with FAA part 107 and the drone must be equipped with particular lighting.

Beginning April 21st, 2021, certified pilots will no longer be required to obtain a waiver … if knowledge of night operations has been demonstrated via FAA drone pilot exam.  The certification exam (to become a Part 107 Certified drone pilot) will be modified to include questions about night operations.

Remote ID

“Remote ID” is sometimes referred to as digital license plates for drones. Beginning April 2022, all new drones will be required to include Remote ID.  And beginning in 2023, all drone flights (using any drone, old or new) must broadcast Remote ID.  Small drones that weigh less than 0.55 drones are exempt from these new requirements.

Remote ID is not entirely analogous to automobile license plates.  Remote ID broadcasts (via either Wi-Fi or Bluetooth) the drone’s unique ID, the current location of the drone, the location of the remote control (location of the pilot), and an emergency indicator (e.g. low battery).   Many people are concerned that broadcasting the location of the pilot could provide an open door to thieves (a drone may be considered an item of value) and to people who simply hate drones and wish to harass the pilot.

If you already own a drone – or you purchase a new drone in 2021 – and it does not include Remote ID, you will be able to purchase an add-on device that fulfills Remote ID requirements. This add-on device is sometimes referred to as a beacon. The cost should be $50 or less. There is a slight difference regarding the specific information that is broadcast. Because a beacon cannot track the location of the pilot, it will broadcast the location from which the drone was launched.  If the pilot then walks away from the launch point, the beacon does not have information about the pilot’s location.

If a drone has built-in Remote ID, possibly it may refuse to launch if Remote ID is not operational. I don’t think we know that yet. 

Remote ID for drones is similar to ADS-B for manned aircraft.  In general, drones will not be allowed to broadcast ADS-B nor ATC; this is apparently what airplane and helicopter pilots want.

Remote ID, FAA Executive Summary, Dec.28, 2020:  https://www.faa.gov/news/media/attachments/RemoteID_Executive_Summary.pdf

Recurring Pilot Test

To maintain certification, the FAA has required remote pilots to pass a recurrent exam every two years. That exam has been conducted in-person under watch of an authorized proctor. However, this is being replaced by an on-line recurrent exam and a fee will no longer be charged to take the recurrent exam.

The official timeline called for online testing to be available March 16, 2021 but that did not happen. The revised timeline says it should be available today, April 6, 2021.

The new online exam will include questions about Remote ID and night operations.  This presumably includes such topics as diminished depth perception, lighting requirements, etc.

See: https://www.faa.gov/news/updates/?newsId=97022

Gloves for Winter Photography

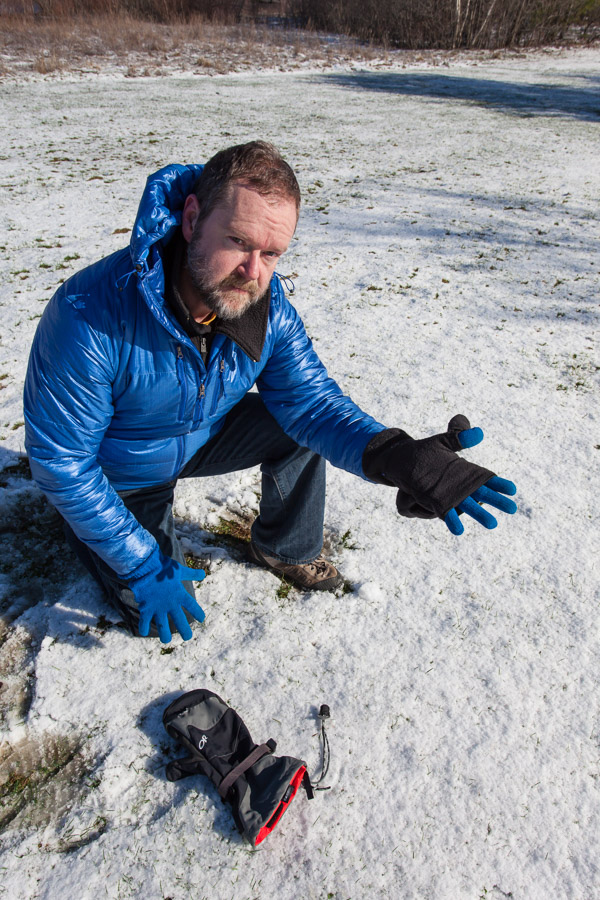
Author Kevin Davis with the Meteor Mitt by Outdoor Research

Operating a camera can be difficult (or impossible) while wearing gloves or mittens.  This problem is compounded if your fingers are very prone to becoming cold – perhaps your fingers get cold at a temperature that causes no trouble at all for some of your friends.  That’s the subject of my video: Gloves for Winter Photography.

Available products change every year; companies routinely invent new models and some older models may be discontinued. Of those that I have personally owned and used, here are my favorite lightweight gloves for mild temperatures (all are touch-screen compatible):

#3 REI: Grip Gloves
#2 Black Diamond: Powerweight Liner Series
#1 Burton: Screen Grab Liner

In the past ten days, I have twice used a glove seen in the video, a pop-finger fishing glove by Palmyth, which I paired with a touch-compatible glove liner. In advance of a snow forecast, I selected these gloves to wrap burlap around shrubs, a task that involves twine and tying knots. And for photography, I used these same gloves to pilot an aerial drone. With my fingertips covered merely by a glove liner, operating the touch-screen was beautifully easy. However, for a flight that lasted less than 15 minutes, my fingers soon became cold. As the air temperature was 33 degrees (f), this solution was barely adequate and would be a terrible choice for a shoot lasting an hour at that temperature.

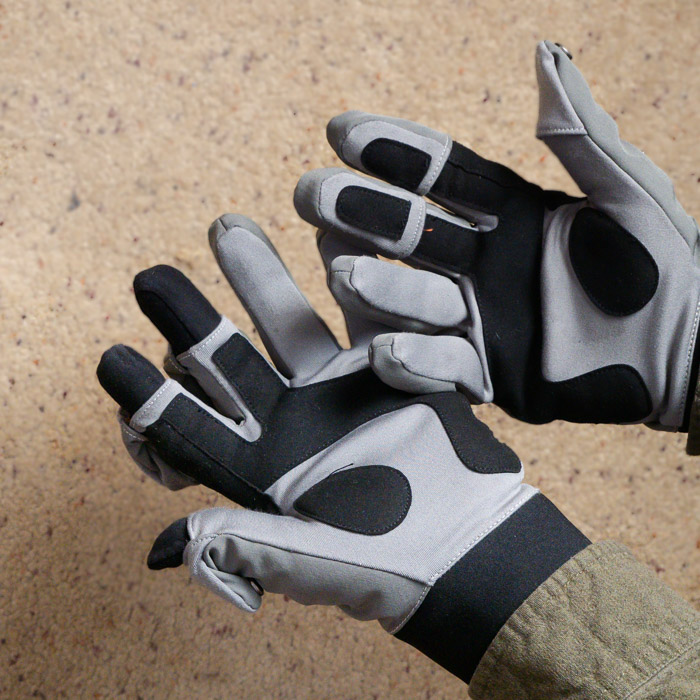
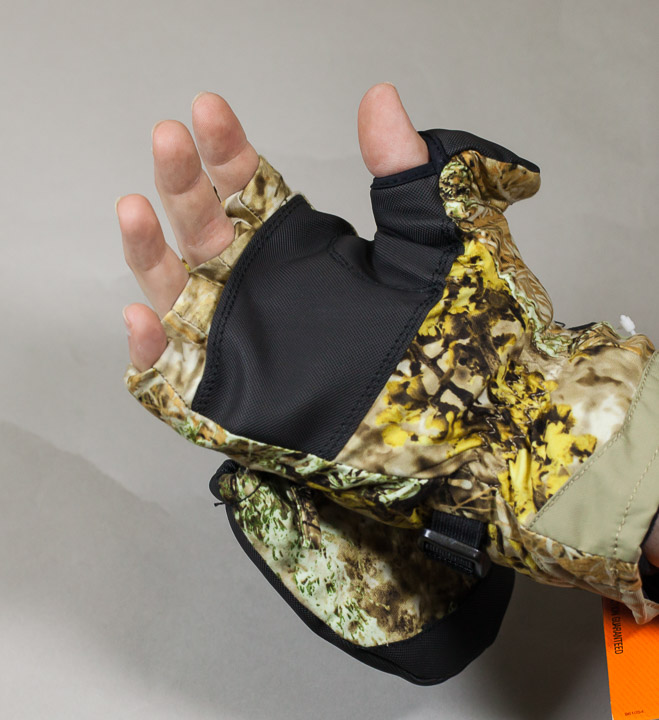
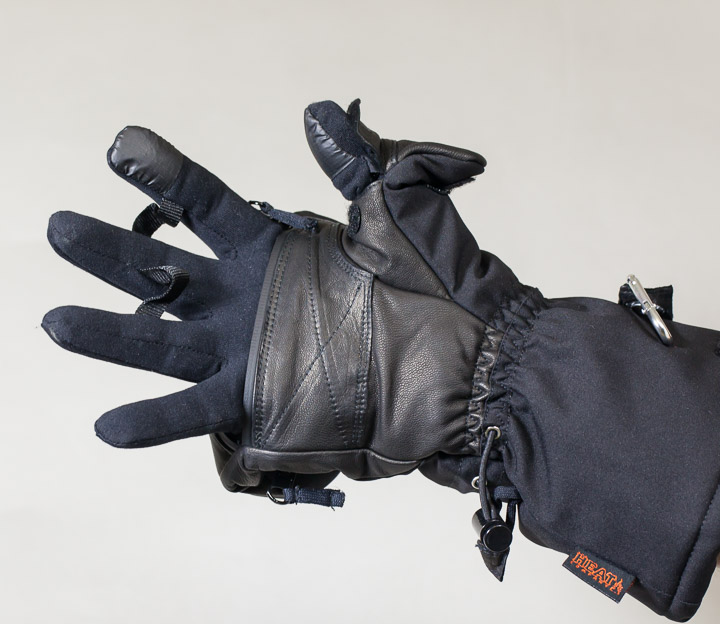
Shown here are a couple specific glove-mittens (a.k.a. glomitts) that I tried but personally decided that they didn’t measure up. Both include a pocket to hold a heat packet, which is a nice feature.

The first is an insulated glomitt from Cabellas. Unfortunately the finger openings were so snug that they could not accommodate a base-layer, a glove liner.  Since bare fingertips is not practical for my cold fingers, this product was unacceptable.

The second is an unusual full-finger glomitt, the Heat3 Smart glove. The interior glove and exterior mitten are fully integrated, the glove is not removable.  Having read very favorable reviews of this product, I tried it.  However, I was disappointed and promptly returned them. Considering the cost of these gloves is $150 (or more), I can get a battery-heated solution for about the same money.

Despite the exceptional construction, the shortcoming of this glove occurs when in half-mitten mode.  With the mitten folded back and fingers exposed, this product is no better than a lightweight glove. If I need an extended period of time making photographs (with the mitten folded back), it simply is not adequate.  A slightly better solution is a half-finger glove with a lightweight glove underneath; therein, the fingers below the knuckle have a double-layer while the fingertips have a single layer.

I must also note that the Heat3 Smart gloves include a magnet. That can be problematic; see tip #7 in my video about gloves.

Recovering Family Photos from Film

Recovering Family Photos from Film

Film Scanner

Recently, I borrowed some old photo albums from my mom. These photos were captured either on negative film or Polaroid instant film.  For posterity sake, I am converting these old photos to digital.

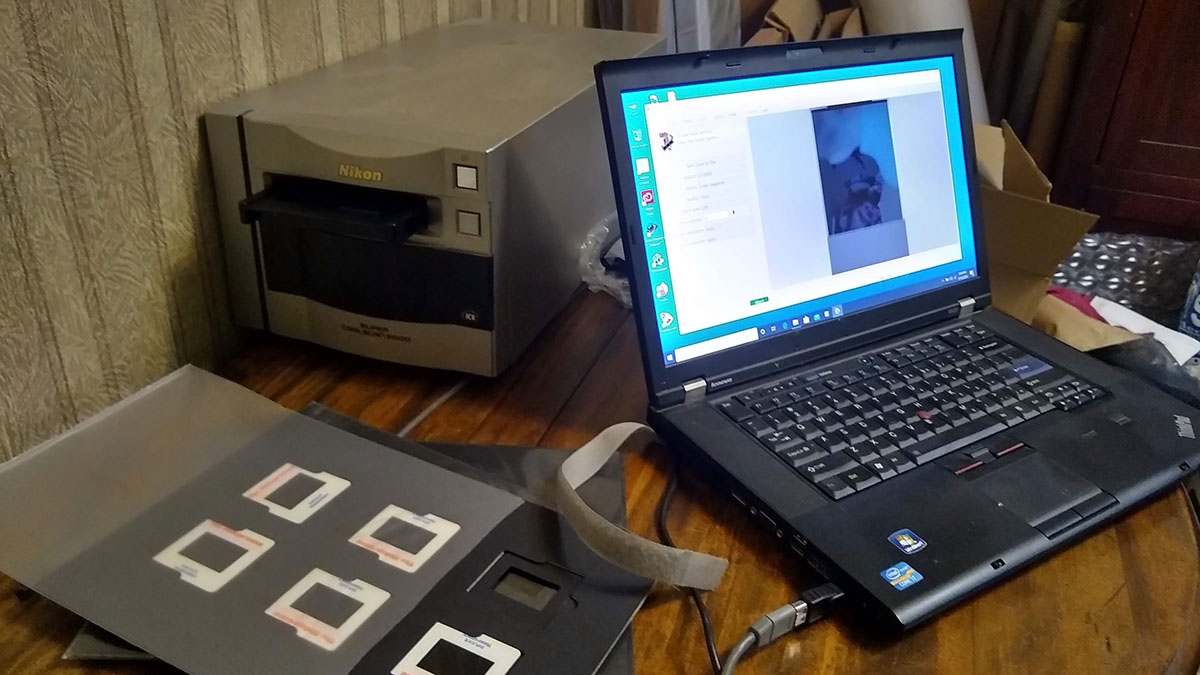
For either negative film or slide film, a computer accessory to scan film can still be purchased today, but I had an old Nikon scanner collecting dust. This scanner is more than a decade old and the interface to a computer is Firewire, not USB. As Firewire has fallen out of favor, most computers do not have a Firewire port. However, my aging laptop does have a Firewire port. Yet I had to overcome two problems. First, having upgraded the laptop to Windows 10 last year, Win10 does not include a driver for Firewire. Second, the port on the laptop is a different size than the cable from the scanner.

With some difficulty, I eventually did install a legacy Firewire driver. And a bit of research online told me that Firewire connectors can be 4-pin, 6-pin, or 8-pin.  Purchasing a 4-pin to -6pin adapter (which can be seen in the photo here) allowed connecting the scanner to the computer.

Nikon no longer supports this scanner and the last software release was intended for Windows Vista (a short-lived version of the OS in between Windows XP and Windows 7).  After considerable research and effort, I could not get this software to function on Windows 10. However, in the past, I had also used a third-party application called VueScan and I found that I still had that 10-yr-old software installer.  After installing that and configuring it to run in Windows-7 Compatibility Mode, I was able to successfully operate the scanner.

If you don’t have a film scanner, you can buy a new or used scanner … or send your film to a lab that provides scanning services.  While I was still struggling to get my old scanner operational, I looked online and saw a used Epson V600 for less than $100.  This was my backup plan, which I now do not need.  The important feature here is that the V600 can scan both 35mm and medium-format films, which is important to me but may not be important to you.

Many labs provide scanning services; just search online.  I have done this in the past with good results. The resulting digital photos may be provided to you via internet download or on a CD-ROM.  (Be aware that labs may charge you a fee for each physical disk, perhaps $5.)

Two services can convert still-photo film, motion-picture movie film, and VHS videotape:  LegacyBox and Kodak Digitizing Box (yes, Kodak, an old trusted name in photography). But I have not personally tried either of these services. If you only need to digitize 35mm negatives or 35mm color transparency film, other service providers may be less expensive.

Personally, I don’t want to digitize ALL the old film photos because most of them are discardable snapshots that do not show important memories. It makes sense to extract the few negatives or slides, scan them, and then return the original to where I found it. For this reason, I chose to do the scans myself rather than send it out to a scanning service.

A smaller number of photos were shot on Polaroid instant film. This is outside the capability of a film scanner.  However, these can be scanned using a flatbed scanner or an all-in-one computer printer (printer, fax machine, scanner all in one). It just so happens that I acquired a new all-in-one last year and I have found that this is adequate to scan the Polaroid photos.

Hypothetically, let’s say you’ve just scanned a photo of somebody’s 18th birthday. (My mom was very careful to annotate each photo with the date and subject, usually written on the backside of the photo.)  You’ll want to save that descriptive information with the photo.  The final step in scanning an image is to rescue the “metadata” – the descriptive information.  The digital photo will be either a JPEG or TIFF file. Both these formats include metadata and you will need some sort of software application that allows you to write that information, notably a particular item called “Description”.  I personally used Adobe Bridge but there are numerous other alternatives.

How to share your mobile device (smartphone, tablet) video/audio to a TV screen

How to share your mobile device (smartphone, tablet) video/audio to a TV screen

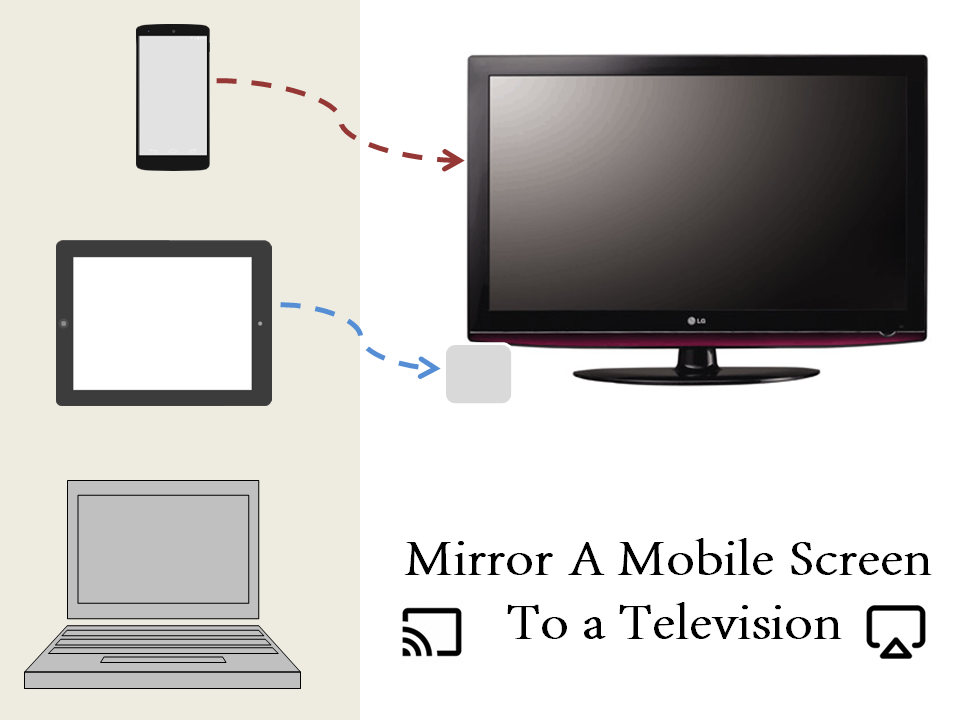
Many devices today support sharing video and audio to a separate device. Getting it to function can sometimes be simple and sometimes be difficult, depending upon the specific devices.  Sharing from an Apple iPhone (or iPad) to Apple TV should be easy to setup.  Sharing from a Samsung smartphone/tablet to a Samsung smart TV should also be easy to setup.  But the word “should” doesn’t always mean much.

Wired connection using an HDMI cable

Regardless of whether the TV is a “smart TV” or not, you may be able to connect the mobile device to the TV via an HDMI cable, set your TV to use the HDMI input rather than television. However not every smartphone or tablet supports this. For example, Motorola smartphones apparently do not support it.

Current iPhone models have a Lightning port and you will need a Lightning-to-Digital-AV-Adapter.  (Rumor suggests that upcoming new iPhone models will instead have a USB-C port.)

An Android phone probably has a USB port. (Specifically, newer models within the past 18 months will have USB-C.) You will need a USB-to-HDMI adapter … or possibly an MHL cable, but most devices do not support MHL.

Wirelessly connect a smartphone/tablet/computer to a television

If a TV is not a smart TV but does have HDMI input ports, you can attach an external device to the TV which effectively adds “smart” to your dumb TV. Common external devices that support wireless sharing include:
Google Chromecast, EZCast, Apple TV, Samsung AllShare, Amazon Firestick, and Roku.

Using your smartphone/tablet/computer as the sending device and your smart TV as the receiving device, there are two basic requirements:

  • The two devices must be on the same local network (e.g. your home wi-fi).
  • The two must utilize the same stream-casting protocol.

The three dominant protocols today are:  Miracast, Airplay 2, and Google Cast (a.k.a. Chromecast built-in) .  Samsung’s Smart View is based upon Miracast.
Chromecast will not function without an internet connection; this is not true for Miracast and Airplay 2. Miracast is built upon a standard called “Wi-Fi Direct”, allowing two devices to communicate directly rather than over a network. (AirPlay is proprietary, specific to Apple.)

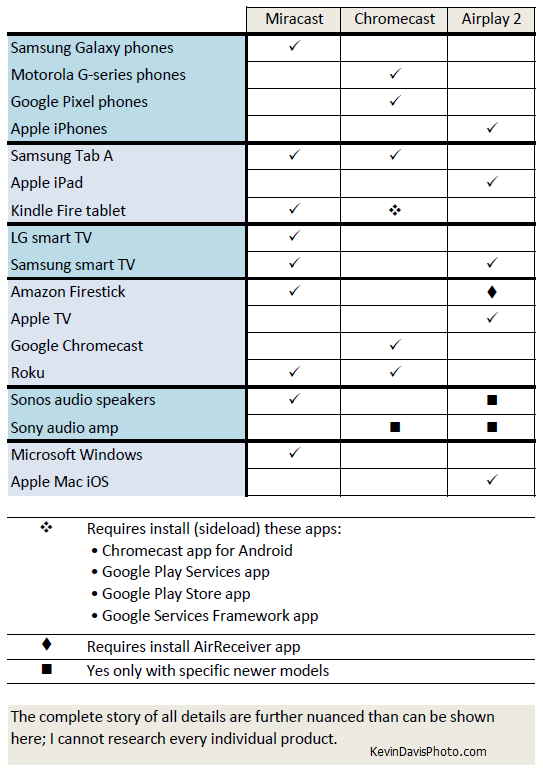
I have an Android tablet that has successfully connected with two different smart TVs, Amazon Firestick, and an audio amplifier; but my smartphone can only connect to one of those four.  The phone supports only Chromecast while three of the other devices support only Miracast. The following table attempts to show such compatibilities and incompatibilities.
Casting

Stream “casting” and “screen mirroring” are two forms of wirelessly sending media (video and/or audio) from one device to another. Although they are different, the term casting may sometimes be loosely misused.

Technically, casting (a.k.a. stream casting) is a feature of a specific application, with support from the mobile device. YouTube, Netflix, Hulu, and iHeartRadio are a few of the apps that support casting.  [Note to some friends using the Zoom videoconferencing app: this does Not support casting but you can certainly use screen mirroring; keep reading.]

Example: On an Android device supporting Chromecast, go to the settings (swipe down from the top of the screen).  Enable: Cast.  That should present a list of available destinations (e.g. a TV). The mobile device will send an invitation to the destination and may display the animated icon (illustrated above).  Then launching the mobile YouTube app, it shows the connected icon (illustrated above) in the title bar at the top of the app.  Upon launching any video within the app, the video and audio are wirelessly cast to the TV.

In the case of a video&audio app such as YouTube, casting to an audio-only device, the video plays on the mobile device as normal while the audio plays from the audio device. I don’t recommend this, as the audio is delayed and no longer synchronized with the video.

Display Mirroring

Display mirroring (a.k.a. screen mirroring) is a feature of your mobile device that wirelessly replicates your local device display on a remote screen (e.g. television).  As this mirrors your entire screen, you can use ANY applications and those apps need not include any special features. (Possibly, you may also be able to use your TV as the source and mirror that to another device, but I cannot think of a scenario where that would be useful.)

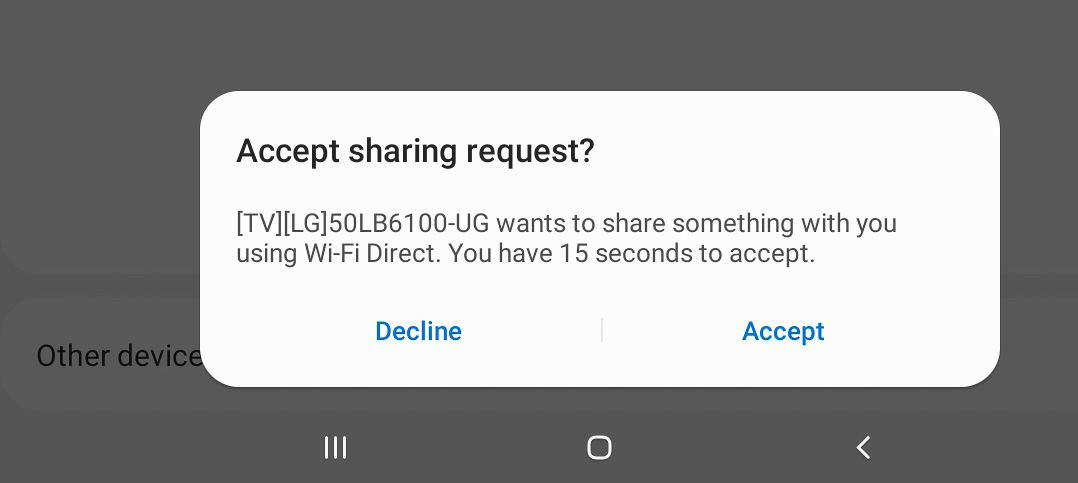
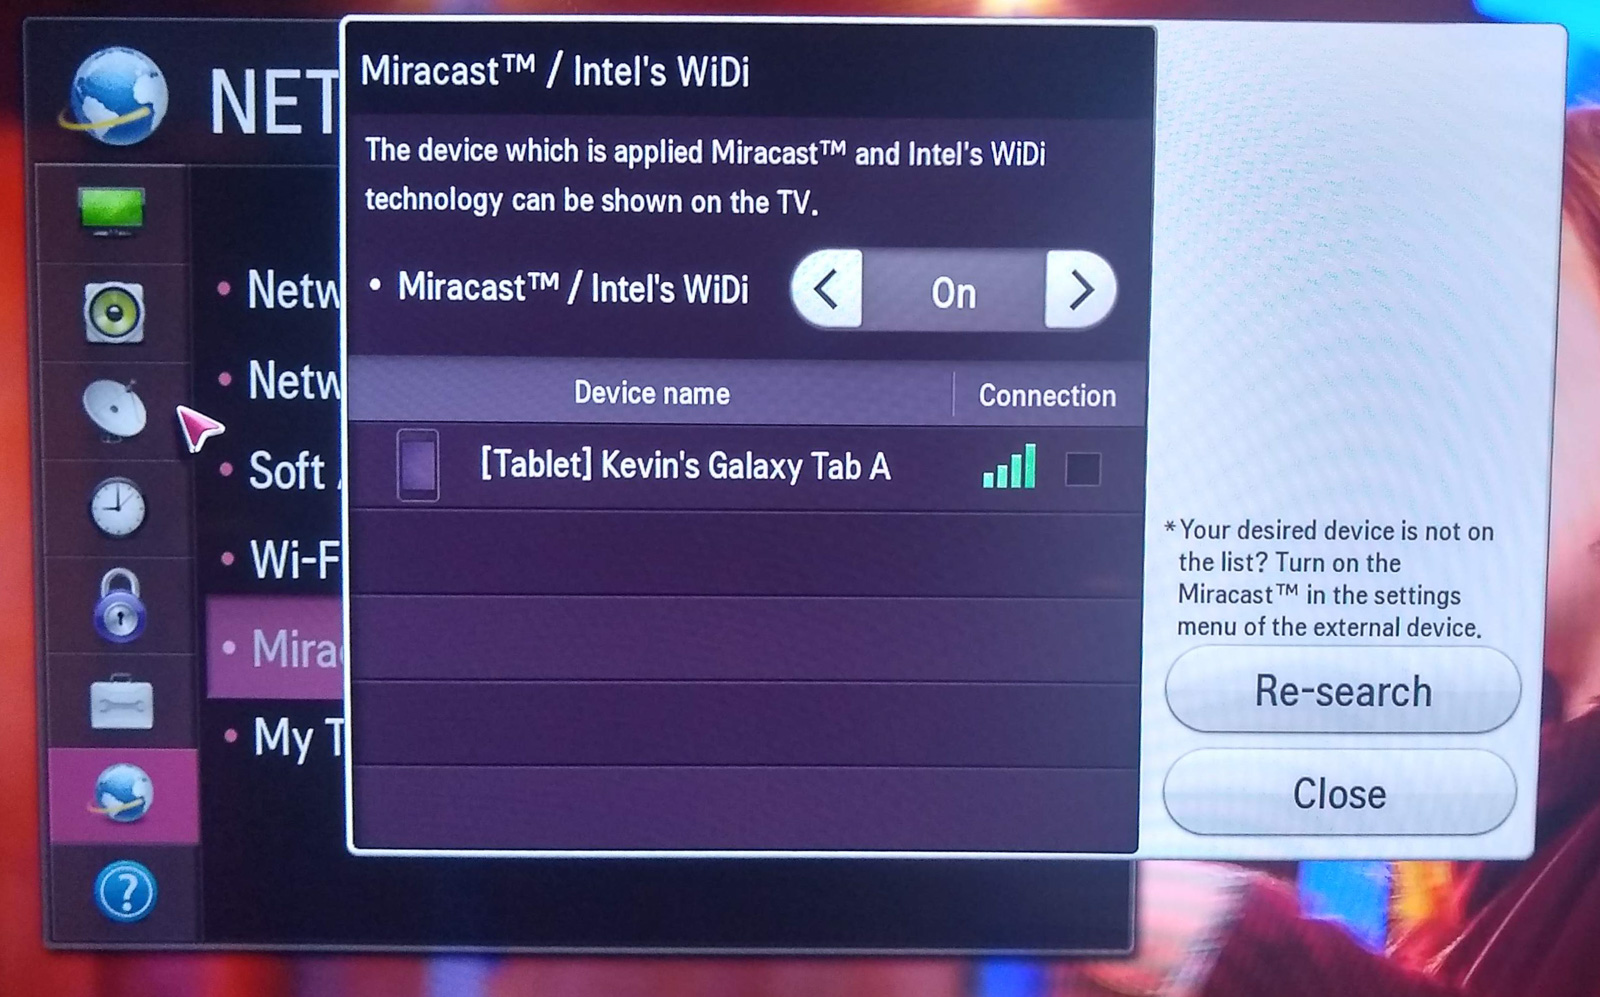
The following photo shows the activation of mirroring on a particular model of LG smart TV.  As you can see, the TV has identified that a Galaxy Tablet is nearby and enabled for casting/mirroring.  The tablet may then prompt to authorize the connection, shown in the next photo.
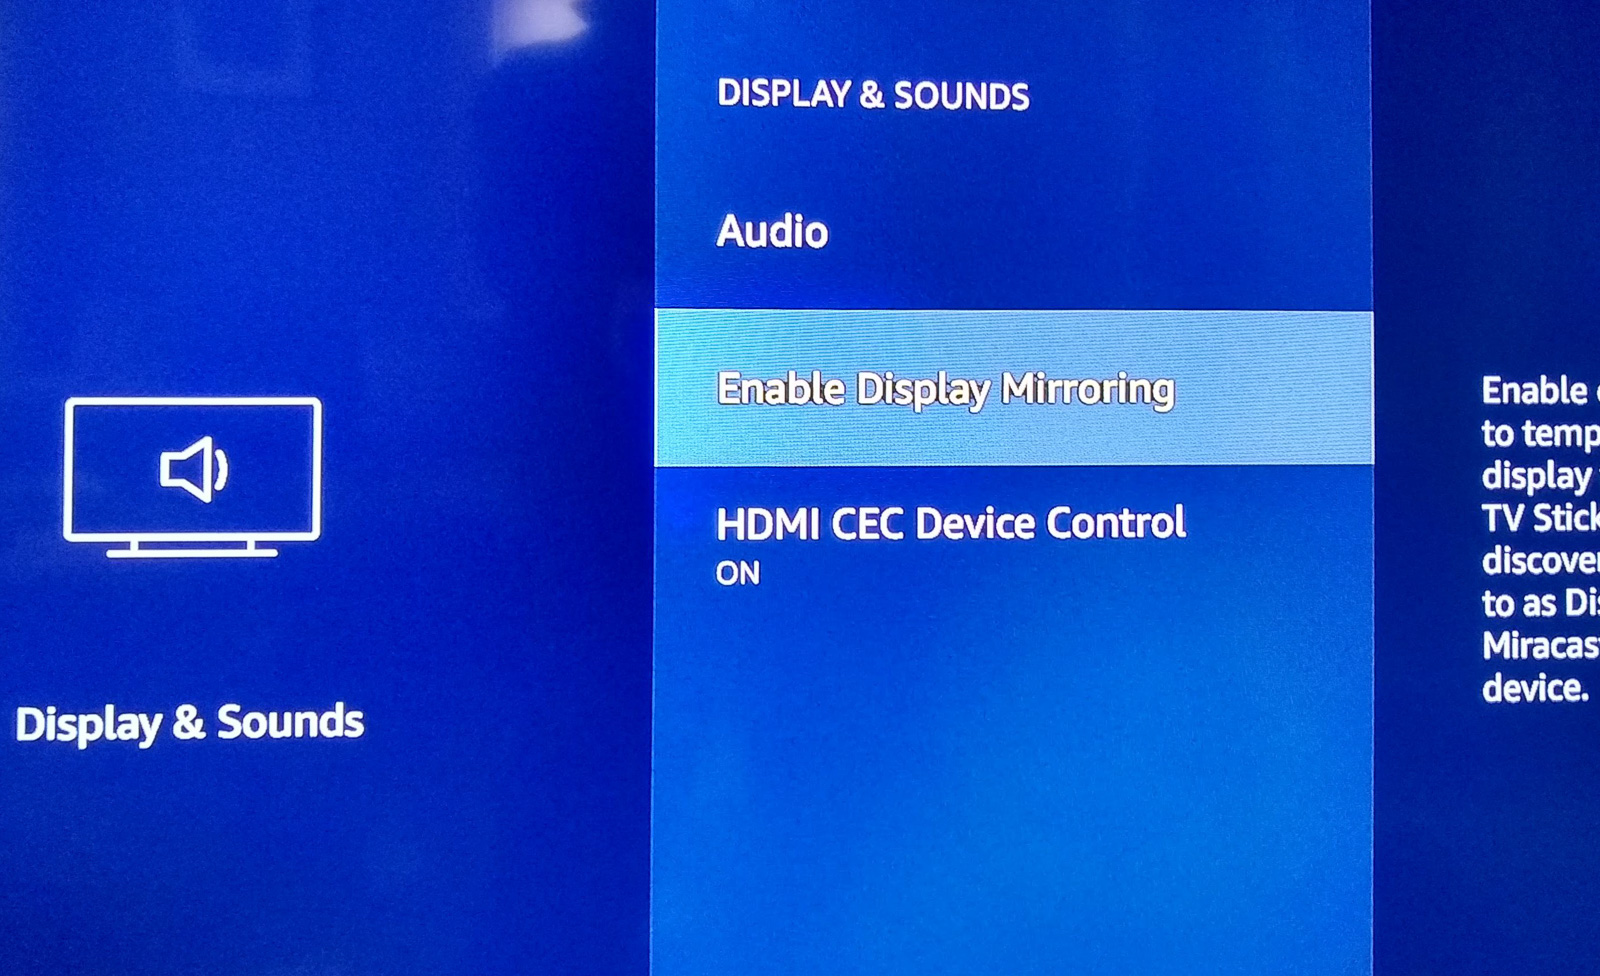
The next photo shows the activation of Screen Mirroring on Amazon Firestick.
Samsung

Smart View is Samsung’s brand of Miracast.  Smart Things is Samsung’s home automation, with the ability to control many smart home devices, including smart TVs.

In the TV on-screen menu, go to Connection Guide and enable screen sharing (screen mirroring).
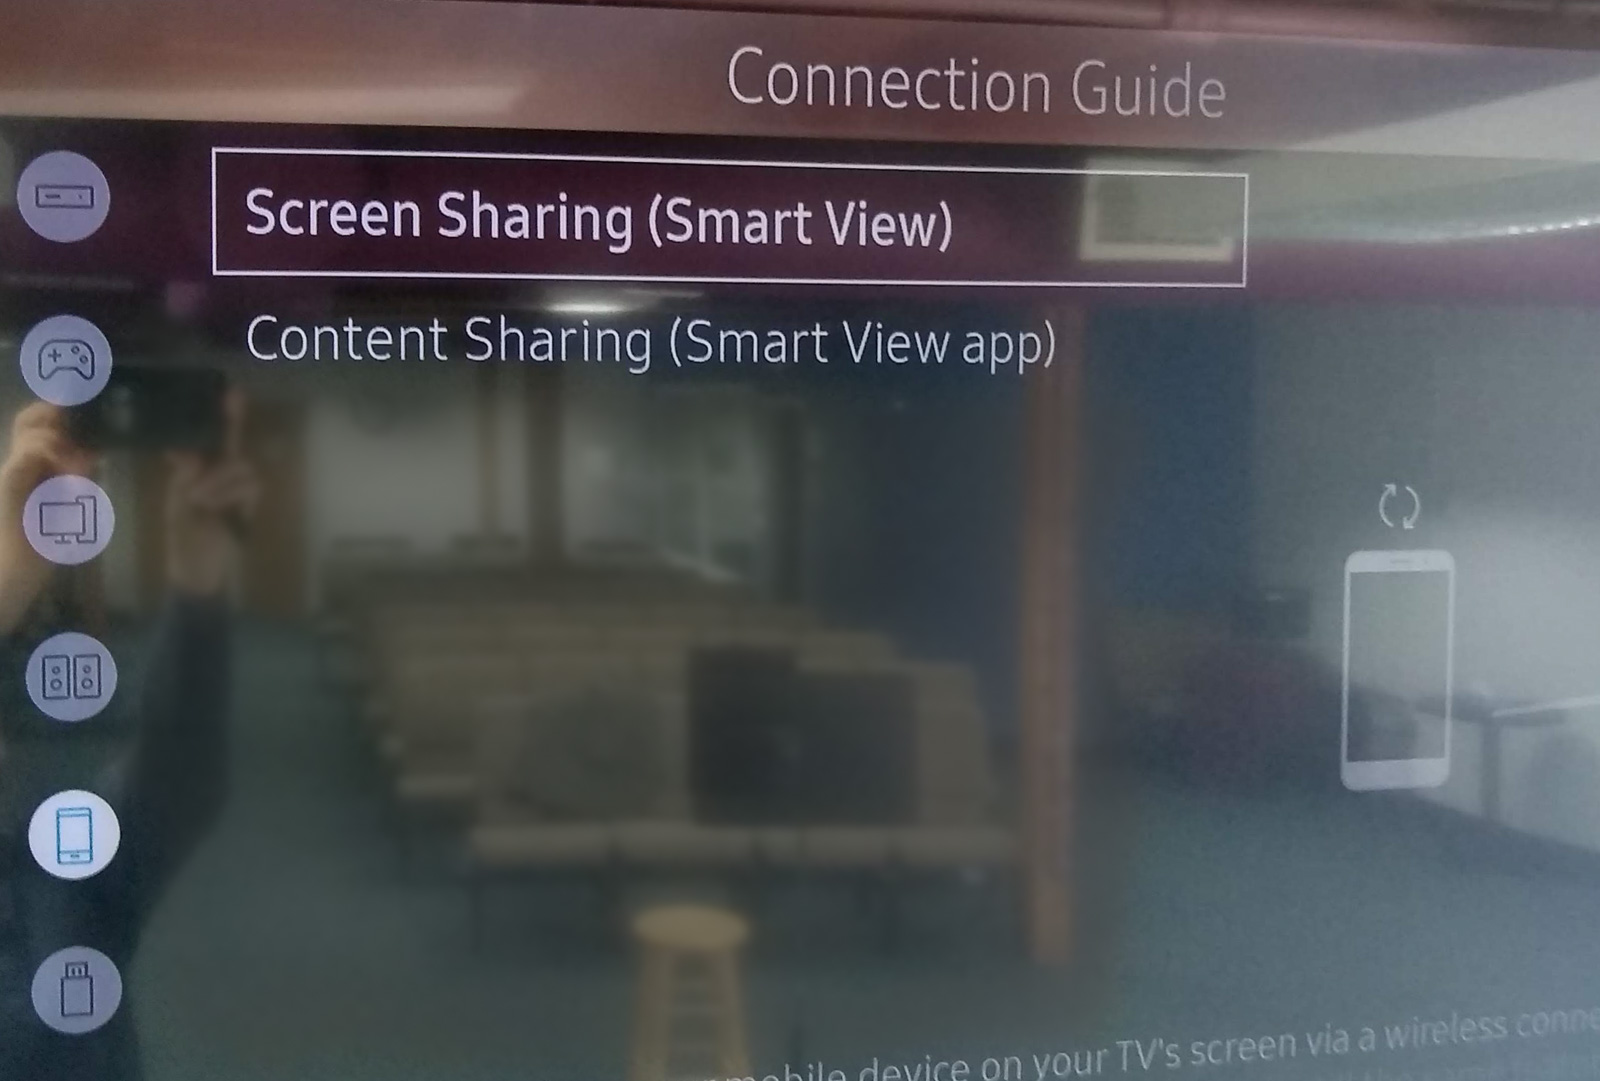
In the tablet settings, enable SmartView, which should then present a list of available destinations, including the nearby smart TV.  Easy peasy.
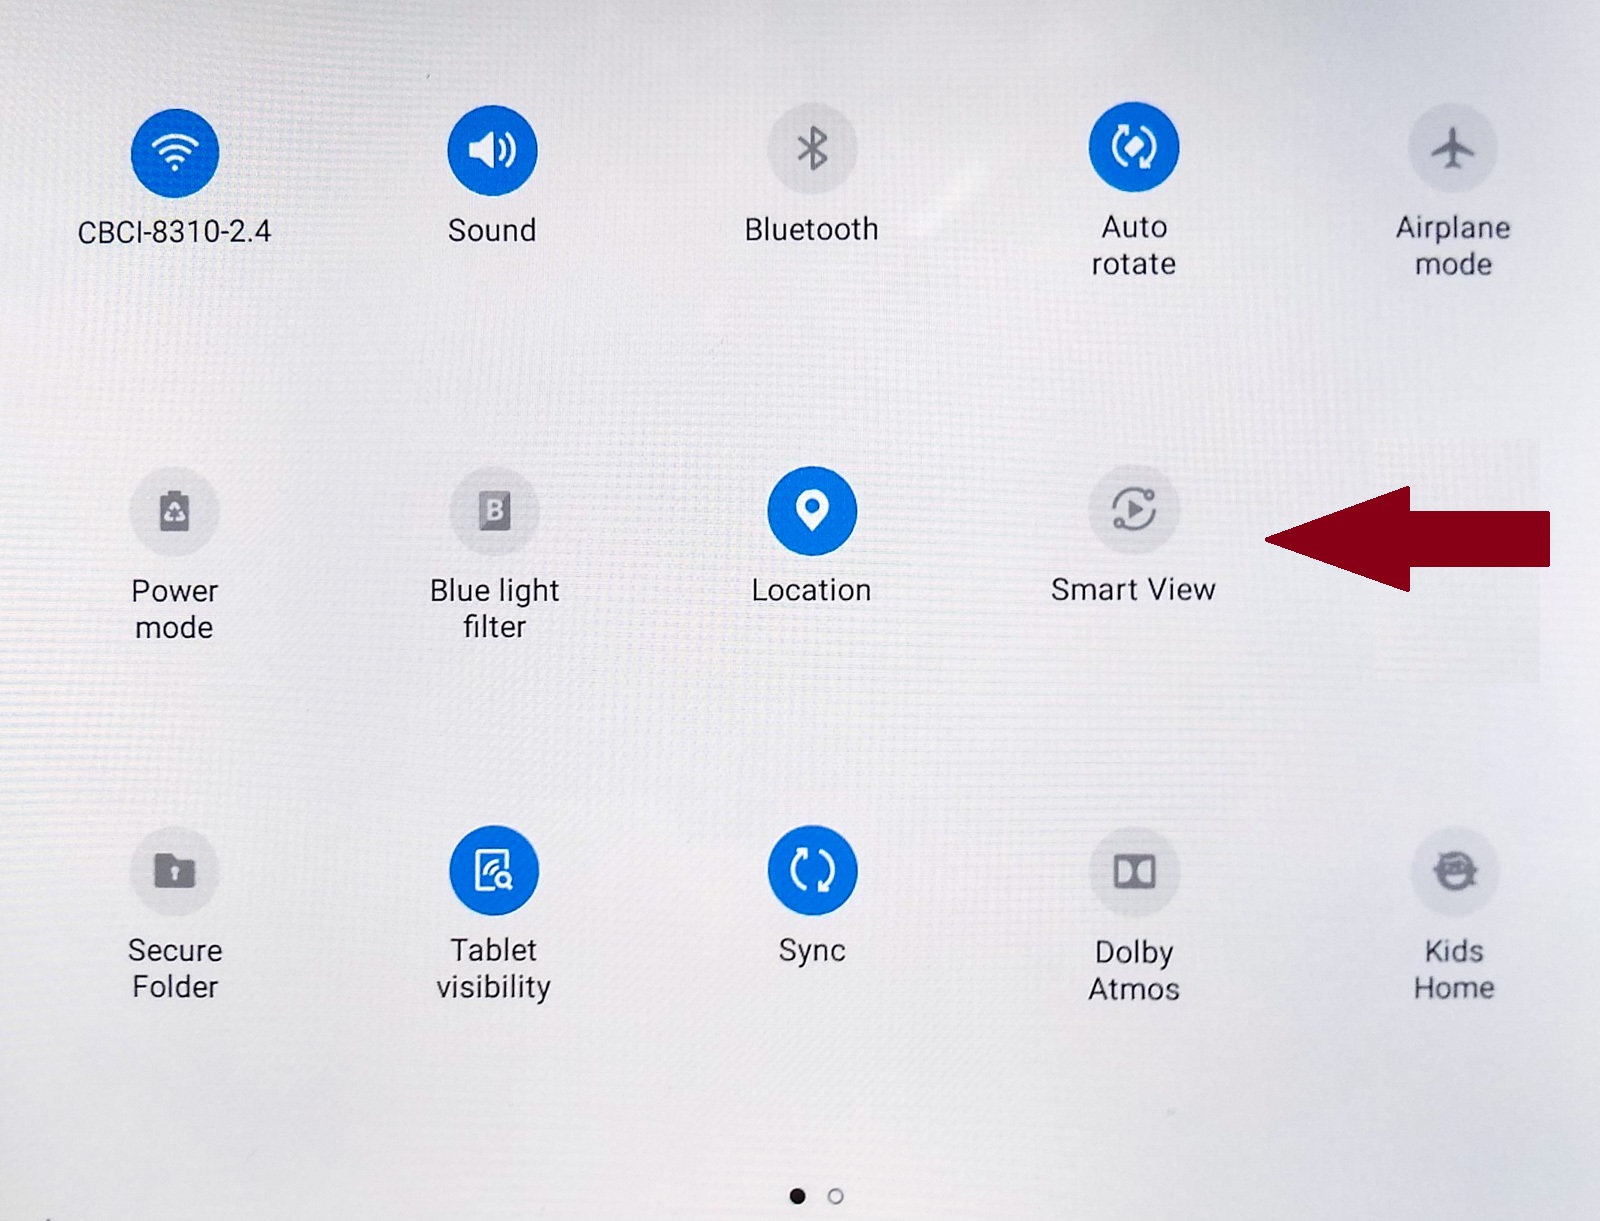
In one particular instance, I easily established mirroring from a Samsung tablet to a Samsung smart TV … but it eventually ceased for an entirely unknown reason and would not reactivate. I rebooted the tablet but that did not resolve the problem.  Restarting the TV also did not resolve the problem.  Seeing no resolution, I searched online to see if anyone else had encountered this problem and perhaps offered a solution.

In online discussion forums, a couple of separate people reported difficulty with S6 or S8 smartphones wherein the problem was solved by using the Samsung Smart View app instead of the phone’s built-in settings. However, the Android app store included a note suggesting a different app for connecting with newer model TVs – Samsung  Smart  Things. I installed that and tried it. Although this was also unsuccessful, it did report a useful help message: try unplugging the TV power (and then plug in again). To my surprise, that did resolve the problem.


Other protocols

  • Amazon Fling is very similar to Google Cast but never achieved wide acceptance
  • DLNA may be available in older products but not used in newer products
  • Intel WiDi (Wireless Display) was officially discontinued in 2016
  • DIAL (DIscovery And Launch)
How Many Megapixels Do I Need?

How Many Megapixels Do I Need?

Problem #1

A friend had trouble emailing photos from his smartphone. His photos were more than eight megapixels and he was trying to email two dozen of them in a single email. His email did not want to send an email totaling 400 megabytes. The resolution of his smartphone camera captured far more pixels than he needed and the files were … not small.

Problem #2

If you upload a small photo to an online service, particularly social media, that service will likely attempt to enlarge the photo … and you may not like the quality of the result.  While shrinking a photo typically does not have a negative impact on photo quality, enlarging can possibly have undesirable results because the enlarging process is attempting to invent pixels that did not originally exist.

Display on a smartphone

If you primarily look at photos on your phone, then 5 megapixels is more than you need.

Consider the display resolution of some popular smartphones:

  • Google Pixel 3 is 1080 x 2160 … 2.3 MP
  • iPhone X is 1125 x 2436 … 2.7 MP
  • Razor Phone 2 is 1440 x 2560 … 3.6 MP
  • Samsung Galaxy S9 is 1440 x 2960 … 4.2 MP

Print

Printing a photo onto paper is the most demanding application. As a general rule of thumb, high-quality printing requires between 240 to 300 pixels per printed inch. The bigger your print, the more pixels you need.

Example:  A 5-megapixel photo should print well up to 8×10 inches
(8×240) x (10×240) = 4.6 megapixels

Facebook

The recommended upload size is 1,200 × 630 pixels. You can certainly upload a larger photo, but Facebook will automatically shrink it.

Instagram

By design, Instagram favors square photos. You can post a rectangular photo, the Instagram default is a square crop. Upon first uploading your photo, you have an opportunity to undo that crop, but you cannot subsequently edit the photo to change it after your posting is complete.

The recommended size ix 1080 × 1080 pixels. You can certainly upload a larger photo, but Instagram will automatically shrink it.  If you upload a rectangular photo, it will be cropped to width 1080 pixels.

Twitter

Recommended upload size is 1200 × 675 (aspect ratio: 16:9): You can certainly upload a larger photo, but Twitter will automatically shrink it.

Display on a tablet

Consider three tablets.

  • Amazon Kindle Fire HDX 8.9” : 2560 × 1600 pixels, 8:5 aspect ratio
  • Apple iPad 10.2” (2019) : 2160 × 1620 pixels, 4:3 aspect ratio
  • Samsung Galaxy Tab A 10.1” (2019) : 1920 × 1200 pixels, 16:10 aspect ratio

If you size an image 2560×1600, it will display full-screen on the Kindle HDX 8.9” but may seem too large for both the iPad 10.2” and the Galaxy Tab A 10.1”.  Not to worry, the tablet includes the necessary smarts to dynamically make your photo fit the device screen without modifying your stored photo.

You can certainly store photos with higher resolution than the device display; the only consequence is that the photos consume more storage space than is necessary.

eBook, part 1 –  cover photo displayed in the ebook store

For the Kindle store, Amazon recommends 2500 x 1563 pixels.

eBook, part 2 –  photos inside the book

In large part, this comes back tablet display screens. As the Kindle and iPad (described previously) are similar regarding 1600 pixels in the smaller dimension, you might size your photos to 1600 pixels. Amazon recommends twice this, 3200 pixels, but I don’t know why.

Upon uploading your eBook to the Kindle store, your photos will be automatically compressed.  My latest ebook manuscript (with photos) was more than 12 megabytes before submitting, but Kindle compression reduced it to 4 megabytes.

The amount of royalty you earn from each book sale may be reduced because total eBook file size may incur a larger “delivery fee” per individual sale, perhaps fifteen cents per megabyte. An e-book with many high-resolution photos may incur a higher delivery charge and therefore reduce the royalties paid to the author.


One Year After The Fire

One Year After The Fire

October 23, 2018; 10:20 A.M.

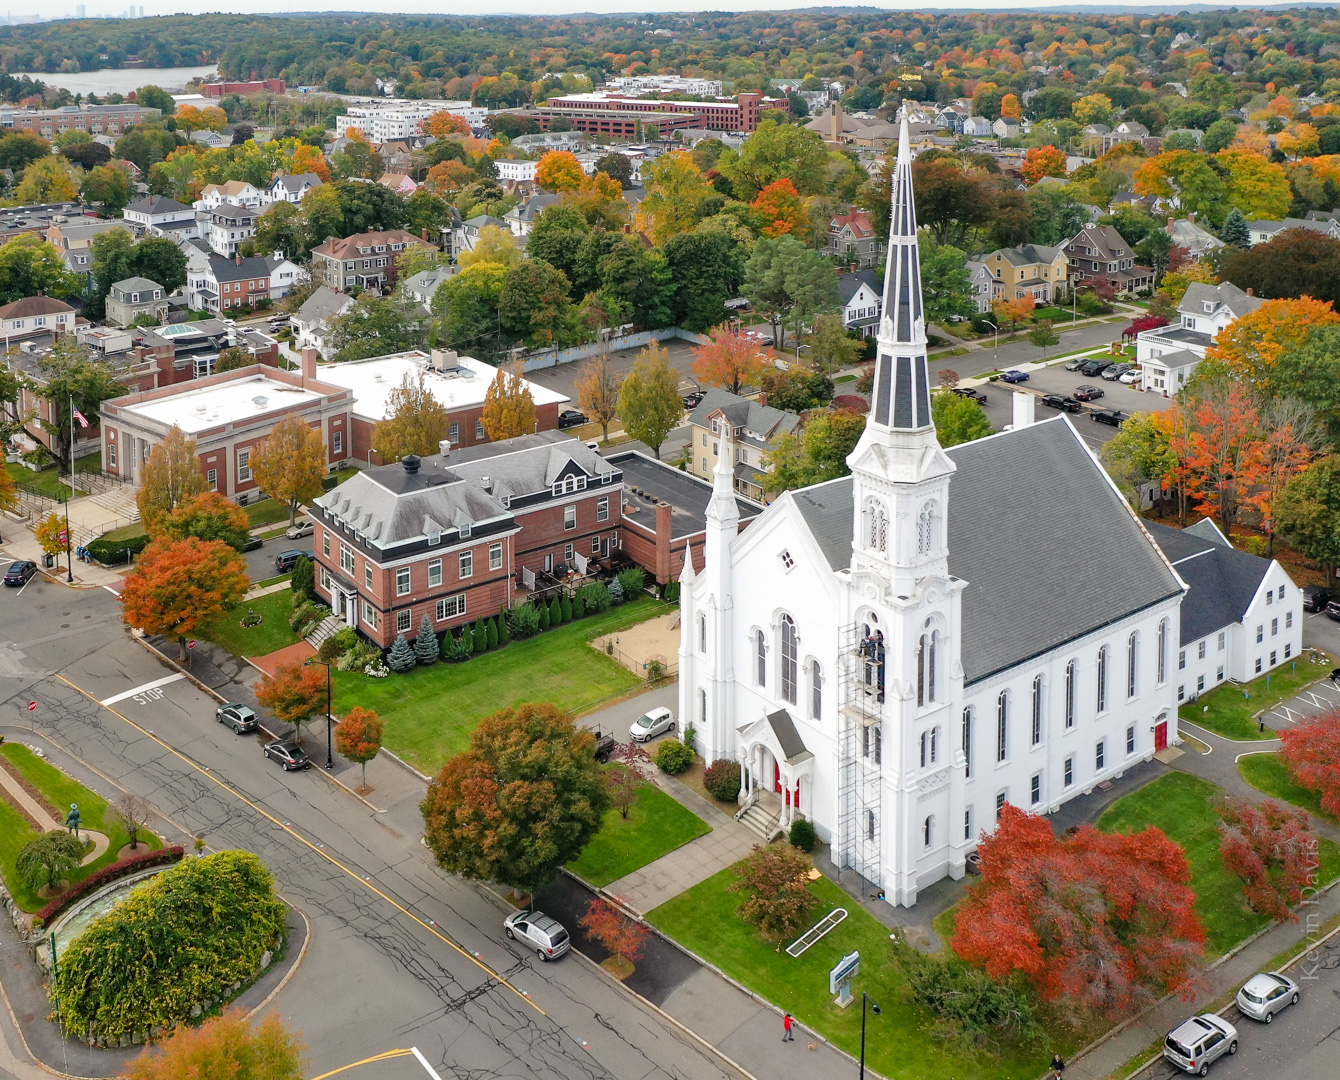
Mid-October 2018, I photographed Wakefield Massachusetts using an aerial drone.  As the autumn colors were not well developed yet, I returned a week later to make the same photo again.  That’s the first photo here, October 23, 2018.

Some renovation work was in progress that day. You can see scaffolding against the steeple and one of the tall windows is laying on the grass.

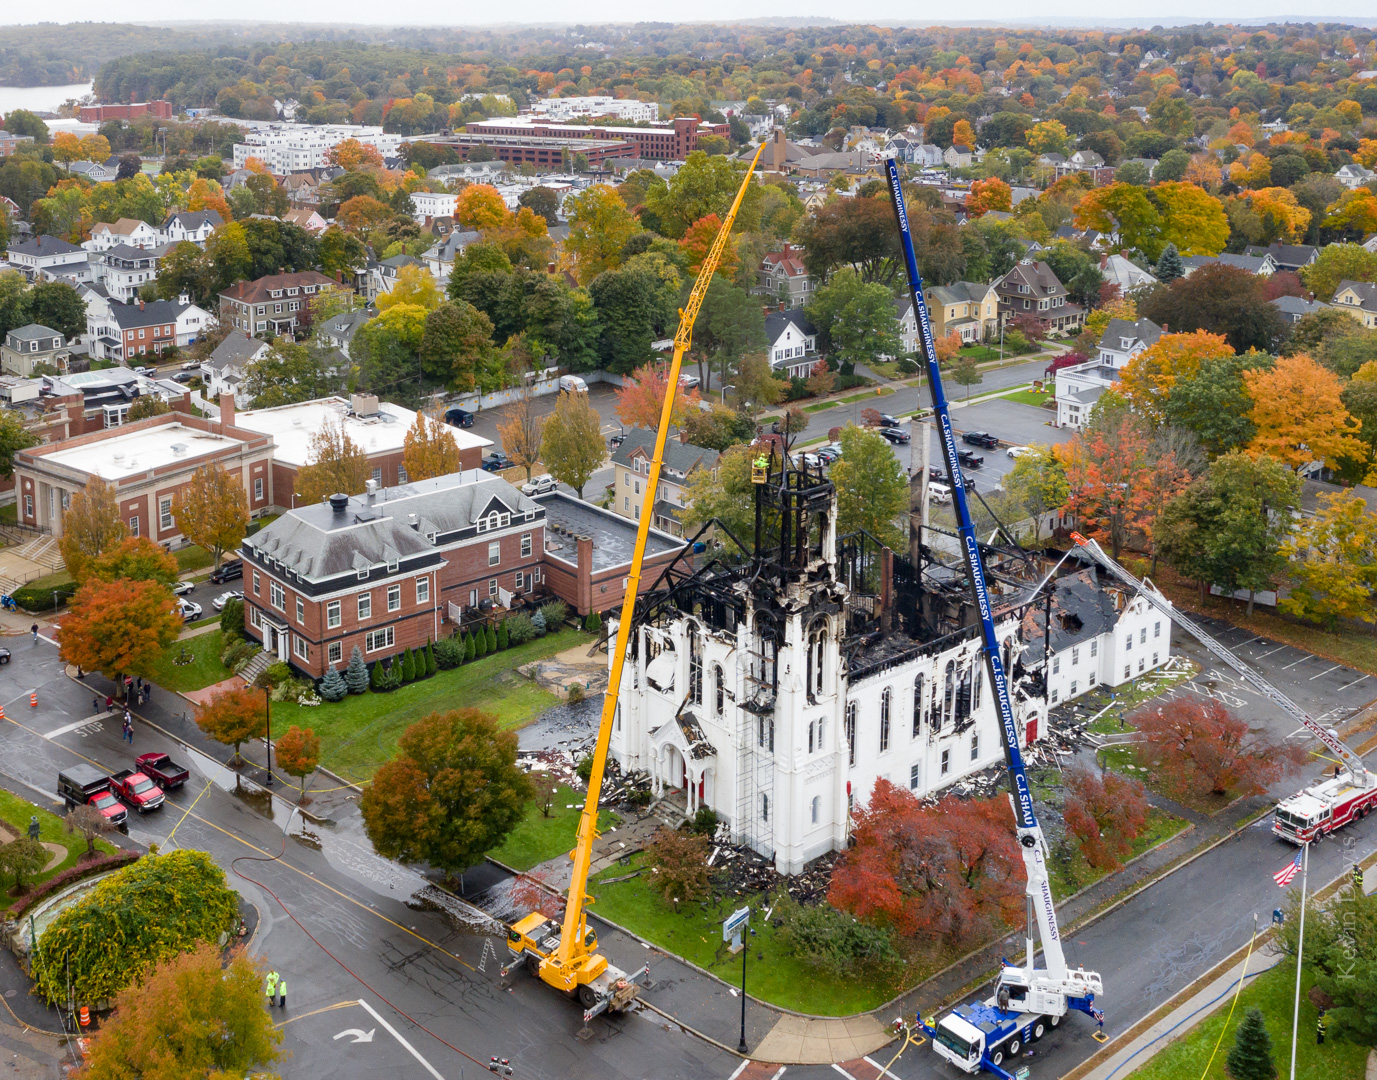
In the evening later that day, a lightning storm passed through the area and this presumably sparked the fire that destroyed the First Baptist Church. The next day, I again put the drone in the air to photograph the aftermath of the fire.

Today is the one-year anniversary of that fire, so I returned to again make the same photograph, but without the church.

October 23, 2019; 10:30 A.M.

Outdoor Photography – chasing mother nature

Outdoor Photography – chasing mother nature

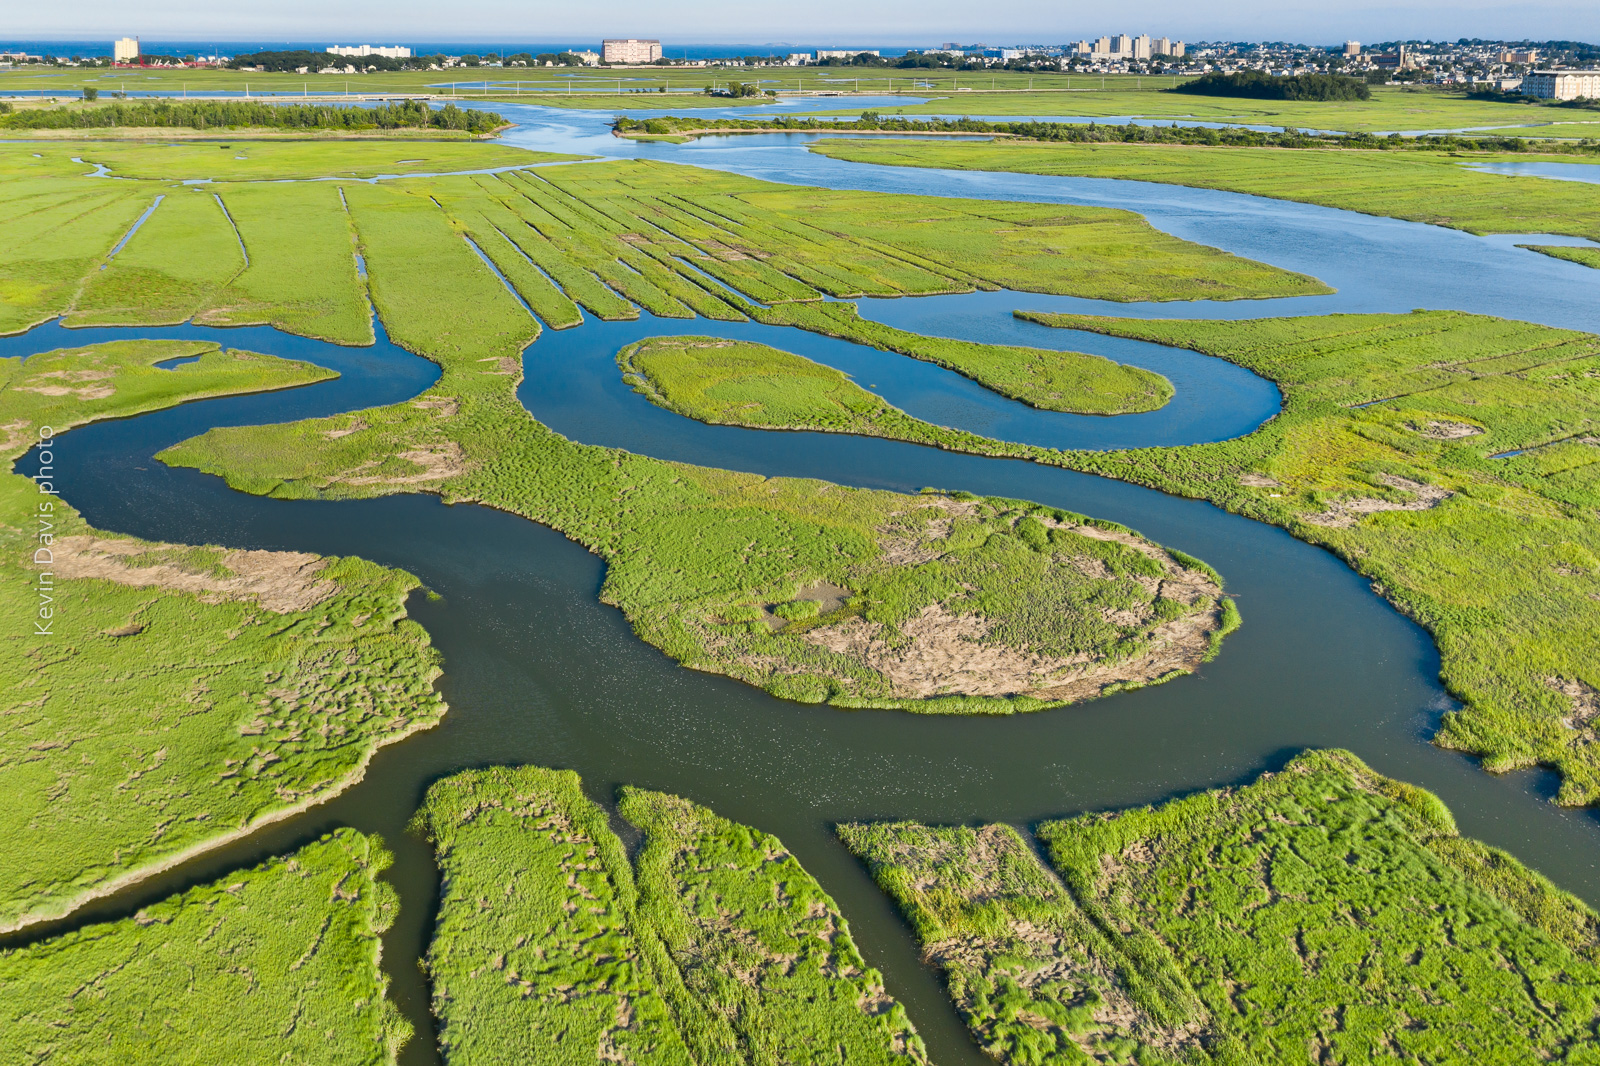
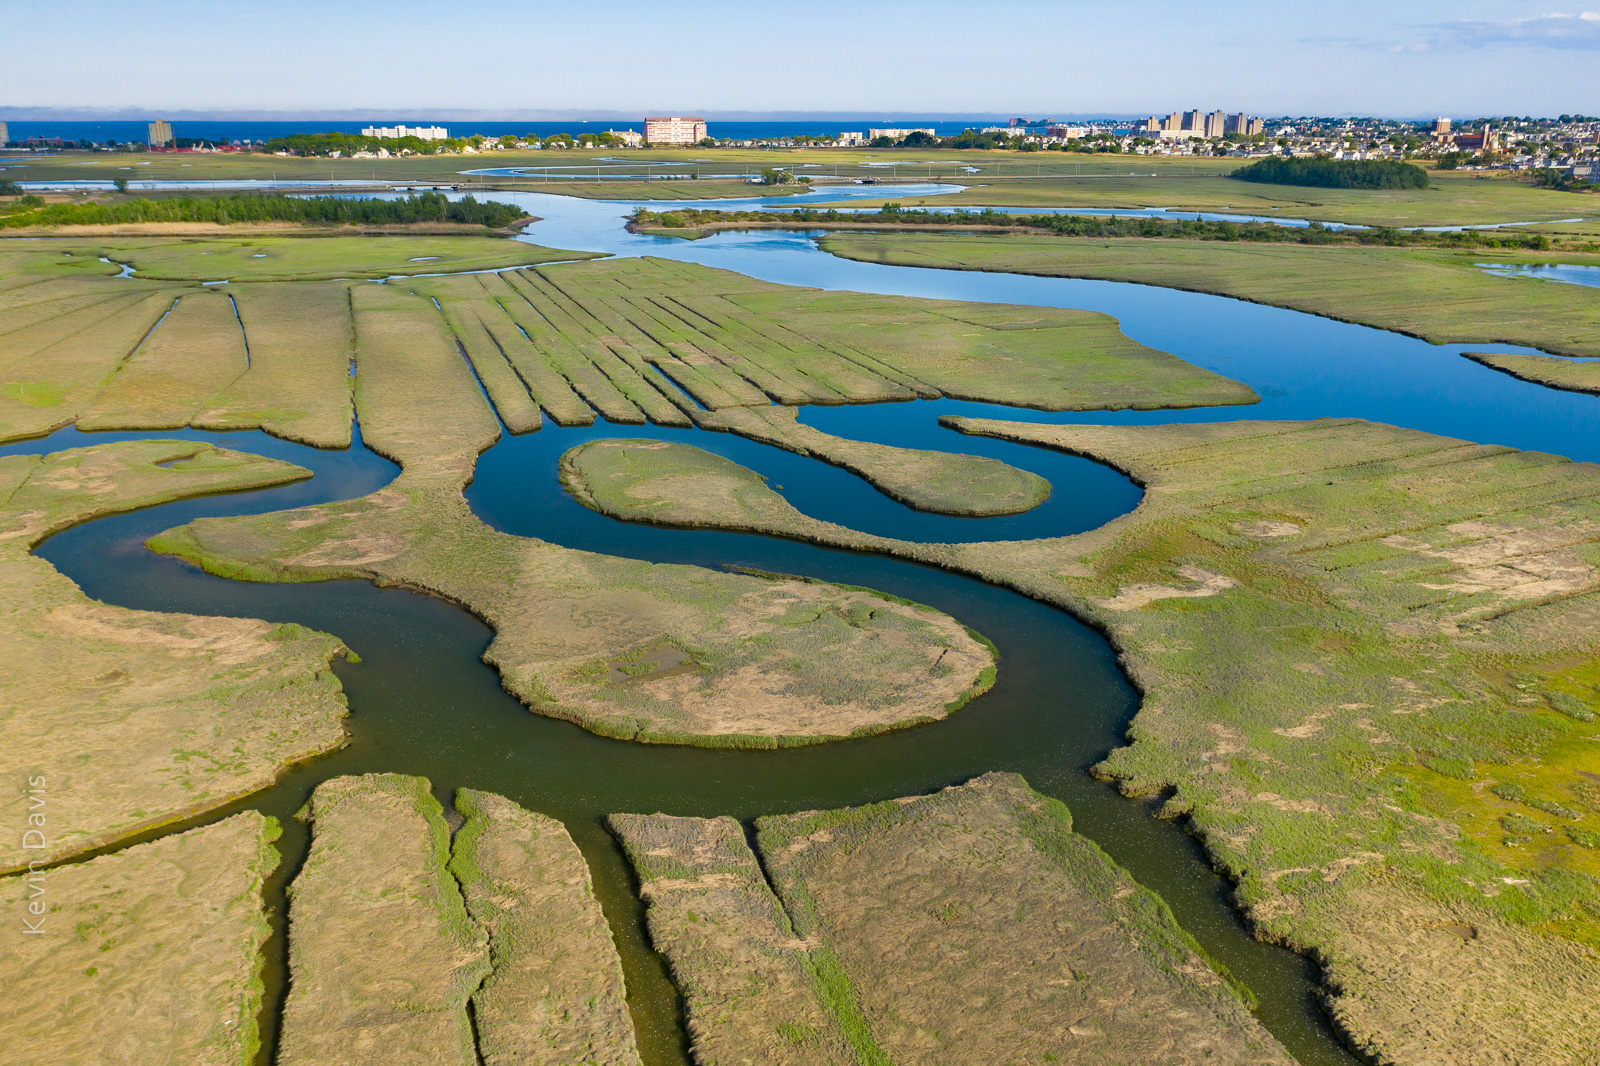
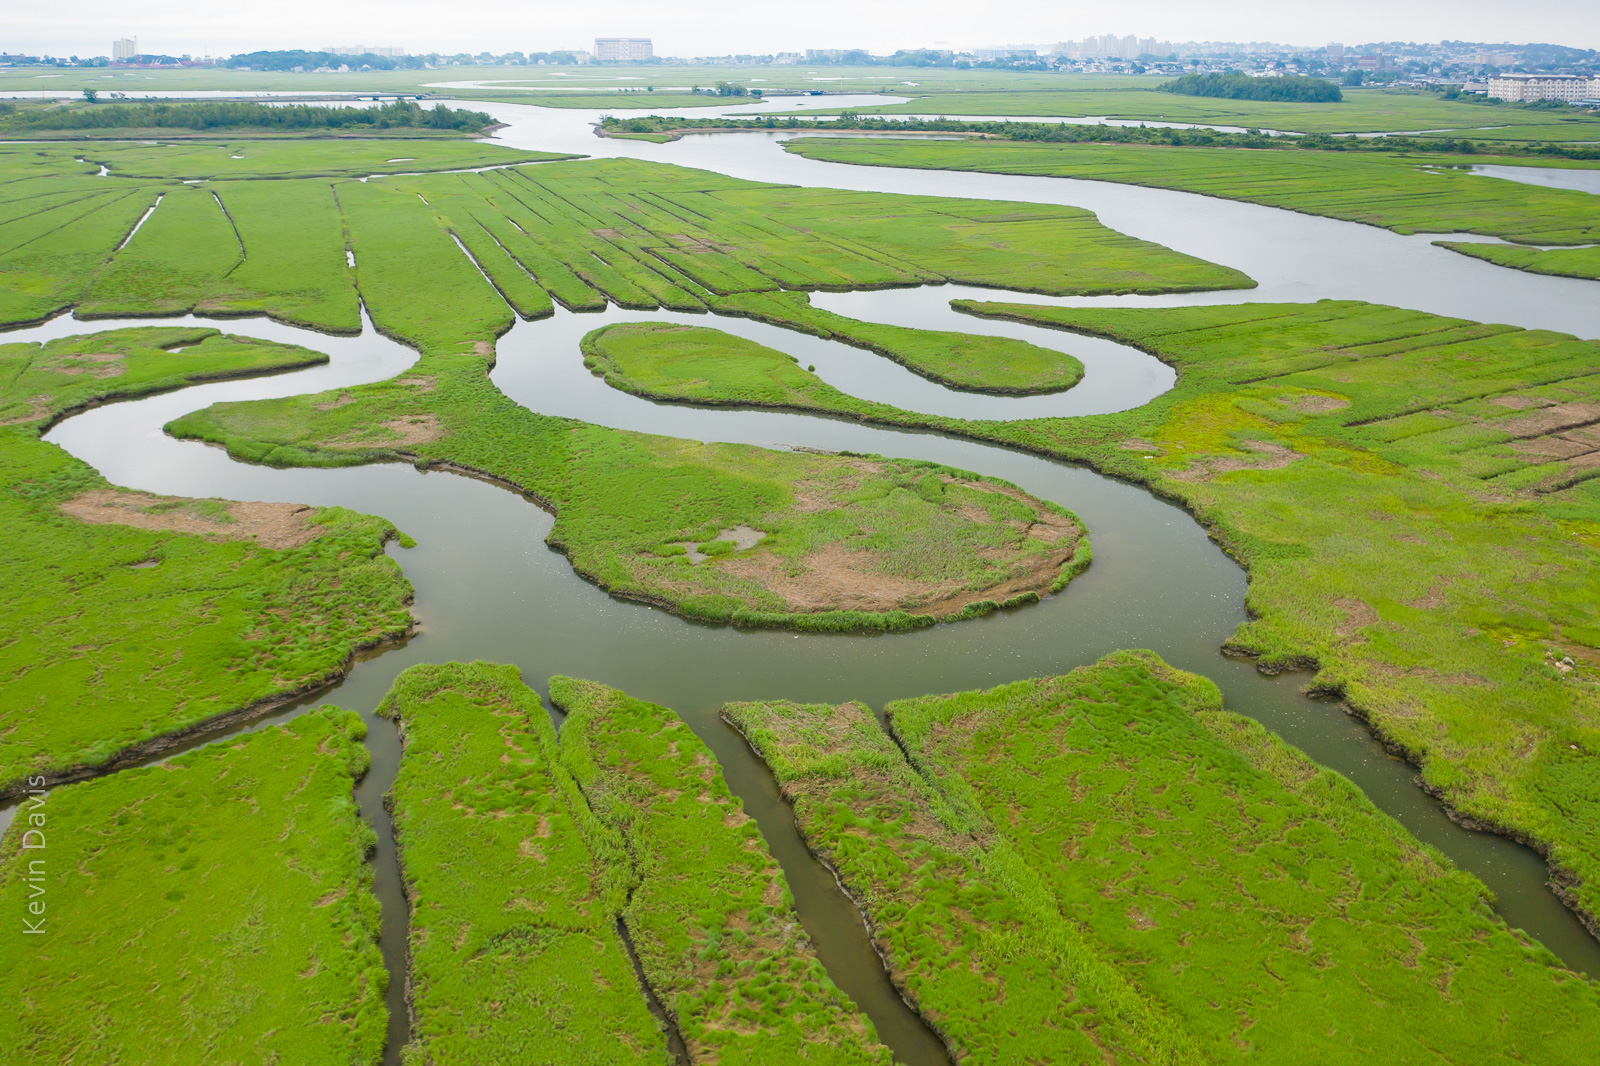
Rumney Marsh photographed with an aerial drone (sUAS)

I first visited Rumney Marsh in the month of May.  Although I discovered some great photo compositions, the marsh was mostly brown.  Presuming that the grasses would fully transform the landscape into a greener palate, I vaguely planned to return some weeks later. Shown here below is my first image from the May visit:

Rumney Marsh in the month of May

.

This year, spring in New England has featured more rain than normal. Dry days are a bit like currency – have to spend them judiciously.  Five or six weeks later I returned to the marsh on a dry day and found the green grasses covered the land, as expected. Unexpectedly, coastal clouds were lingering and the water reflected white sky (not blue sky).

Rumney Marsh (June) under cloudy skies

While that is a nice image, … I had imagined the water reflecting a blue sky. So, I returned later that same day after the clouds cleared away. That final image is shown at the top of this article.

In all three instances, the image required post-processing for HDR, particularly because the buildings on the horizon were too bright. So each of these three instances is a combination of multiple exposures, simply to control the dynamic range of light.