Mavic 3 Photo Quality vs. Mavic 2 Pro

Mavic 3 Photo Quality vs. Mavic 2 Pro

Although the Mavic 3 includes some groundbreaking new features, many reviewers will render their opinions about such things and I will not do so here.  I am only analyzing the photo quality from Mavic 3 with comparison to the predecessor Mavic 2 Pro.

Mavic 3 includes two cameras.  I am comparing the main camera to the camera of Mavic 2 Pro. The Mavic 3 main camera has a fixed-focal-length lens, 4/3 image sensor, and variable aperture.

The Mavic 3 supports capturing photos in either JPEG format or JPEG & RAW. While I almost always capture photos in RAW format and I do not need a JPEG, the initial release of MAVIC 3 will always save a JPEG.  That could possibly change in a future firmware update.

See the end of this post for a link to my 2018 comparison of Mavic 2 Pro image quality, compared to original Mavic Pro.

Testing the Mavic 3 at sunset … f\3.2, ISO 100

The main camera of Mavic 3 uses a 4/3 image sensor; this has implications.

  • The image rectangle has an aspect ratio of 4:3, which is same as Mavic 2 Zoom but is different than Mavic 2 Pro and Mavic Air.  For me personally, this implies that I must crop each image and discard some pixels to obtain a final image of 3:2 aspect ratio.
  • Four-thirds and Micro Four Thirds (MFT) are established standards. The diagonal measure of a 4/3 sensor can vary but is typically around 22mm.  Compare this to Mavic 2 Pro and Mavic Air 2S, which each have image sensors with diagonal measure around 16 mm.
  • A larger sensor can allow for either more pixels or larger pixels.  The Mavic 3 pixel resolution is not significantly different than Mavic 2 Pro.  Likely the individual dot elements (pixels) are larger.  Potentially that might translate to better ability to gather light, potentially reducing the signal-to-noise ratio.  But that is theoretical.  As the old saying goes, the proof is in the pudding. 

Some online articles suggest that the larger image sensor “gives Mavic 3 higher resolution and dynamic range” but …. higher resolution is a dubious claim and higher dynamic range is theoretical.

DJI drones have historically employed Sony Exmore image sensors; DJI/Hasselblad cameras are no exception. I must guess that the Mavic 3 is using the Sony IMX472-AAJK, but I have not confirmed this.  That sensor can capture all 20 megapixels at 120 frames-per-second.  Notably, this sensor uses “stacked CMOS” technology and is the first ever stacked CMOS sensor in the 4/3 size.  This sensor diagonally measures 21.77 mm.

The Mavic 3 user guide (available online) includes this disturbing note: “Before shooting important photos or videos, shoot a few images to test the camera is operating correctly.”   I shudder to imagine what might have happened during initial product testing to warrant such a warning.

Pixel Resolution

If you want a final image to have3:2 aspect ratio, then any 3:4 image must be cropped and that includes Mavic 3. Technically, you end up with fewer pixels than Mavic 2 Pro and Mavic Air 2S.

Mavic Air 2S @ 3:2 aspect  ………………  5472×3648  = 19.9 million pixels
Mavic 2 @ 3:2 aspect  ……………………… 5464×3640 = 19.88 million pixels
Mavic 2 @ 4:3 aspect (crop from 3:2)… 4852×3640
Mavic 2 @ 16:9 aspect (crop)…………… 5464×3070
Mavic 3 @ 4:3 aspect  …………………….. 5280×3956 = 20.88 million pixels
Mavic 3 @ 3:2 aspect (crop from 4:3)… 5280×3520 = 18.58 million pixels
Mavic 3 @ 16:9 aspect (crop)…………….. 5280×2970

Color

Opening RAW images in Adobe lightroom, the color is a bit green. That’s correctable but really annoying; I’m guessing this problem is because Lightroom/Photoshop/CameraRAW do not yet include a camera profile for Mavic 3 (Hasselblad L2D-20c).

Looking at the JPEGs, the color looks good – not vibrant, but good.

Sharpness

Comparing images from Mavic 3 and Mavic 2 Pro, at aperture f\3.5 and f\4.0, the two are equally sharp at center of the lens.  However, away from center, toward the edges of the image, Mavic 3 exhibits improved sharpness over Mavic 2 Pro.
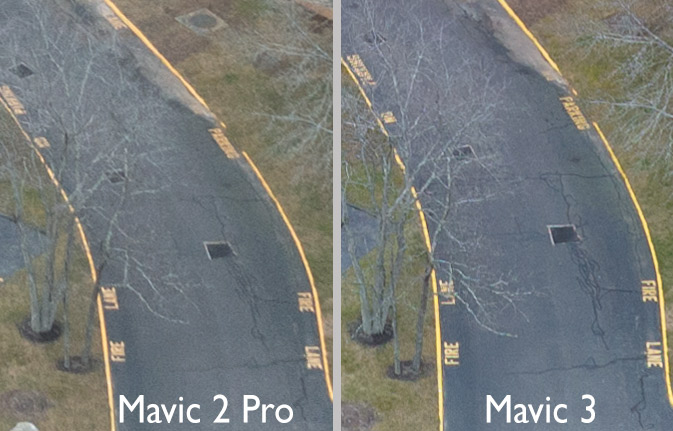
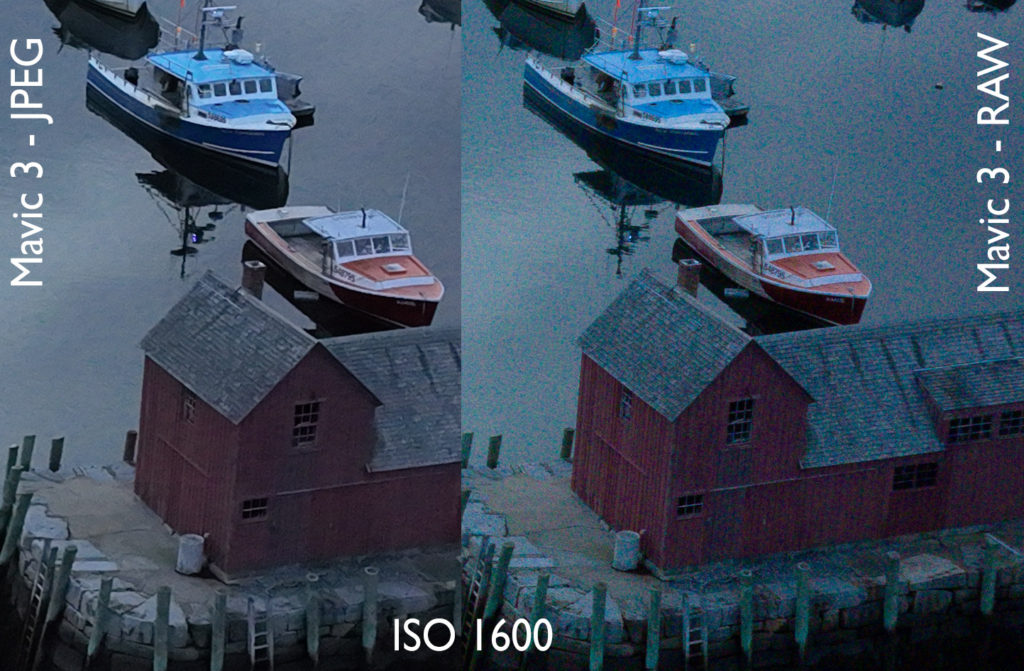
High-magnification crop from the original RAW image

Image noise

Considering all ISO 100 through 3200, Mavic 3 shows less luminance noise than Mavic 2 Pro. However, at any ISO, low light situations can result in considerable chroma noise in both shadows and midtones.  It is worst at IS0 800, 1600, 3200.  While it can usually be mitigated using noise-reduction in post-processing, the 4/3 image sensor should not exhibit this problem.  

As the camera saves both RAW and JPEG, I looked at the JPEGs.  Luminance noise is reasonably mitigated through ISO 1600; mitigation can be dicey at 3200.  Chroma noise is essentially eliminated. However, not surprising, this noise reduction comes at a price –  loss of sharpness.

Luminance noise in shadows … ISO 400, daylight with ND4 filter … N0te: ambient light and altitude are not identical

Mavic 3 … chroma noise in low light … ISO 1600

Chromatic aberration

In some situations with high-contrast fine detail, Mavic 3 can suffer from chromatic aberration similar to the first-generation Mavic Pro.  Although Mavic 2 Pro significantly reduced chromatic aberration, Mavic 3 is a step backward. This is observed with the clear DJI lens cover; I haven’t tried it yet with the naked lens.
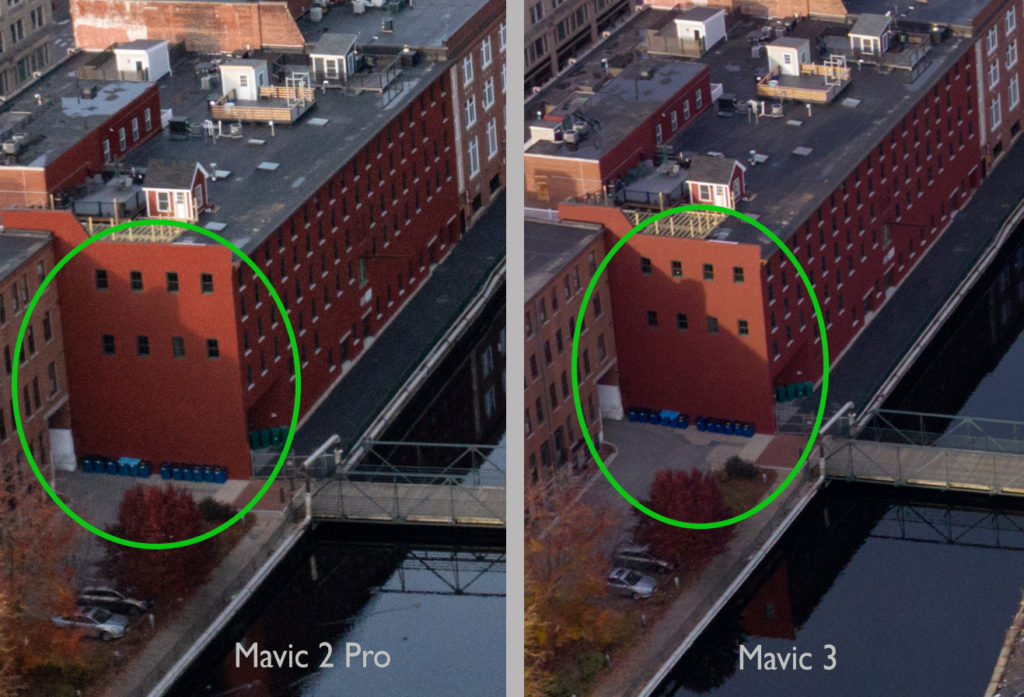
Mavic 3 (RAW image) shows improved sharpness, but also shows chromatic aberration in railing balusters

Shadow detail

Considering detail in the darkest shadow areas, Mavic 3 has a slight advantage to reveal details that Mavic 2 Pro cannot. The difference is quite small.

DJI has stated that the Mavic 3 main camera has 12.8 stops of dynamic range, which is not significantly greater than Mavic Air 2S or Mavic 2 Pro.

Highlight detail

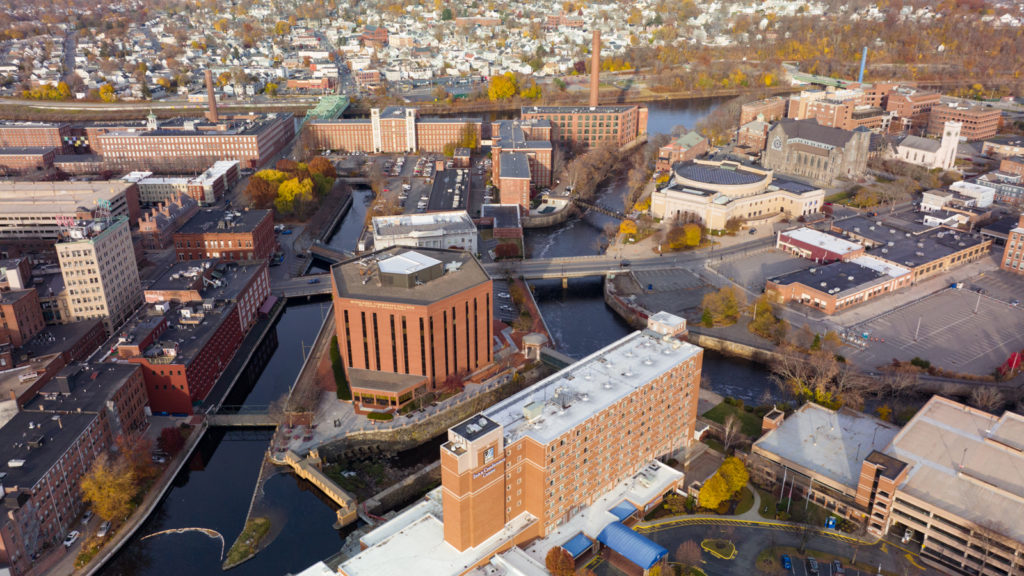
Both the original Mavic Pro and the successor Mavic 2 Pro often failed to resolve subtle detail in highlights. This commonly manifests in architectural details that are white,such as clapboard siding and trim mouldings.   Mavic 3 does shows a slight improvement.

Images captured with Mavic 2 Pro – particularly images that include architecture – have commonly required a great deal of effort to safeguard highlight details. At the time of capture, exposure bracketing saves an additional exposure wherein the highlights are rendered with reduced brightness.  In post-processing, that exposure is developed carefully and specifically for hightlight details.  Then those highlights are manually blended into the other exposure.  Only time will tell if Mavic 3 eliminates the need for that extra work.

Remote control

Apart from the camera itself, I must mention the remote control.  With the Mavic 2 Pro, I have very commonly used the camera control dial under the right index finger.  With Mavic 3, the RC-N1 remote controller has no such control dial; exposure settings can only be controlled via touch-screen. The expensive RC Pro controller includes a dial for right index finger, which I vaguely believe controls camera zoom and I do not know if it can be used for exposure purposes.  I did not spend the extra $1000 to get an RC Pro.

Mavic 3 … , daylight with ND4 filter, f\4.0, ISO 400


Here is my investigation of the Mavic 2 Pro, back when that was released in 2018:

How Many Megapixels Do I Need?

How Many Megapixels Do I Need?

Problem #1

A friend had trouble emailing photos from his smartphone. His photos were more than eight megapixels and he was trying to email two dozen of them in a single email. His email did not want to send an email totaling 400 megabytes. The resolution of his smartphone camera captured far more pixels than he needed and the files were … not small.

Problem #2

If you upload a small photo to an online service, particularly social media, that service will likely attempt to enlarge the photo … and you may not like the quality of the result.  While shrinking a photo typically does not have a negative impact on photo quality, enlarging can possibly have undesirable results because the enlarging process is attempting to invent pixels that did not originally exist.

Display on a smartphone

If you primarily look at photos on your phone, then 5 megapixels is more than you need.

Consider the display resolution of some popular smartphones:

  • Google Pixel 3 is 1080 x 2160 … 2.3 MP
  • iPhone X is 1125 x 2436 … 2.7 MP
  • Razor Phone 2 is 1440 x 2560 … 3.6 MP
  • Samsung Galaxy S9 is 1440 x 2960 … 4.2 MP

Print

Printing a photo onto paper is the most demanding application. As a general rule of thumb, high-quality printing requires between 240 to 300 pixels per printed inch. The bigger your print, the more pixels you need.

Example:  A 5-megapixel photo should print well up to 8×10 inches
(8×240) x (10×240) = 4.6 megapixels

Facebook

The recommended upload size is 1,200 × 630 pixels. You can certainly upload a larger photo, but Facebook will automatically shrink it.

Instagram

By design, Instagram favors square photos. You can post a rectangular photo, the Instagram default is a square crop. Upon first uploading your photo, you have an opportunity to undo that crop, but you cannot subsequently edit the photo to change it after your posting is complete.

The recommended size ix 1080 × 1080 pixels. You can certainly upload a larger photo, but Instagram will automatically shrink it.  If you upload a rectangular photo, it will be cropped to width 1080 pixels.

Twitter

Recommended upload size is 1200 × 675 (aspect ratio: 16:9): You can certainly upload a larger photo, but Twitter will automatically shrink it.

Display on a tablet

Consider three tablets.

  • Amazon Kindle Fire HDX 8.9” : 2560 × 1600 pixels, 8:5 aspect ratio
  • Apple iPad 10.2” (2019) : 2160 × 1620 pixels, 4:3 aspect ratio
  • Samsung Galaxy Tab A 10.1” (2019) : 1920 × 1200 pixels, 16:10 aspect ratio

If you size an image 2560×1600, it will display full-screen on the Kindle HDX 8.9” but may seem too large for both the iPad 10.2” and the Galaxy Tab A 10.1”.  Not to worry, the tablet includes the necessary smarts to dynamically make your photo fit the device screen without modifying your stored photo.

You can certainly store photos with higher resolution than the device display; the only consequence is that the photos consume more storage space than is necessary.

eBook, part 1 –  cover photo displayed in the ebook store

For the Kindle store, Amazon recommends 2500 x 1563 pixels.

eBook, part 2 –  photos inside the book

In large part, this comes back tablet display screens. As the Kindle and iPad (described previously) are similar regarding 1600 pixels in the smaller dimension, you might size your photos to 1600 pixels. Amazon recommends twice this, 3200 pixels, but I don’t know why.

Upon uploading your eBook to the Kindle store, your photos will be automatically compressed.  My latest ebook manuscript (with photos) was more than 12 megabytes before submitting, but Kindle compression reduced it to 4 megabytes.

The amount of royalty you earn from each book sale may be reduced because total eBook file size may incur a larger “delivery fee” per individual sale, perhaps fifteen cents per megabyte. An e-book with many high-resolution photos may incur a higher delivery charge and therefore reduce the royalties paid to the author.


Pixels (part 2)

With the information in my blog post entitled Pixels (part 1) [how-many-pixels-part-1], you may conclude that 8×10 inch prints call for a 5 megapixel camera. That’s generally true, but not entirely. It is possible to use computer software to artificially increase the number of pixels. Different software programs may perform differently. The general rule of thumb is you can double the number of pixels. So, you might print very good 8×10 prints though your camera only records 3 megapixels.

Maybe you just bought a new DSLR that records images up to 15 megapixels. Those 15 megapixel images may require three times more storage than 5 megapixel images. If you shoot
some pictures on Tuesday, intended for 11×14 prints, set your camera to record large size. If you shoot some pictures on Wedensday, intended for computer screens only, set your camera to record small size.

Pixels get a little weird when you move to television display. Pixels on a computer are square. A digital image that is 400×400 pixels will display square on your computer monitor. Not so on a television screen. Television pixels (defined by either NTSC or PAL standards) are not square.

Consider an picture aspect ratio of 4:3, meaning the picture is 25% wider than it is tall. Standard television (not HD) has a 4:3 picture aspect ratio. Yet the resolution is 720×480 pixels, which numerically seems to be 50% wider than it is tall. But rest assured it is 4:3 because each television pixel is taller than it is wide. (Take a very close look at a television and you can see this is so. It is more difficult to see on a HD television.) While pixels in a computer or in your camera are equally wide as they are tall (often called square pixels), pixels in television are taller than they are wide.

Pixels (part 1)

Perhaps the most common question regarding digital photography is … how many megapixels do I need? The answer depends upon how you intend to use the photo. You need to answer two questions: how large will the photo appear (inches or centimeters) and how many dots per inch (or centimeter).

If you want to share it on a computer screen, one megapixel is more than enough. Why? Computer displays typically have either 72 pixels per inch or 96 dots per inch. So, for example, to display a photo at a size of 6 by 9 inches, you need (6 x 96) x (9 x 96) = 497,664 pixels = 0.497 megapixels.

Computer screen: 72 – 96 dots (pixels) per inch
Photo print: 240 – 300 dots per inch
Magazine: 100 – 200 dots per inch
Poster or banner: 100 – 150 dots per inch
Billboard: 10 – 20 dots per inch

Magazines print fewer dots per inch. If you look real close, you may see the individual dots, but maybe not. It depends upon the exact printing equipment and the tendency of ink dots to blend together. Billboards, viewed from far way, use very low resolution simply because it is not apparent from far away.

So, here is another example. For a photo print 6 x 9 inches, you need (6 x 240) x (9 x 240) = 3,110,400 pixels = 3 megapixels. More pixels in your camera means that you can get larger prints without sacrificing quality. Using the same math, you can easily see that a 20 x 24 inch print needs 27 megapixels.

You may ask: 240 dots per inch? My printer supports 1000 dots per inch.
OK, here is the bottom line. If you print at the higher resolution, can you see a difference in the final print? You might see a tiny difference, but 240 dpi usually provides excellent quality and sharpness. If you are using a photo lab to make your prints, consult their guidelines, but 240dpi or 250 dpi is very common.