The day of the new Mavic 2 release one week ago, numerous sites and YouTube channels already had reviews prepared. DJI had judiciously provided new Mavic 2 drones to people who would do these reviews. I have no intention of rehashing that stuff. I am interested specifically in the camera performance. Because I am largely interested in image quality, we’re talking about the Mavic 2 Pro, not the Mavic 2 Zoom. As for video quality, we’ll have to leave that for another day.
For high-quality images, DJI now provides this choice: Phantom 4 Pro, Mavic 2 Pro, Inspire 2 with Zenmuse X5s, Inspire 2 with Zenmuse X7. The unique value proposition of any Mavic is that it folds down to a size that can fit in a camera bag. A Mavic drone and remote controller requires physical space similar to a DSLR camera body and a zoom lens.
For photographers, is the upgrade worth it, from Mavic Pro to Mavic 2 Pro?
Yes, after brief testing this morning, there is no doubt in my mind.
With the advent of Mavic 2 Pro, the camera difference between Mavic and Phantom has been erased. Both the variable aperture (f/2.8 to f/11) and the sensor resolution (5472×3648) are on par with the pre-existing Phantom 4 Pro and superior to the original Mavic Pro. Note that this is a 2:3 aspect ratio compared to a 3:4 aspect ratio of Mavic Pro, Mavic 2 Zoom, and Zenmuse X5s.
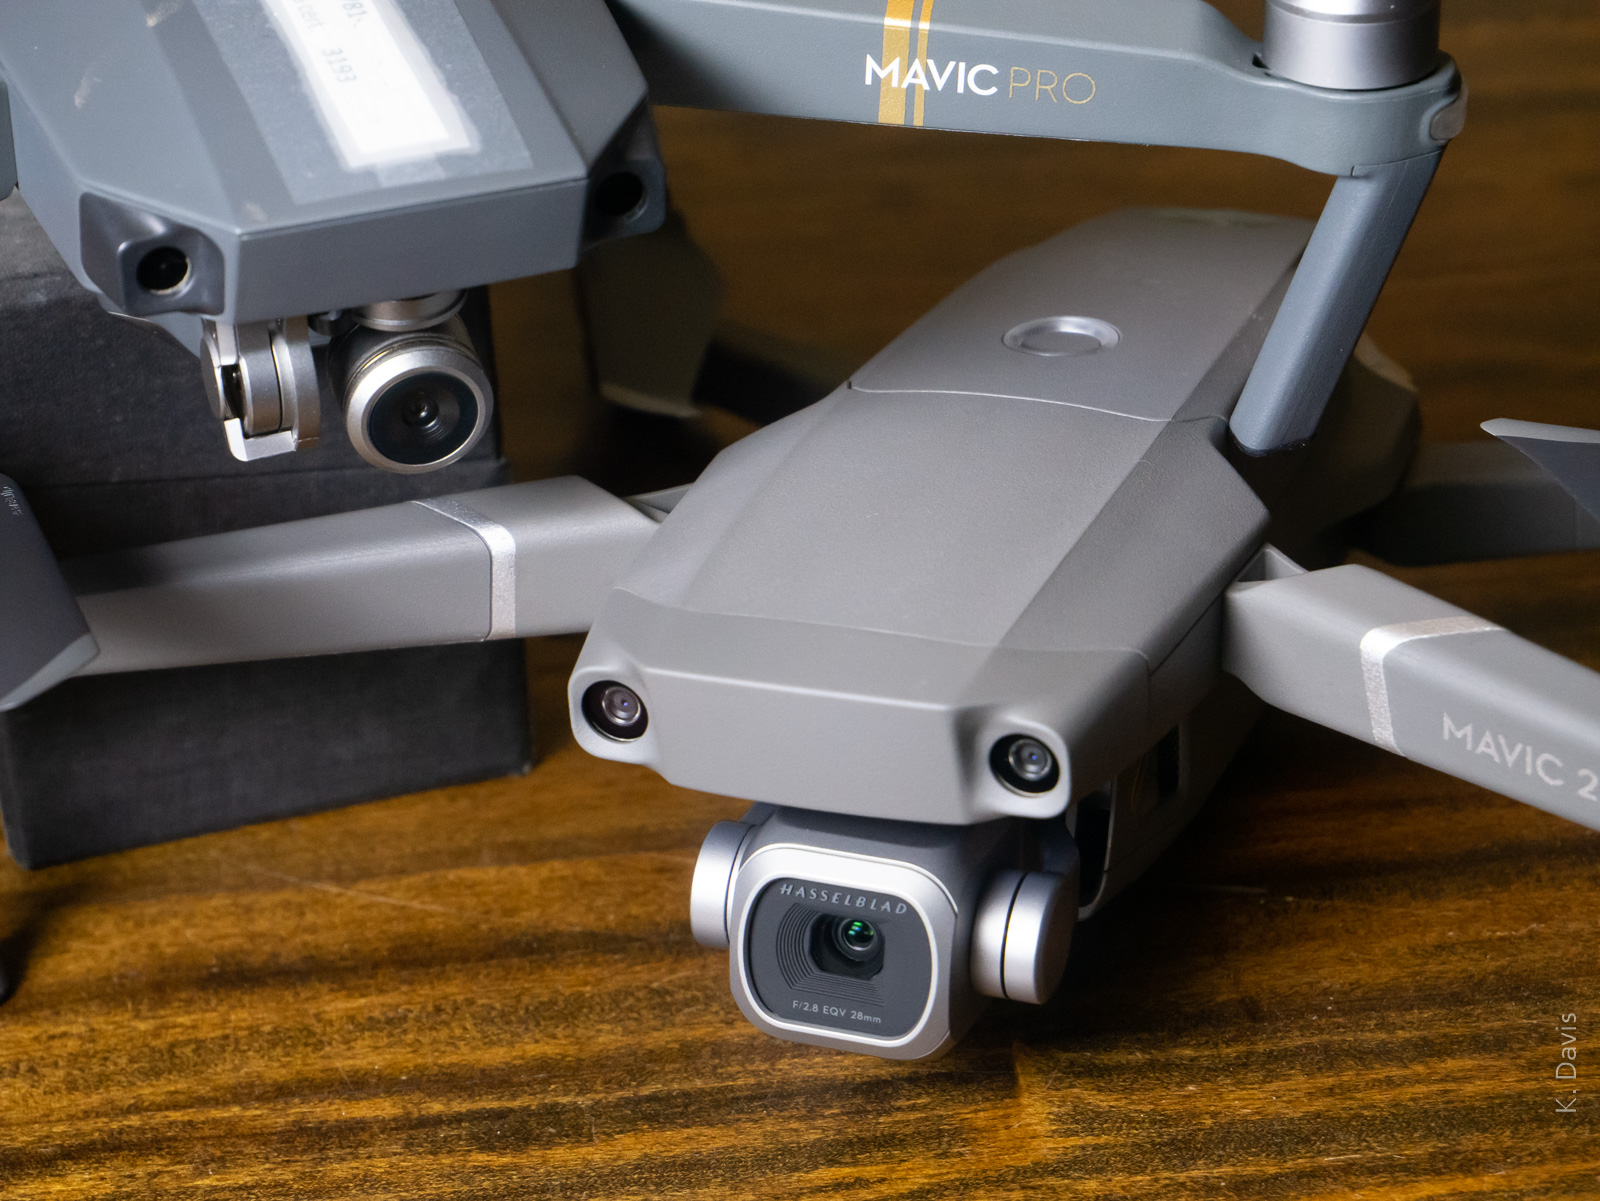
Note that camera is new and not exactly the same as P4P. DJI bought a majority stake in Hasselblad a couple years ago and this apparently is the first fruits of that partnership. (Yes, DJI essentially owns the legendary Hasselblad company.)
According to the numbers, the angle of view is a bit different, though I did not notice during actual use. Mavic 2 Pro provides a FOV equivalent to 28mm lens on a full-frame camera. This is narrower than the original Mavic Pro’s equivalent 26mm and narrower than the Phantom 4 Pro’s equivalent 24mm. Despite being less wide angle, vertical lines can still keystone strongly and you may choose to correct for that in post processing.
Here are the problems with Mavic Pro that I hope are improved with Mavic 2 Pro.
- Dynamic range in the Mavic Pro was not very good. In high-contrast scenes, highlights can easily blow out and/or the shadows block up. To mitigate this, I have sometimes captured multiple RAW exposures and then post-processed for HDR.
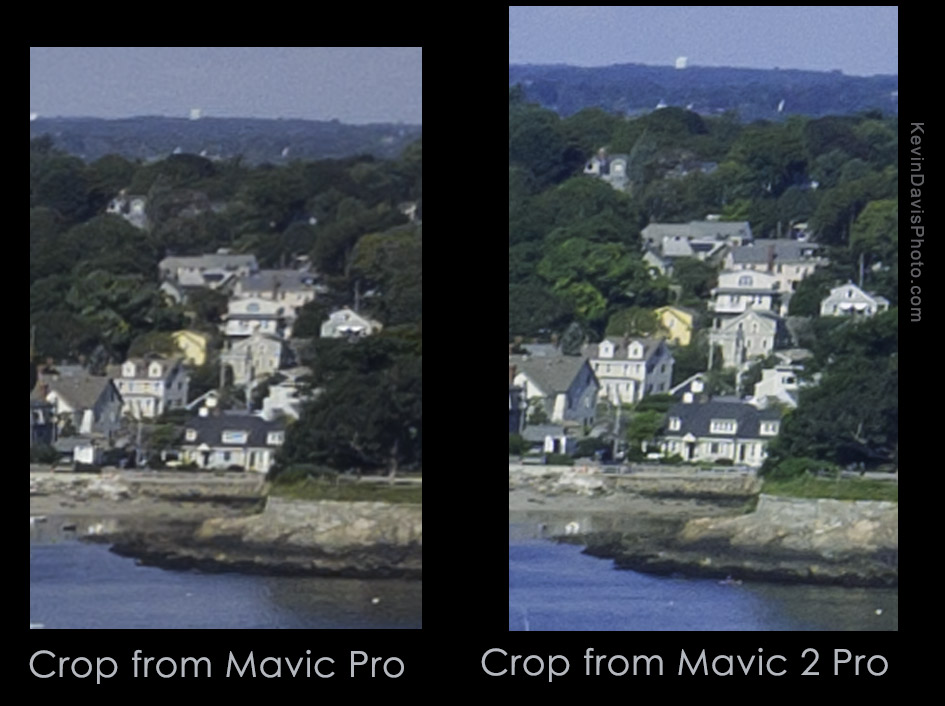
- Using RAW capture, if the highlights do not blow out entirely, the camera still fails to resolve details in the highlights. For example, houses with clapboard siding in full sun – the separation of the clapboards may be entirely absent in the image. This seems surprising to me … if the story is true that the RGB color space has finer granularity in the highlight range compared to the shadow range.
- Image noise, particularly in shadows. To mitigate this, I have relied upon heavy-handed post-processing. While noise reduction in Adobe Lightroom is very good, there is a price to pay – higher levels of noise reduction can deteriorate details throughout the brightness range.
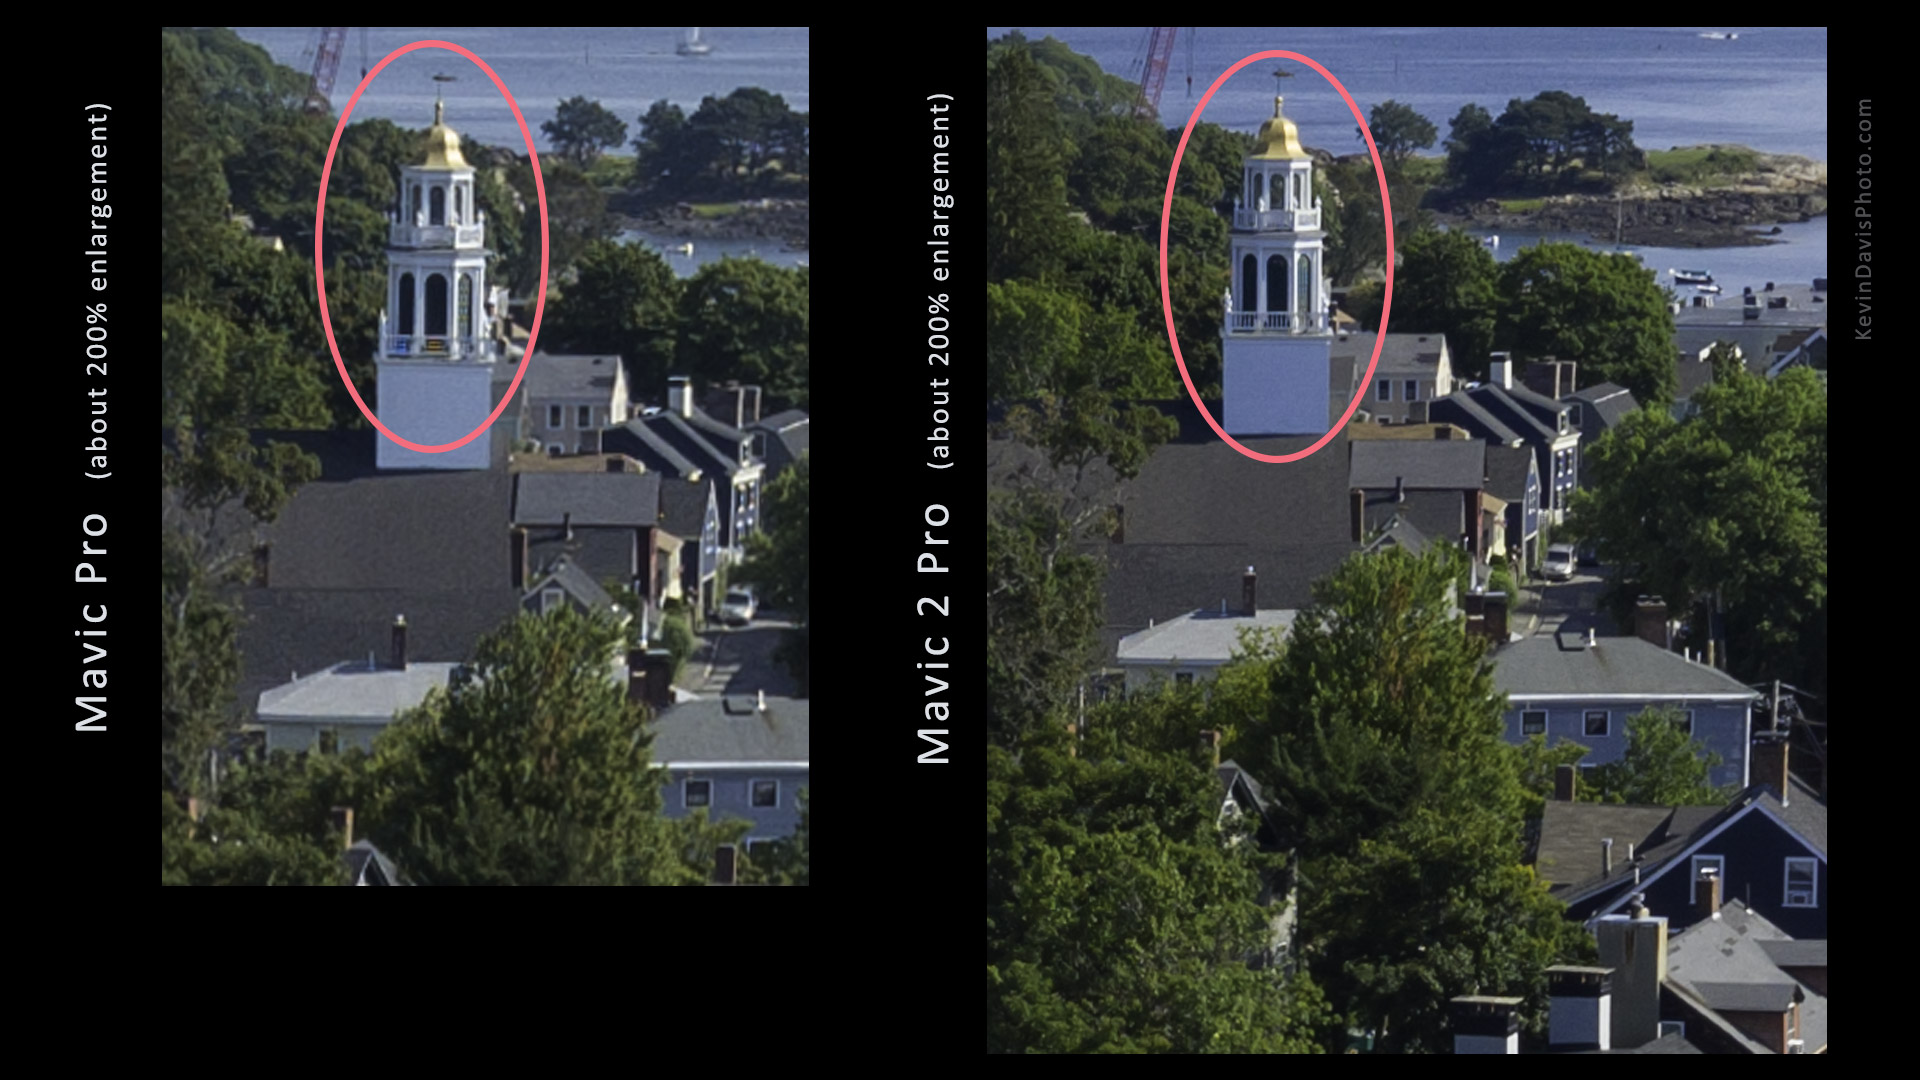
- With high magnification, images lack sharpness. In post-processing, I have found it necessary to apply twice as much sharpening compared to my hand-held cameras.
- Color from RAW images is typically worse than any other camera I have used (except perhaps GoPro Hero3) and the images require heavy-handed post-processing. Of course, RAW images from any camera will always require some degree of post-processing.
- Blue/red chromatic aberrations. I commonly see this around white baluster railings. Lightroom’s ability to mitigate chromatic aberration typically fails to resolve the problem.
In summary, the Mavic 2 Pro does achieve small improvements in all of these problem areas. So let’s look at some actual images from the new Mavic 2 Pro compared to the original Mavic Pro.
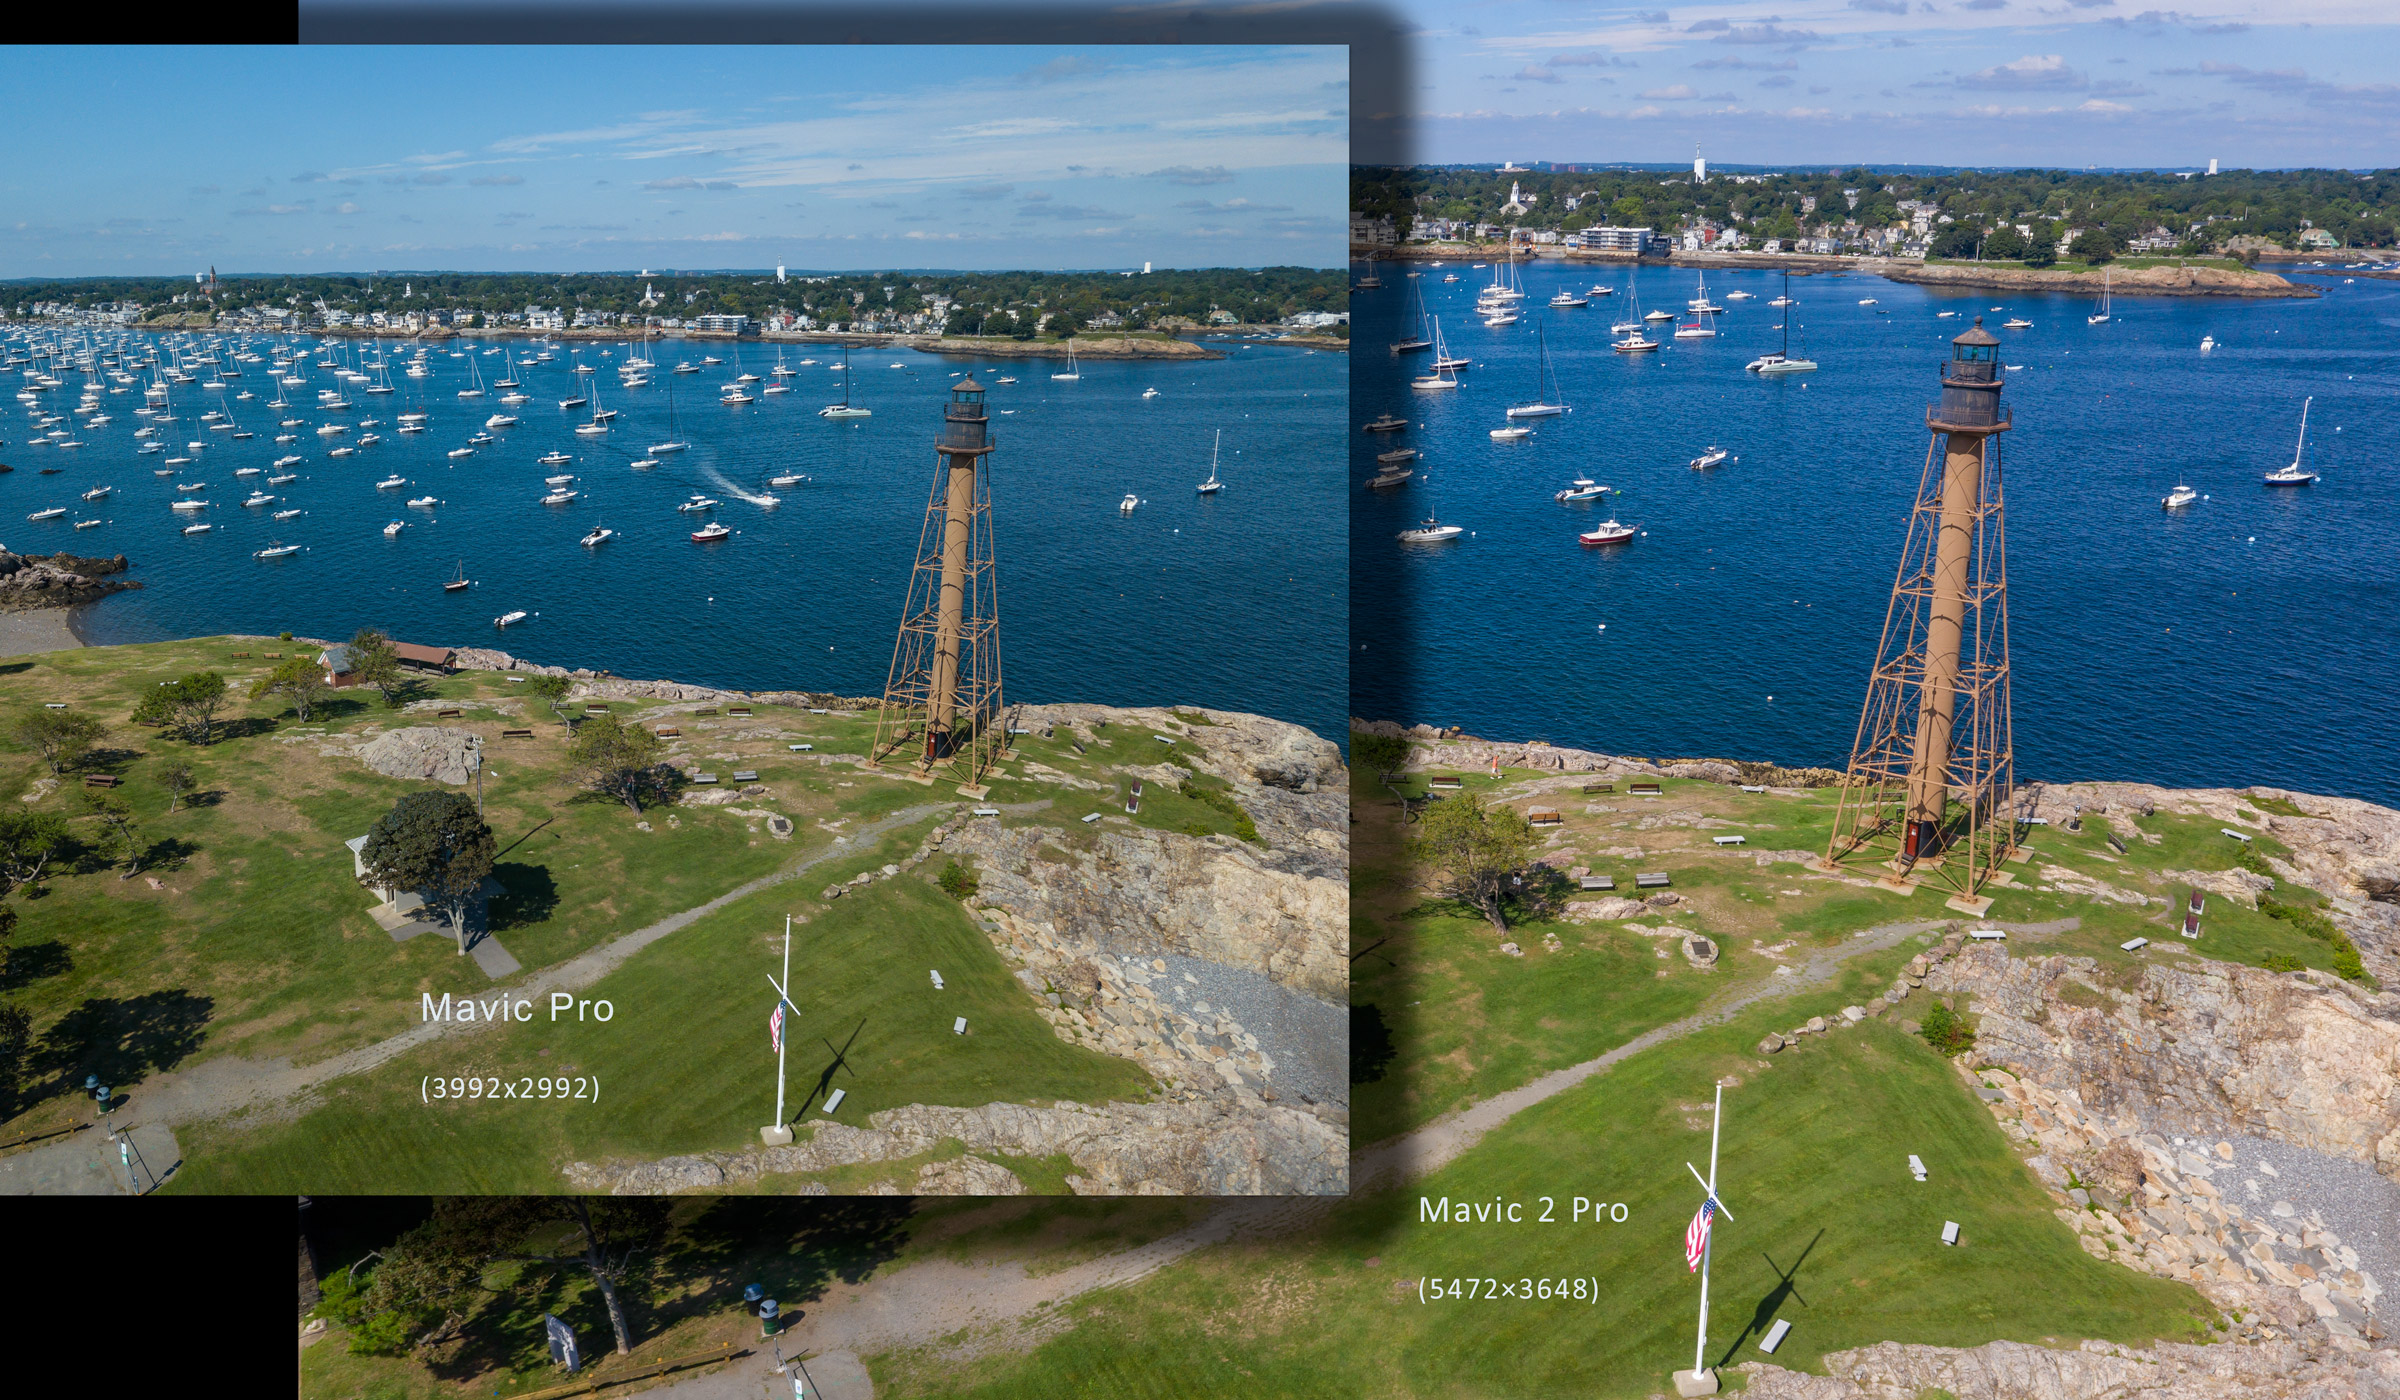
In high-contrast situations such as this scene with white boats and white houses, Mavic 2 Pro still has difficulty retaining detail in the highlights, but is not so bad that it requires HDR techniques to overcome it. It is still necessary to reduce the exposure by 1/3 stop to protect the highlights (this does not jeopardize shadow details) and also apply highlight reduction in post-processing.
[Click on an image to see the full resolution.]
[Images shown here are all RAW and individually post-processed to the very best of my ability using Adobe Lightroom.]
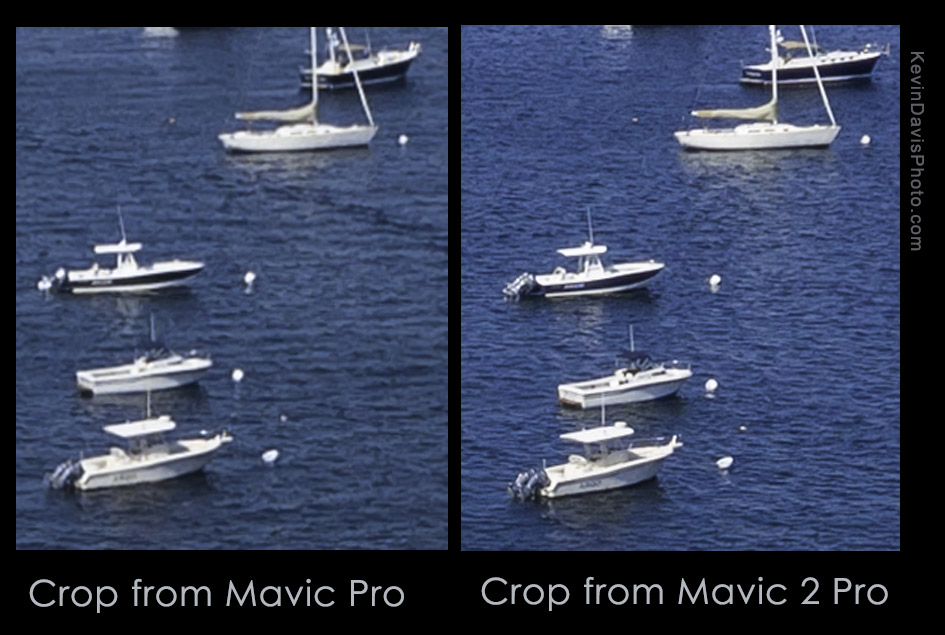
Noise reduction is still necessary but far less than with the original Mavic Pro.
Color of RAW images is much better, requires less correction.
Here’s an example (not a particularly good one) that shows Mavic Pro was unable to resolve the balusters and suffered chromatic aberration. Mavic 2 Pro did not exhibit either of these problems.
Finally, a few notes that do not regard image capture.
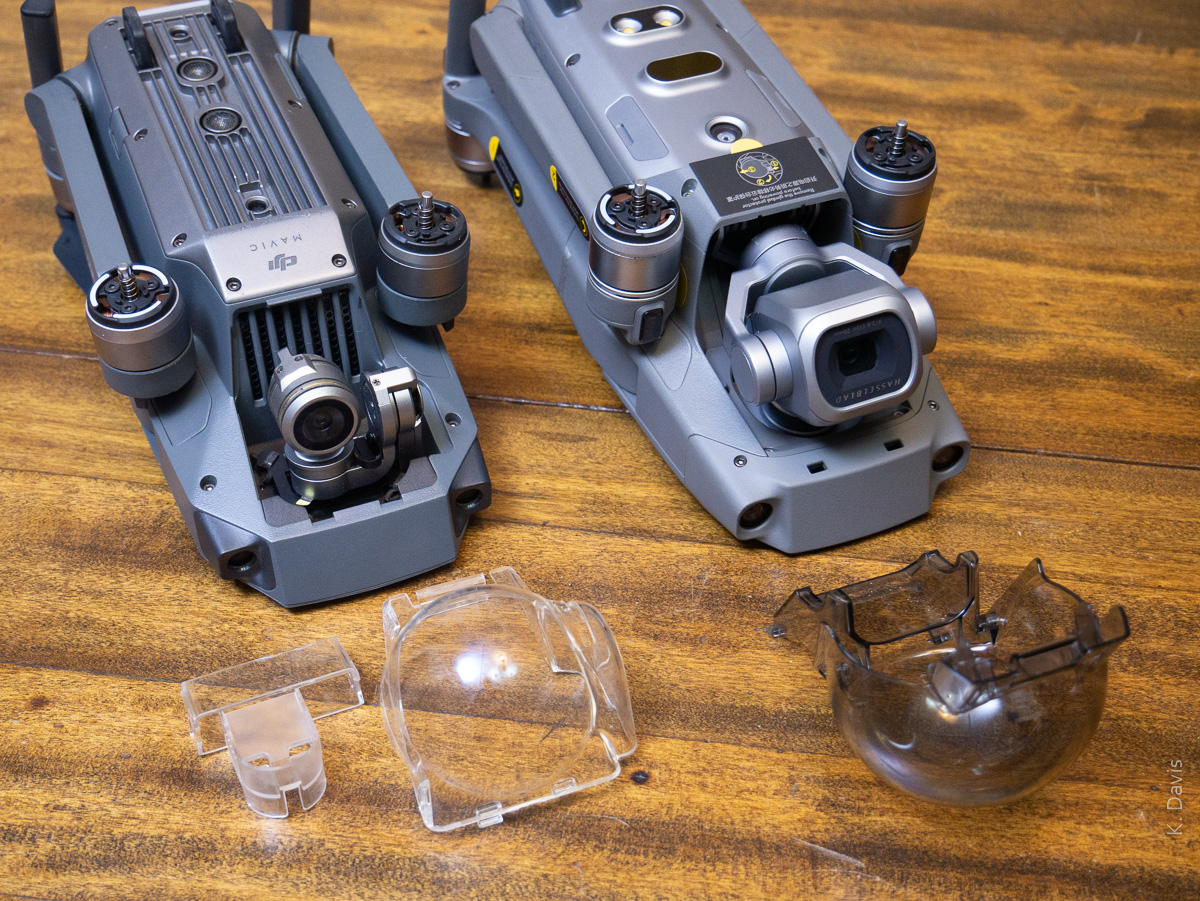
If you’ve ever fumbled with the gimbal clamp on the original Mavic Pro, or worse yet have forgotten to remove the clamp before powering on the drone, rest assured that the new Mavic 2 Pro does provide an improvement. The gimbal clamp is integrated into the protective dome cover – remove the dome necessarily removes the gimbal clamp. See the photo below showing both the Mavic Pro and the Mavic 2 Pro.
Unlike the original Mavic Pro, the Mavic 2 includes 8GB on-board memory in addition to a micro SD slot. To access this memory from another device, connect a USB cable (included) to the Mavic 2 USB-C port and turn on power to the Mavic 2. (Remember to remove the gimbal clamp before turning on the Mavic.) After having inserted a micro SD card, the DJI GO app prompted whether to use that instead of the on-board memory. I am assuming that we must select one or the other and automatic switch-over is not supported, but I don’t know that for certain.
The transmission system between the drone and the controller is theoretically the most robust of any DJI product to date. Mavic 2 utilized second generation Occusync 2.0, while the Phantom line has yet to adopt the Occusync transmission system. Although Occusync 2.0 reportedly can operate at distances up to five miles, I personally have no need of that. Increased robustness of the signal is welcome, as I have seen unexplainable video signal loss when using the original Mavic Pro.
| Mavic Pro | Mavic 2 Pro | |
| Diagonal Size (Not including propellers) |
335 mm | 354 mm |
| Obstacle avoidance | forward, downward | forward, backward, left, right, downward, upward |
| Flight time on single battery charge |
27 min | 31 min |
| Max speed | 40 mph | 72 kph |
| Built-in RAM | 0 | 8GB |
| Cost (first released) | $1,000 | $1,450 |
| Battery cost | $90 | $120 |
| Mavic Pro | Mavic 2 Pro | |
| Photo ISO range | 100-3200 | 100-6400 |
| Video ISO range | 100-1600 | 100-12800 |
| Lens focal length | Equivalent to 26 mm on 35mm full-frame camera | Equivalent to 28 mm on 35mm full-frame camera |
| Lens aperature | f/2.8 | f/2.8 – f/11 |
| Max photo resolution | 4000×3000 | 5472×3648 |
| Max video resolution @ 30 fps | 4K: 3840×2160 | 4K: 3840×2160 |
| Max frame rate @ 1080 | 96 fps | 120 fps |
| Max video bitrate | 60 Mbps | 100 Mbps |
| Video compression | H.264 | H.265 |
| HDR video | no | yes |
.