Panasonic Lumix G3

A picnic this week provided opportunity for my fIrst test drive of the Panasonic Lumix G3.
I am very pleased with the ease of use and the image quality. I was super impressed by the face-detection auto-focus and the LCD-touch-screen focus selection.

 Shown here is my favorite shot, Balasankar dishing up a nice overhand serve.  As you can probably guess, I am holding the G3 over my head for this shot.  An articulated/swivel display screen is very helpful for overhead shots and also down-on-the-ground shots.  I quickly learned to love this feature on the C-5060 (very few cameras had this feature back in 2004/5) and I absolutely required it for a replacement camera. The 3-inch swivel-touch-display on the G3 is a sweet upgrade.

ISO 800, f\6.3, 1/800 sec, auto white-balance
Shot as JPG  (not RAW)

(click the image for a larger view)


And here are a couple more shots with the same 14mm lens (equivilent to a 28mm on a full-frame DSLR).


Camera Upgrade – Panasonic G3

Across two decades, I have owned/used three film cameras, two digital cameras, and one video camcorder.  Recently, I acquired a new camera to replace my old digital compact.  The new camera is a Panasonic Lumix G3. 

The G3 is a relatively compact camera with interchangeable lenses.  It is half the size of my Canon DSLR.  The G3 is a Micro Four-Thirds camera.   Because Four-Thirds and Micro Four-Thirds are both open standards (jointly developed by Olympus and Panasonic), the camera can accept lenses from different vendors, such as Olympus, Panasonic, and Leica.

The biggest reason I replaced the old compact camera is poor low-light performance.  The old camera had a maximum ISO of 400 and was prone to a good deal of chromatic noise.  The new G3 has a maximum ISO of 6400 and the noise is far less than the old camera at ISO 400.  

The ability to record images in low-light is largely a matter of the image sensor.  Most small cameras employ small image sensors, which perform poorly in low light.  In recent years, some small-to-medium size cameras have been employing larger image sensors.  The G3 features a Four-Thirds sensor, which is about six times larger than the sensor in the old C-5060 and is half the size of the image sensor in my DSLR.  G3 has three times more pixels than the C5060, while the image sensor size is six times larger. So the individual pixels are larger; and, theoretically, larger pixels can take in more light.   But this is theory; the proof is the actual image quality.


When the Light is not quite what you want

Friday evening, as Hurricane Irene thrashed the coast of Florida, the weather in New England was clear and the warm glow of the setting sun raked across the land.  I went a short distance down the road to photograph the river.   But, to my surprise, the light on the weeds and grasses was largely back-lit and unflattering.  So I planned to return and try again Saturday morning, as the weather forecast called for overcast clouds.

Soft light / overcast sky

As expected, the morning provided soft diffuse light and I snapped a few images.  To get a bit of elevation above the river, I used two familiar tools.  One, a portable telescoping ladder.  Two, a tripod fully extended and raised far over my head.  The latter requires a bit more shutter speed to compensate for the unstable camera perch. 

A bit later, after returning home, the sun was peeking through the clouds and I considered repeating my brief excursion in different light.  But, in the end, I did not.

As you can see in the image here, the soft light features no distinct shadows.  This is not automatically good or bad.  A diffuse light avoids high contrast and specular reflections, but it can also reduce sense of  shape and depth.  A moderate light from the side (side light) will wrap around a subject and enhance the subject shape.  But too much and the shadows may be too dark, loosing all details.

When dealing with natural light (not electronic flash), sometimes we can anticipate the light we want.  But sometimes, the light really is not doing what we expect or want.  When that happens, sometimes the right thing to do is simply try again after the light has changed.


Infinite storage for photos and video

Maybe you are running out of storage space on your computer … because of video or fat megapixel photos.  Or maybe you need to backup your files, for safety (in case your computer storage drive should die).  You might save to optical disk (CD, DVD, or BluRay disc) but the storage capacity is quite limited.   A standard DVD will store less than 5GB.  A BluRay disc stores up to 25GB and a dual-layer BluRay disc will store 50GB. But that is still not enough.

You may be contemplating adding a disk drive with larger capacity.  But sooner or later, you will fill up that amount and still need more. Cramming bigger disk drives into your computer is only a temporary solution.  External disk drives provide a long-term solution of unlimited storage. 

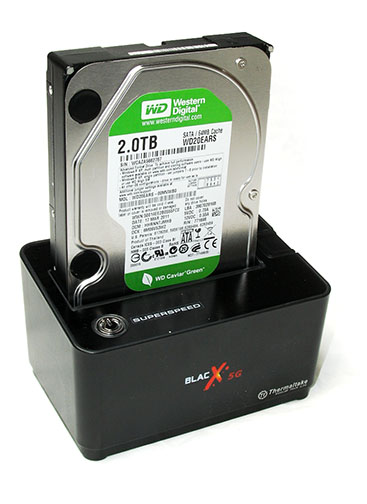
Let me suggest a relatively low-cost option called an external hard drive dock.  A dock is basically an adapter that allows you to use internal type drives externally.  Why? Because internal type drives simply cost less than external drives. If you divide the price by the number of gigabytes, external drives range from 6 – 20 cents per gigabyte, while internal disk drives range from 4 – 14 cents per gigabyte. Removing a drive from the dock, then inserting another drive, requires mere seconds.

How does an external disk drive or dock connect to your computer?  Here is a quick survey of available interfaces.
USB 2.0 : up to 480 megabit/sec
USB 3.0 : up to 4.8 gigabit/sec
eSATA II : up to 3 gigabit/sec 
eSATA III : up to 6 gigabit/sec
1394a FireWire 400 : up to 400 megabit/sec
1394b FireWire 800 : up to 800 megabit/sec
1394d Firewire 6400 : up to 6.4 gigabit/sec
Thunderbolt : up to 10 gigabit/sec

Strangely, these interfaces are typically rated for throughput in units of Mb/sec (megabits per second), while disk drives are rated in terms of MB/sec (megabytes per second).  The difference is simply a factor of eight.

Inside your computer, long-term data storage devices are typically based upon SATA. 
SATA II (a.k.a. SATA 3Gbps) provides data transfer capability much faster than most disk drives.  (A SATA II disk drive will typically move data to-and-from your computer at a rate less than 700 megabit/sec.)  SATA III was introduced to support solid-state drives (300 to 500 megabyte/sec).  External SATA (eSATA) allows external devices to connect directly into your SATA storage system.  This is ideal for connecting external storage, but most computers do not include any eSATA ports.

Firewire has some interesting technical features, but current products do not offer speeds above 800. Thunderbolt is very new, currently available only with the new 2011 Apple MacBook Pro. (Just within the past couple months, there has been a rumor that Sony will soon offer Thunderbolt on an upcoming Vaio laptop computer.) 

In 2011, USB 3.0 seems to be the clear winner.  Simplistic speed ratings suggest that USB 3.0 is faster than eSATA II, but some tests have reported that this is not necessarily true for currently available USB 3.0 products.  While USB 3.0 usually outperforms eSATA when reading data, eSATA may have a slight advantage when writing data.

If you already have an eSATA interface, you can buy an adapter that converts between eSATA and USB 3.0. (available from Bytecc, Addonics, and NewerTech.)  Cost is about $35 – $40.  But for a bit less money ($30), you can buy an expansion card that adds USB 3.0 ports easily to your existing computer (if you have an available PCIe expansion slot). 

If you are buying a new computer in 2011, read the specifications carefully to make sure you get USB 3.0.  While you can connect a USB 3.0 devices to a USB 2.0 device, they will communicate at the lower speed.

If you are looking for a high-capacity disk drive, here is a 2010 comparison of 2TB drives:
http://hothardware.com/Reviews/Definitive-2TB-Hard-Drive-Roundup

Essential Guide to Memory Cards


The two most common types of memory cards are Compact Flash (CF) and Secure Digital (SD).  Compact Flash was first introduced 15 years ago and is still used in many new cameras.  SD format is physically smaller and is more suitable to smaller cameras.  For larger cameras that can accomodate CF, some people find that the larger size of CF cards is easier to manage. Many SD cards today will actually be SDHC (Secure Digital High Capacity).  If you have an older camera, be careful to read the camera specifications to understand if you can use SDHC cards. 

From a technical perspective, both CF and SD/SDHC have evolved to offer increasing speed and storage capacity. In general, CF supports a maximum storage capacity 128 gigabytes. (The newest revisions can support far more.)  The original SD supports up to 4 gigabytes. SDHC supports up to 32 gigabytes. SDXC supports up to 2 terabytes (1TB = 1000GB).

The photo attached here shows three memory cards: xD, micro SD, and SDHC.  Micro SD cards are commonly used in mobile phones and come with an SD adapter, which is essential if you need to insert the card into a card reader. xD has been used by some Olympus and FujiFilm cameras, but both these vendors seem to be phasing out the xD cards in 2010 (see: http://en.wikipedia.org/wiki/XD-Picture_Card).  The xD card in this photo was taken from an 4-year-old Olympus camera that accepts both xD and SD cards.

Historically, Sony cameras have exclusively used a proprietary card type called Memory Stick.  This decision by Sony (to ignore standard card types such as CF and SD) has been a nuisance to camera buyers for a decade.  In a very significant and obvious change, new Sony camera models introduced in 2010 support both Memory Stick and industry standard SD/SDHC cards.

Not all cards are created equal.  Some memory cards will read or write faster than others.  The write speed can affect how fast your camera can save an image to the card.  Furthermore, if your card is too slow, it may not be compatible with some newer high-resolution cameras, that require high-speed cards in order to save fat megapixel images.  Before buying a memory card, I highly recommend that you check Rob Galbraith’s memory card database (www.robgalbraith.com/bins/multi_page.asp?cid=6007). 

To copy photos from your camera, you have four options. Most cameras can connect to a computer via a USB cable. Doing so, the camera appears to the computer as a simple external storage device, just like a flash drive or external disk drive.  Altneratively, you can remove the card from the camera and use a card reader, connected to your computer.  If your camera is built-in to a cell phone or tablet, you may be able to send your images via email (possibly incurring fees for large amounts of data). Finally, some cameras support a wireless connection, such as BlueTooth.  For some cameras, wireless connectivity may be available via a camera accessory that must be purchased separately.

Not all memory card readers are equal.  In the photo shown here, both card readers connect to a computer via USB.  Both accept a variety of different cards.  The big difference between the two is speed.  One supports Ultra DMA and the other does not.  Be careful to read the fine print before purchasing a card reader.  Using a slow card reader can be frustrating, particularly if reading 8GB or more.

Lastly, a particular note regarding video cameras.  With the advent of newer memory cards offering both fast write speed and high storage capacity, video cameras have quickly moved away from magnetic tape storage in favor of memory cards.  Some cameras allow you to record for indefinite periods of time by providing two card slots and automatically switching when the current card becomes full.

Windows vs Mac -and- Nikon vs Canon

Windows 7 will be available later this year and most reports agree that it is the operating system that Windows Vista should have been.

Considering Mac OS X and Windows 7, some people dare to say that the culture war between Mac and PC has now become somewhat moot. Feature-for-feature, Mac and PC are now entirely comparable. It’s akin to the culture war between Nikon and Canon cameras. Those people who maintain extreme brand loyalty usually do so because of experiences 10 years ago and not because of objective comparison.

If you’re looking to buy a new SLR camera, and you already have some Nikon lenses, you will likely buy a Nikon. Same goes for Canon.

f you’re looking to buy a new computer, and you already have a software and accessories for Mac, you will likely buy a Mac. Same goes for PC.

Backpacking and Photography

Carrying a lot of heavy camera equipment on an overnight hiking trip … is a little crazy. It’s just too much weight. For a three-day backpack trip, you might need to carry 35 to 40 pounds of food, clothes, and camping equipment. Add to that 8 to 12 pounds of cameras and lenses, then another 8 pounds for a tripod, you are then carrying 60 pounds. I do not recommend it. That being said, I will do it on occaision to photograph remote locations.

But how to carry all this stuff? “Photo backpack” sounds perfect, but truthfully, these things are designed to carry camera equipment and not much else. Photo backpacks cannot carry all the food, clothing and camping equipment for overnight trips. A hiker’s backpack is necessary. I use a large backpack, stuff a camera bag inside of that, then make daytrips from camp, carrying only the smaller photo bag.

In the past, my camera bag on these trips has been a waist pack plus a small day pack. In fact, the LowePro Orion AW actually comes with both (at least mine did years ago). The waist pack allows fast access to camera equipment without removing a pack from my back.
For my upcoming trip, I will be using a Kata 3N1. This bag quickly converts from a two-shoulder backpack to a one-shoulder sling. On top of that, it has a small compartment at the top, just big enough for lunch and a jacket. Compared to the Orion AW waist bag, the small 3N1-10 is about the same capacity, while the larger 3N1-30 has twice the capacity and still provides fast access to equipment.

My large backpack is an old Kelty Super Tioga external frame pack. Because most hikers today use internal frame packs, most don’t realize that an external frame pack is still a good option in some cases. Some people seem to believe that external frame packs are relics from WWI and no longer manufactured today. Of course, this is false. Just as an example, the ancient and venerable Super Tioga lives on in 2009, though the name has changed. I recently ordered a replacement hip-belt for my Super Tioga, which simply is not possible with an internal frame pack.
.

Tripods – is Good and Inexpensive possible ?

You can find tripods in any department store that sells cameras. You might find a good tripod, though perhaps the odds are against you. You can find tripods in any specialty camera store; these are a bit different than the department store variety and they can be far more expensive.
A couple years ago, I went hunting for a good tripod around $100; here is what I found.

There is one quality that a tripod must have above all else; it must be sturdy. While this might seem a good opportunity to denegrate a lot of department store tripods, I am not going to to that. Why? Because “sturdy” means one thing if your camera weighs 10 lbs and means something quite different if your camera weighs 10 oz. A tripod of the department store variety is typically intended for lightweight cameras. For the intended camera, some of these tripods can be quite sturdy, while others simply defy the notion of “sturdy” no matter the camera. Decades ago, my first tripod could be readily described as flimsy; the parts were not fitted together with any precision to prevent the parts from moving about. Without comparing it to other tripods, I knew no better. Of course, there is an argument to be made that any tripod is better than no tripod at all.

The second quality I look for in a tripod is good control of the camera movement. Camera movement is a funciton of the tripod head, as opposed to the tripod legs. The two most common types of tripod heads are the ballhead and the tilt & pan head. Tilt & pan heads are often referred to as video heads because they are particularly useful for video cameras. These heads have long handles attached so you can pan and tilt the camera very smoothly without jerky motion. Ballheads are more compact, basically a ball and socket with one knob that loosens/tightens it. Loosen it and the ball can move in any direction, forward, backward, side to side. A good quality ballhead will have a tension adjustment to prevent the camera from suddenly falling to one side when you loosen the ball. A bigger ball will support a heavier camera compared to a smaller ball. A bigger ball will move more smoothly than a smaller ball. A bigger ball usually has a bigger price tag.

Good tripods are often sold in two separate pieces, the head and the legs. The connection point between the two is a simple screw afixed into the top of the legs. While European tripods may use a different standard, there are two english measurment standards for tripod screw mounts, 1/4 inch and 3/8 inch. If you buy the head and legs separately, just make certain that the mount is compatible. Some tripods sold with both legs with head actually have a detachable head, which gives you the option of upgrading the parts later. Simply be aware of which screw size is used. If it has a 1/4 screw mount, that does not necessarily mean you cannot use a tripod head with 3/8 screw mount. You can employ a 1/4 to 3/8 adapter. However, a set of legs with 1/4 screw mount is intended for smaller cameras; I recommend that you don’t put a 10 lb camera on a set of legs that is not designed for that much weight.

For hundreds of years, tripod legs have been made from wood and these are still available today. However, most legs today are made from aluminum. Innovations over the past 10 years have led to the use of other materials such as carbon fiber. Regardless of the material used, most tripods are adjustable in size for simple reason of portability. A common design consists of sections of tubing that fit within each other like a telescope. When the legs are completely stowed, the tripod has a minum height. This measurement is important for reasons of portability, particularly if you intend to carry your tripod onto an airplane. Fully extended, each tripod has a maximum height. Most people will want a tripod that is tall enough such that you need not bend over to look through your camera’s view finder. Two tripods with the same maximum height may have very different minimum height. In particular, if the tripod legs are each comprised of four sections, this will typically collapse to a size that is significantly smaller than tripod legs having only three sections or two sections.

So here was my task; find a good tripod, not too expensive, nothing too fancy, too heavy or too expensive. Considering the particular photographer, this would be her first tripod; while I insist upon a quality product, I didn’t want to spend hundreds of dollars.

From my own experience, Gitzo tripods are superb. Unfotunately, the cost was a higher than I was intending to spend.

One of the most respected names in tripods is Manfrotto. Manfrotto model 190 was just the right size, with easy-to-use lever locks to extend the legs, 3 leg sections. Legs adjust to 4 different angles and will drop flat to the ground (for ground level photography) with use of a piece (included) that acts as a center-column replacement. Leg tubes are somewhat triangular, stronger than simple round tube. Cost is $125 with no head. Adding the cost of a separate tripod head, this was not inexpensive.

Manfrotto did offer less expensive tripods but they all seem to include a permanently attached head and are rated to support only 2-4 lbs. This might be acceptable for the particular photographer I was shopping for, but I felt that it was a undesirable compromise for anyone using an SLR camera.

You will find Slik tripods in department stores as well as specialty camera stores. Slik model 330 and 340 seemed pretty good, but I felt that the leg-locking levers are too small / under-designed. The model 500 corrects this, but is a significantly larger tripod. Levers are better on Calumet. I believe the included head is removable/replacable.

Giotto has been offering tripod products for a few years; a relative newcomer compared to Manfrotto and Slick. Excellent quality. Better legs than Calumet. However, legs are extended using a twist lock similar to Gitzo and I think lever locks better for a new photographer. Furthermore, each takes 3 turns to lock/unlock, whereas Gitzo is only 2 turns. Extending the Giotto is tedious.

Giotto ballheads, purchased separately, were also very good quality; includes tension adjust. Hoever, the ballhead cost $90 without quick-release and $120 with quick-release; so the combined cost of the legs plus the head was a bit too much.

Tilt-all has made photography products for decades. Unfortunately, the tripods I saw were unacceptable. Every part had a cheap finish and the twist-locks on the legs were lousy.

Induro tripods looked interesting on-line, but I could not find these products in any local stores.

In the end, I found a clear winner … Calumet. Similar to the Manfrotto 190, but the legs were constructed from cheaper thin-wall round-tube aluminum. Legs were locked/unlocked via easy-to-use lever locks. Four leg sections instead three (so collapses smaller). Legs adjust to 3 different angles. Though the center column prevents it from going flat to the ground, the bottom half of the center column can be removed or the entire column can be inverted. Includes a pan-tilt head with quick-release; and the head can be replaced with a good ball head (1/4 inch thread). Three year warranty. Cost $50, wow! I would have expected $90. I bought it.

In a later post, we’ll take a closer look at ballheads.