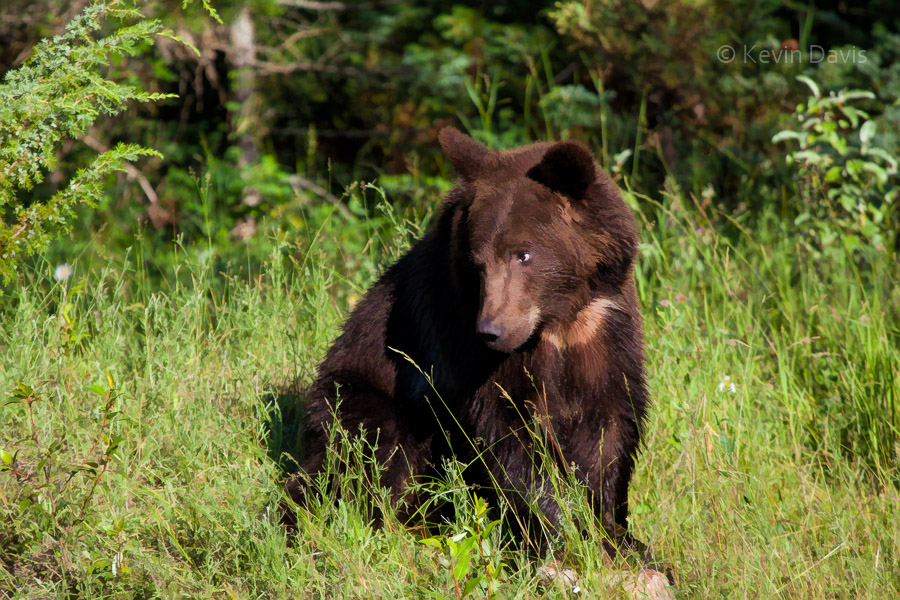
Here is a before/after of Bruno the grizzly bear. The first image is straight from camera, without any filters applied.
Unmodified straight from camera
.
And here is a modified version using a painterly filter by Topaz Labs.
I don’t do this sort of thing a lot, but I like the effect here on Bruno’s fur.
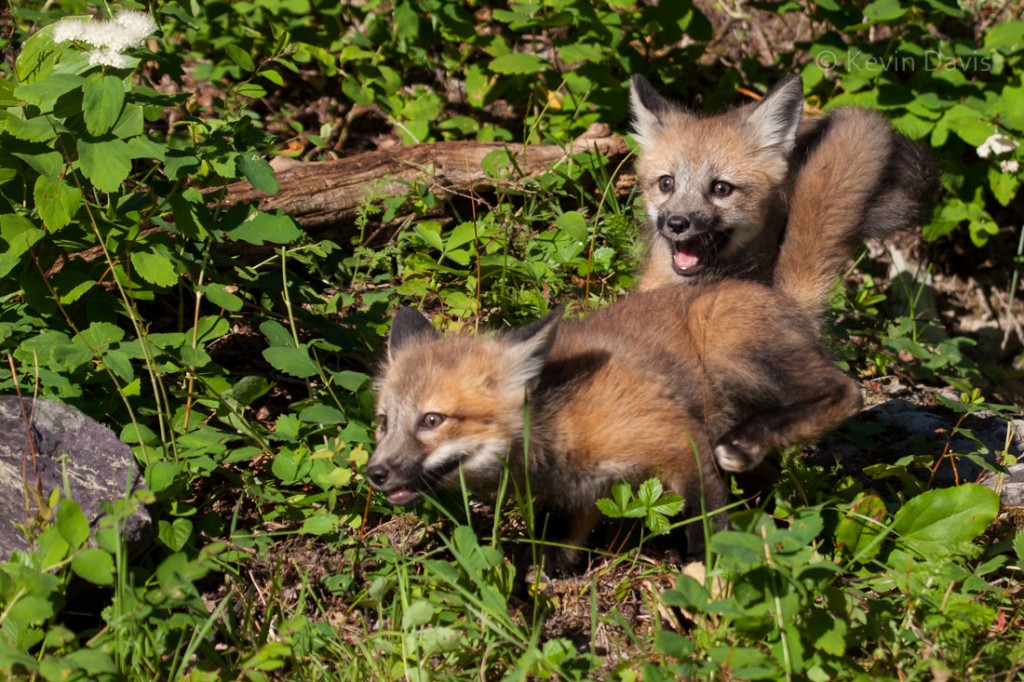
When I heard about this photography opportunity, I could not ignore it. Everyone loves baby animals! A 3-day workshop with leader Jeff Wendorff, to photograph baby animals at a game ranch in Montana.
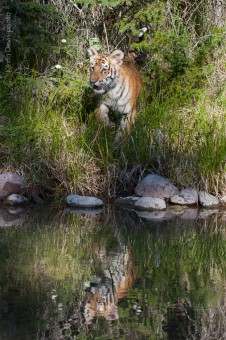
Wolf cubs, Red Fox cubs, Bobcat kits, a 4-month-old Tiger, and more. The cuteness factor is very high.
I discovered limitations of my camera equipment that I had known before; particularly, my ability to quickly select a focus point. In this regard, I have never considered the Canon 5D2 to be cumbersome, but I found here that the controls are not quite agile enough. The common technique of focus, then recompose, takes 2 seconds and that’s not fast enough. The wolf cubs were particularly difficult; they are very energetic and very fast.
All totaled, I shot somewhere around 3400 photos. By comparison to some other folks, that’s not a lot.
After editing, I had fewer than 1000 images. (I should probably do another round of editing and cut that number in half.) Images were rejected for a variety of reasons. Maybe my composition cut off the tip of a tail. Maybe the animal’s ears were pointing in an odd way. Sometimes there is nothing particularly wrong with the image, but I have a similar image that is slightly better. Delete the weaker image because there is no point in keeping both images.
[ Click on either image to see a larger view. ]
The workshop included a 4th day, just in case foul weather might interfere with the workshop, though this wasn’t necessary the week we were there. So we had the option to photograph some other animals, including adult animals and a 1.5-year-old Grizzly Bear.
Of the 3.5 days, two days are jam-packed busy. The other 1.5 days are still busy but not as exhausting.
Not only is Jeff Wendorff (jeffwendorff.com) an expert at photographing wildlife, but he also has an excellent relationship with the staff at the game ranch.
One of those posts regarded the yet-to-be-available and much-to-be-desired Canon 200-400; that lens is now available.
MFT zoom lens without a teleconverterMFT lens with 1.7 teleconverter
This week, I have had two different needs for a long lens.
Photographing wildlife. I will be at a game ranch next week. I must choose and rent some long telephoto glass. (If this need arose more frequently, I would purchase/own it.) What lens choices available to me?
First, note that there is generally a trade-off between any fixed-focal-length lenses (non zoom) that have wide aperture (gathers more light) and zoom lenses, which provide variable focal length but sacrifice a bit with regard to aperture. I would love to have multiple long lenses at my disposal; but if I must choose one, then the flexibility of a zoom is the safe choice.
Zoom options. Top of the list is that new 200-400. Hands down, that is the lens I want to shoot with. The problem is the price tag; the rental fee is over $600 and purchase price is more than $10,000. This leaves me with a choice of the Canon 100-400 f/4.5-5.6L, Canon 100-300 f/4.5-5.6L, that same 100-300 plus a 1.4x teleconverter, or possibly a third party lens such as Sigma.
Multiple reviews across the internet all agree that the 100-300 is a superior lens compared to the 100-400. Unless you need the extra reach of 400mm. Apparently the 100-300 is not compatible with Canon teleconverters. So I chose the 100-400.
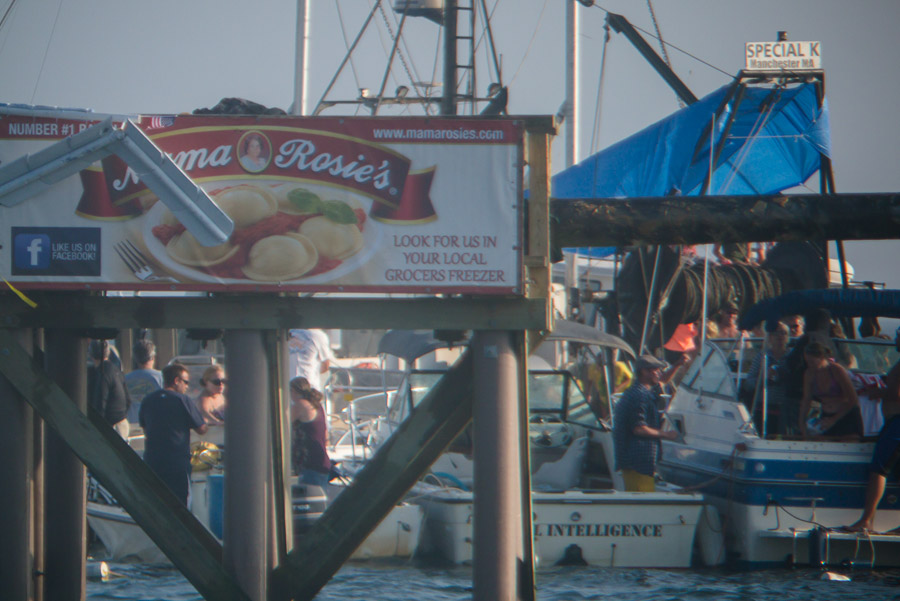
Photographing an ocean event from the shore. The event this week was the Greasy Pole challenge at the St. Peter’s Festival in Gloucester. For this event, I opted to test something new with a small camera, specifically, my micro four-thirds (MFT) camera, a Panasonic Lumix G3.
All micro four-thirds cameras use an image sensor that is the same size and is half the size of the sensor in my DSLR. A 200mm lens on the smaller camera is like putting a 200mm lens on the larger camera and then cropping the image to ½ size. It is called “crop factor”, but it implies that the smaller sensor size makes a 200mm lens seem like 400mm. Image quality of my MFT camera is very good, but significant image noise is present at ISO 800 (because the image sensor jams pixels into a much tighter space).
My zoom lens for MFT goes up to 200mm. For whatever reason, neither Olympus nor Panasonic offer a real teleconverter for MFT. So I tried a 1.7x teleconverter that threads on to the front of the lens. If we ignore the fact that the sensor is small, the result is akin to 1300mm. Or considering the small sensor size, it is like shooting a full-frame camera with a 680mm lens and then crop the image to one half size (you get fewer pixels, but it looks like zoom).
[Click on any of the included images to see a larger view.]
The sample images shown abive are (1) without the teleconverter and (2) with the teleconverter. The teleconverter is worse than I had hoped; it causes very significant loss of sharpness and contrast. Is this acceptable? No, not for me. But the teleconverter was a remnant piece of equipment (from a deceased video camcorder) that was collecting dust at home and cost me nothing to try it.
Without any teleconverter, but image is cropped
The last image shown here is shot without the teleconverter and then cropped to achieve the same perspective as though I had used the teleconverter. The result has far fewer pixels than originally captured by the camera. Using computer software, I then artificially increased the size of the image, to arrive at a 10-megapixel image with far better image quality than when shot with the teleconverter.
So, for situations like this one, where auto-focus is not particularly important, I come to the same conclusion as before. An old/used telephoto lens for any SLR, with an adapter to fit it onto a four-thirds or micro four-thirds camera.
And my best MFT solution that includes auto-focus, would be the Panasonic 100-300/4-5.6 Lumix G Vario (cost roughly $600).
A beautiful morning Thursday in Beverly Massachusetts. I was there not to make photographs, but to get my car repaired. By some accounts, Beverly is the birthplace of the U.S. Navy. In recent news, it is the home of Angie Miller, a finalist in the American Idol singing competition.
After breakfast with a friend and a bit of research at the library, I walked the short distance to Dane Street Beach. A chilly wind was coming in off the ocean, but that didn’t stop some folks from sunbathing.
Returning from the beach, I did not have a “camera” with me, but I did have a mobile phone that has a camera built in. Thought about maybe making a few photographs, but the time was almost noon and the light was bad.
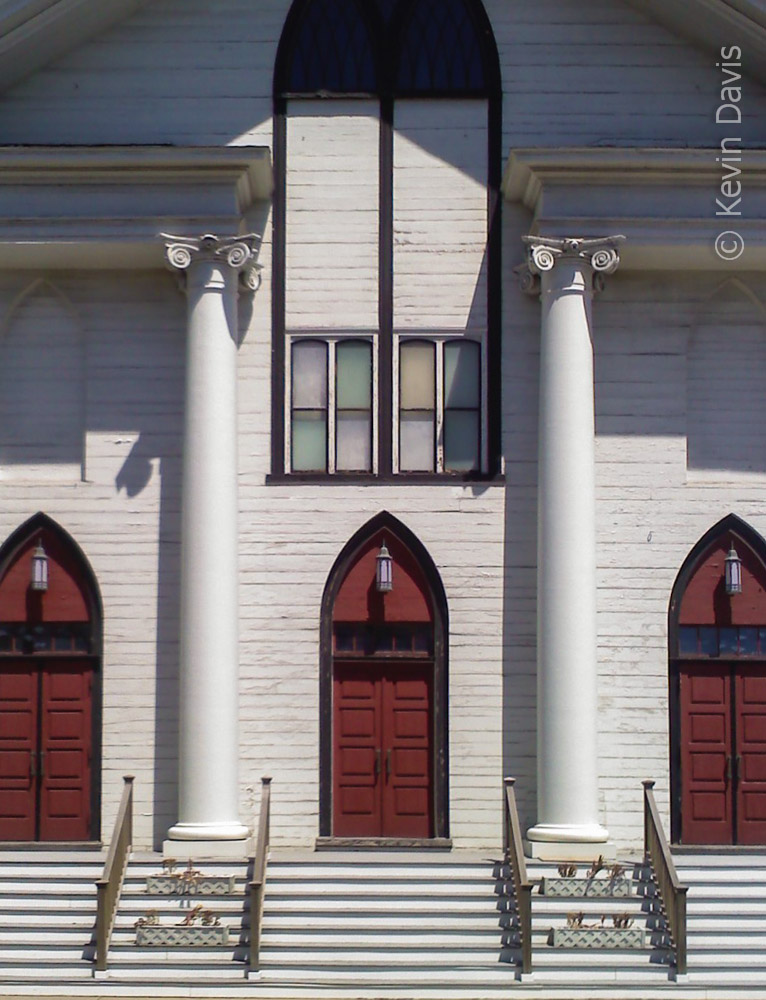
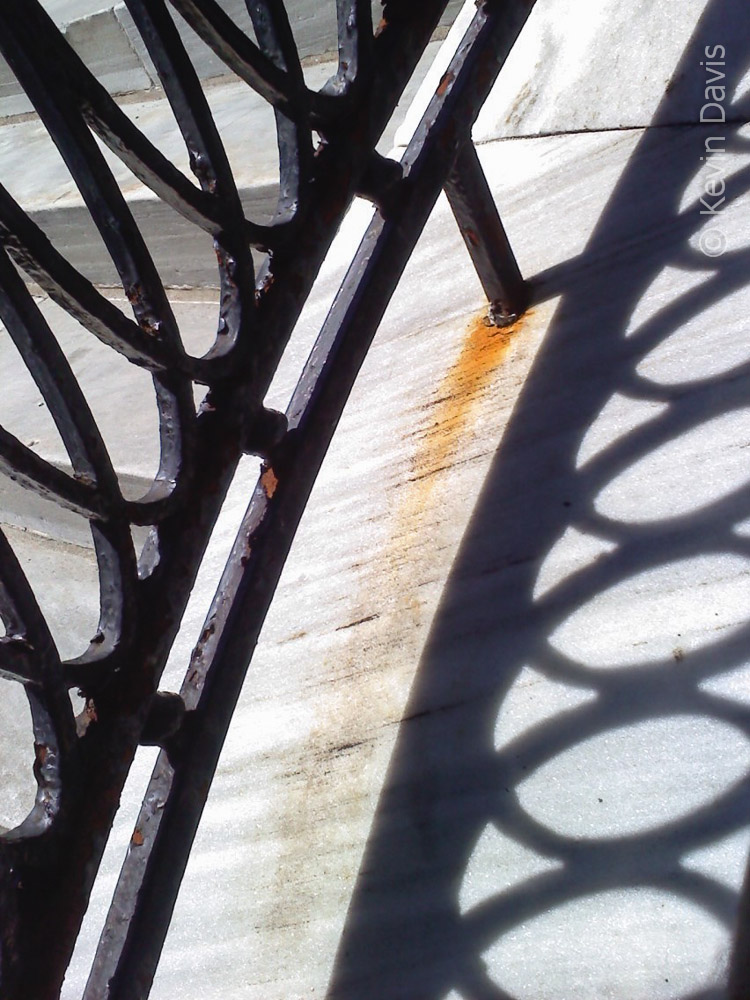
What is “bad light”? It is a term that outdoor photographers sometimes use. “Bad light” is often caused by bright sun directly overhead; it results in high contrast and hard-edged shadows. If you look at a shadow (shadow cast by a tree or a person’s nose, it doesn’t really matter), the edge of the shadow can be a sharp transition from dark to light, or a softer gradual transition. Great weather for a picnic usually implies deep shadows with hard edges.
So, what is a photographer to do when the light is harsh? First, you can make photographs in some shady spot; within the shade, the contrast is not as high, shadows are more subtle or perhaps disappear entirely (everything is under the same shadow).
Second, you might photograph subjects that are naturally high contrast. So, on my walk back to the auto repair shop, I shot the two photos attached here.
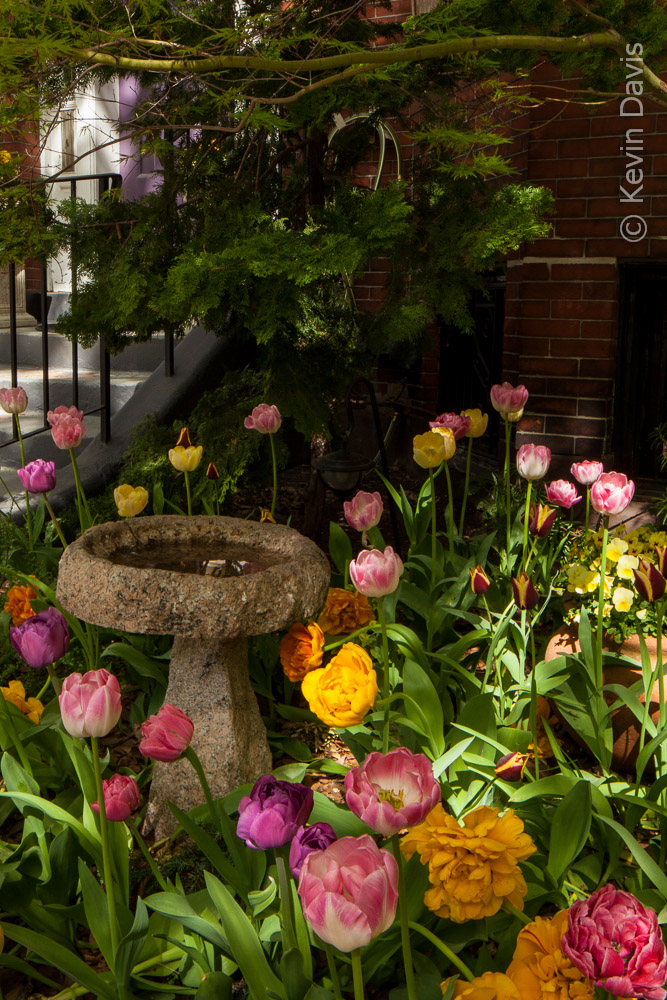
Boston is buzzing with the bright colors of flowers and flowering trees. Hands down my favorite time of year in Beantown.
Boston Spring Blooming
The crown jewel is probably Boston Public Gardens, but there is much more. The Esplanade along the Charles River is bursting with flowering trees … and B.U. students out enjoying the sunshine.
In the narrow streets of Beacon Hill, you can find some surprising small displays. For photography, be aware that the light changes dramatically in these tight spaces sheltered by tall brownstones.
A long winding stretch of busy roadway known as The Riverway skirts along the edge of the Emerald Necklace. At the northern end, close to Kenmore Square, are the Kelleher Rose Garding and Fenway Victory Gardens. (Though, there’s not much to see right now at the Rose Garden; too early for roses.) Heading south into Jamaica Plain, an hour or two at the Arnold Arboretum is always nice.
My friend Charlie drives a taxi in the city of Boston; he doesn’t much care for the busy heart of the city. But as I occaisionally make time to walk the streets, I am frequently surprised by gems of natures splendor, whether planted by the city or by residents tending what small patch of ground is available to them.
Having a need to get some prints done quickly, I employed a print lab that offered the paper I wanted at a good price. Unfortunately, they overcharge for 2-day shipping and also charge a $25 fee for a rush order. Really? $70 for rush processing + shipping? One of these cost penalties is understandable, but the sum of these two penalties was disturbing. Maybe a different lab would do the job without one of these two penalties?
I returned to a lab that I had used a month ago. Speaking with the lab via telephone, they told me I must upload the file within 60 minutes to get it into the processing queue. After consulting the shipper’s web site (UPS), they quoted me only $20 for 2-day shipping and no apparent surcharge for rush processing! But the paper choices are different and the print cost is significantly higher, compared to lab#1. In the end the total cost would be just a bit less, not much. I did login and upload the file, but then I could not seem to place an order. Their website allowed me to upload the file, but then the site navigation was confusing and I could not figure it out. (Which is odd because I had used this site just one month ago.) At this point, I was experiencing a lot of anxiety because of the time pressure.
Returning to lab#1, I completed the ordering process. Then sent a courtesy email to lab#2 because they were watching to receive my rush order (which I abandoned). Ten minutes later, someone from lab#2 telephoned me because he saw the upload and called to help. Sorry, but it was too late.
Lesson 1: When push comes to shove, never ever underestimate website ease-of-use.
Lesson 2: For rush jobs like this, I need to print myself rather than outsource to a print lab (incurring shipping delays, shipping costs, and rush processing fees).
Having sent out two sets of images, each to a different lab for printing, I have received both sets of prints. They all look great. Both sets were printed on archival inkjet paper, but two different brands … Epson Premium Luster for the sports images and Museo Silver Rag for nature/landscape. Premium luster is a lightly coated paper with a very slight pearl texture. Although I have seen Museo Silver Rag referred to as luster, I am inclined to say that it is semi-matte (one notch below luster), with a subtle sheen and subtle paper texture. The density of black color is not as good on Silver Rag (compared to the Epson Premium Luster), but is quite good considering this is an uncoated paper. In retrospect, I am very happy with both choices.
Acadia National Park
For sports images, I mounted each to a pure black presentation board. The presentation boards were pre-cut to size and are solid black through the core. From the print lab, each print had a broad white border; I trimmed down the borders to maybe 1/16 inch before mounting to boards.
For nature images, I did not want black or white, so I selected an off-white color mat board. General-purpose mat board can be inexpensive, but depends upon the particular board. Sheets 32×40” may cost less than $9. But this is only practical if you have the tools to easily and accurately cut the boards.
All said and done, including shipping, 32 prints cost me more than $400. Mounting boards cost an additional $1.20 – $2.00 per print. A spray-can of adhesive can cost as little as $10 for non-archival and as much as $20 for acid-free archival. Because a portfolio is not meant to last forever, there is no point in spending extra dollars for acid free adhesive or acid-free mounting boards.
If you have a set of images, is that a gallery or a portfolio? To my thinking a gallery can be any set of images, they need not even be related in any strong way. In contrast, a portfolio is a very closely edited collection of 20-30 images, your very best.
A portfolio can be presented in many ways, but foremost in my mind are these four: contained in a book, individual prints, digitally on a web site, or digitally on a tablet computer. Today, a professional photographer probably needs at least two of these four. Most recently, I have been working on a print portfolio. The last time I did this was years ago. (I should probably burn those old prints because they cannot hold a candle to my recent work.)
The last time I created a print portfolio, the prints were all made on chromogenic paper … chemically treated paper that is light-sensitive and processed with chemicals to permanently fix the image onto the paper. These types of prints are still very common, can be very inexpensive, and can create stunning images. The image can be projected onto the paper either using traditional film enlargers or digital enlargers, such as a LightJet. Chromogenic prints are continuous tone, unlike inkjet/giclée prints.
Bicycle race
For my new portfolio, I am employing only giclée (a.k.a. inkjet) prints. These types of prints offer far more options with regard to the paper. There are dozens of paper manufactures, each offering a variety of surfaces, textures, and contrast characteristics. It’s all very confusing. Photographers, who print often, have experience with several papers and have learned a few favorites for different types of images. But that’s not me.
After a ton of research, I selected a specific paper and a lab that offered this paper at a reasonable price. But before uploading my images to a print lab, I thought to check the image via soft proofing. Because printed images are dramatically different than images displayed on a computer monitor, soft proofing is a software feature that compensates for paper and ink, then shows on a computer monitor an approximation of what the print will look like. I downloaded a color profile specifically for the paper I had intended to use, then displayed the soft proof using Adobe Lightroom. The result was absolutely awful. My best efforts were not enough to make the image look good, and I ultimately abandoned the paper, did more research, and selected a different paper.
Very briefly, let me say that a single print 11×14” or 8×12” can cost anywhere from $13 to $60, depending upon the particular lab, how much personalized care they give to each print, and the particular paper you choose. (If you buy multiples of the same print, the additional copies typically cost less than the price for the first one.) Compare this to a print on chromogenic photo paper, which might cost only $4 to $15.
When I began to place my order for prints, they informed me that my preferred paper was no longer available. Again, I returned to research and selected a third paper. Because the lab offered a specific set of papers, I limited myself to just those papers that this lab supported. Having already uploaded my images to the lab, I spoke directly with someone at the lab, to confirm that my paper choice was right for these particular images. (Specifically, I did not want glossy or matte, but rather something in between that would provide very good color saturation and contrast.) Unfortunately, the lab also informed me that the prices advertised on their web site had all been changed recently (they had neglected to update the web site). Despite the paper changes and price increases, I chose to stick with this particular lab rather than go back to research and look for another lab that might possibly be less expensive.
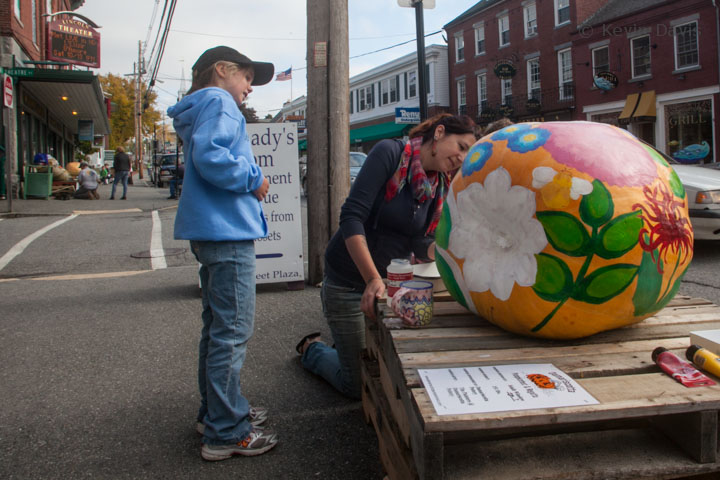
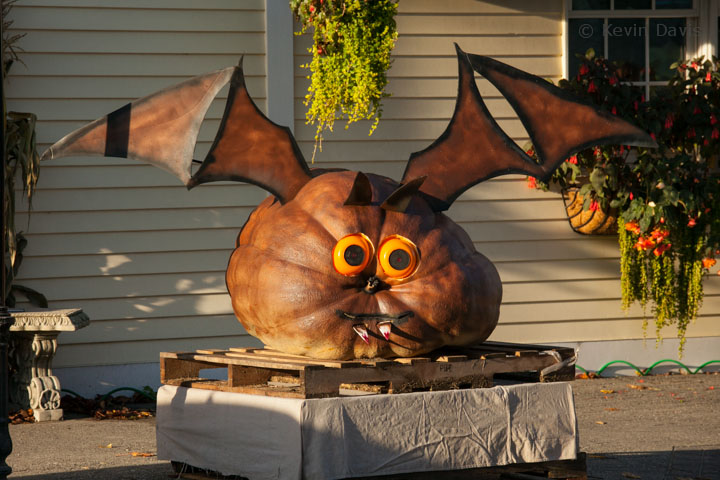
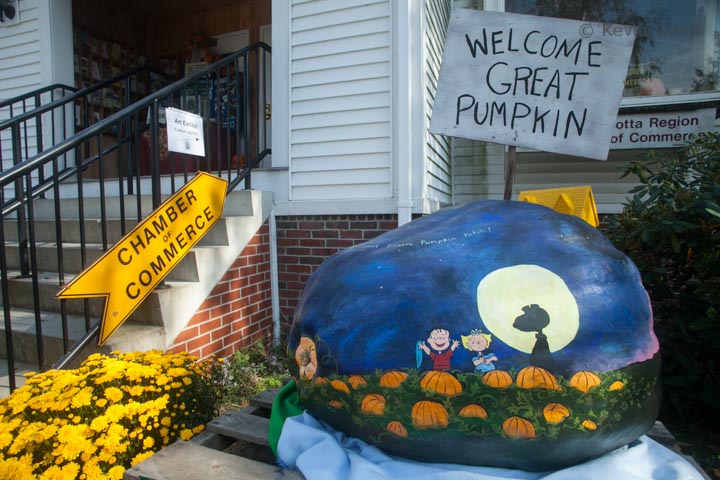
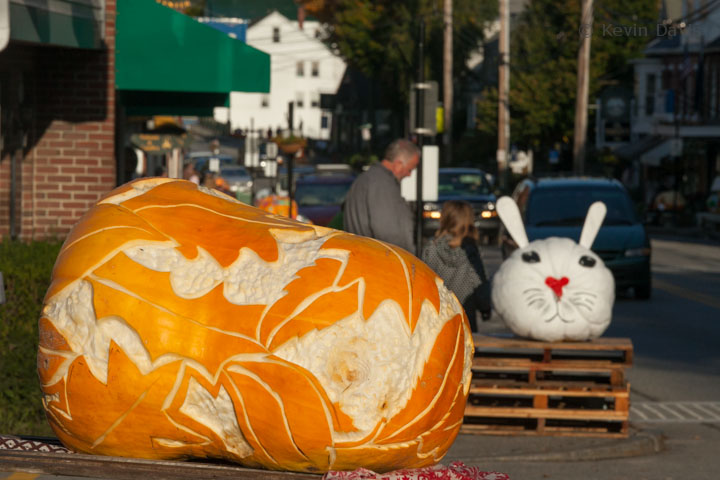
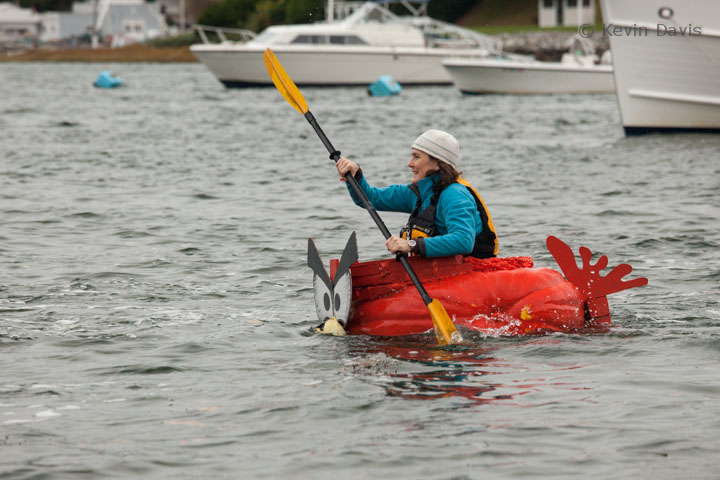
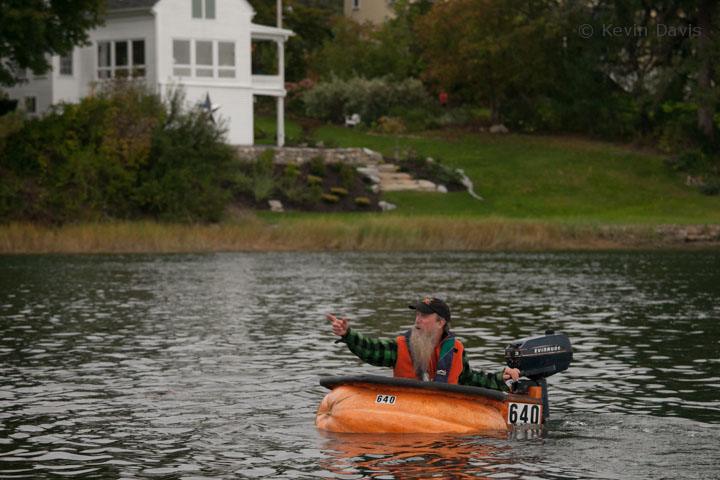
At the tail end of September this year, I photographed a couple of events where giant pumpkins were weighed in competition. I overheard a fellow make a comment about one particular giant, “There’s something weird about that one.” I leaned over and offered my own uninvited follow-up comment “There’s something weird about all of those pumpkins.” The guy grinned and enthusiastically agreed, “Yeah, they’re all huge!”
Giant fruits and vegetables are generally peculiar. But a crowd of a hundered people eagerly watching pumpkins get weighed on scales, that’s peculiar too. Even more surprising is the uproar and applause when a new contender puts up a number (on the scale) bigger than any other. Stranger still, some people carve out the giant pumpkins, float it in water, climb inside and paddle it as a boat. I love New England!
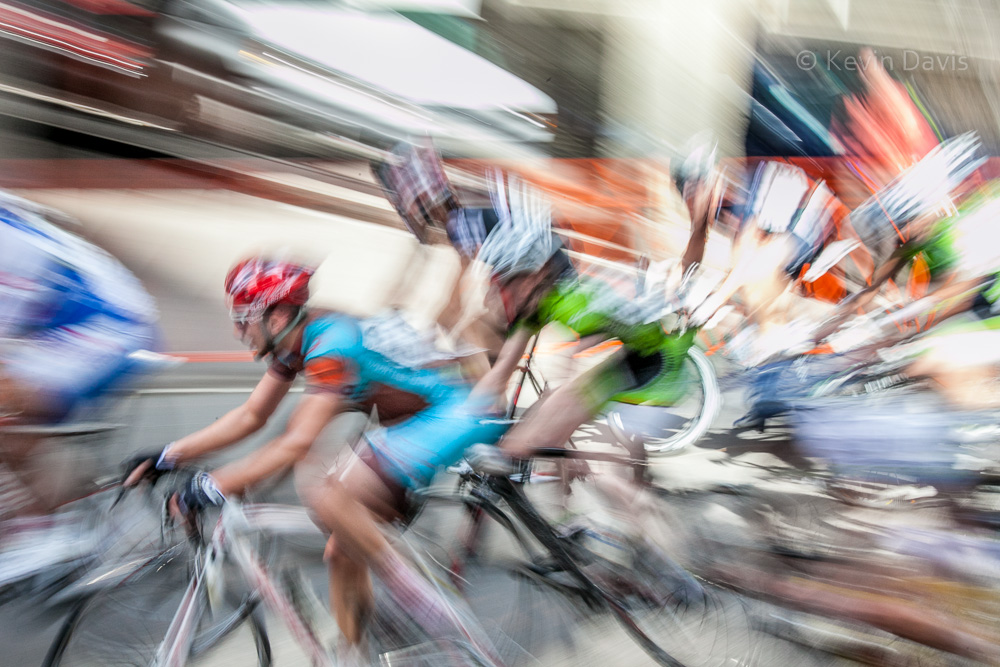
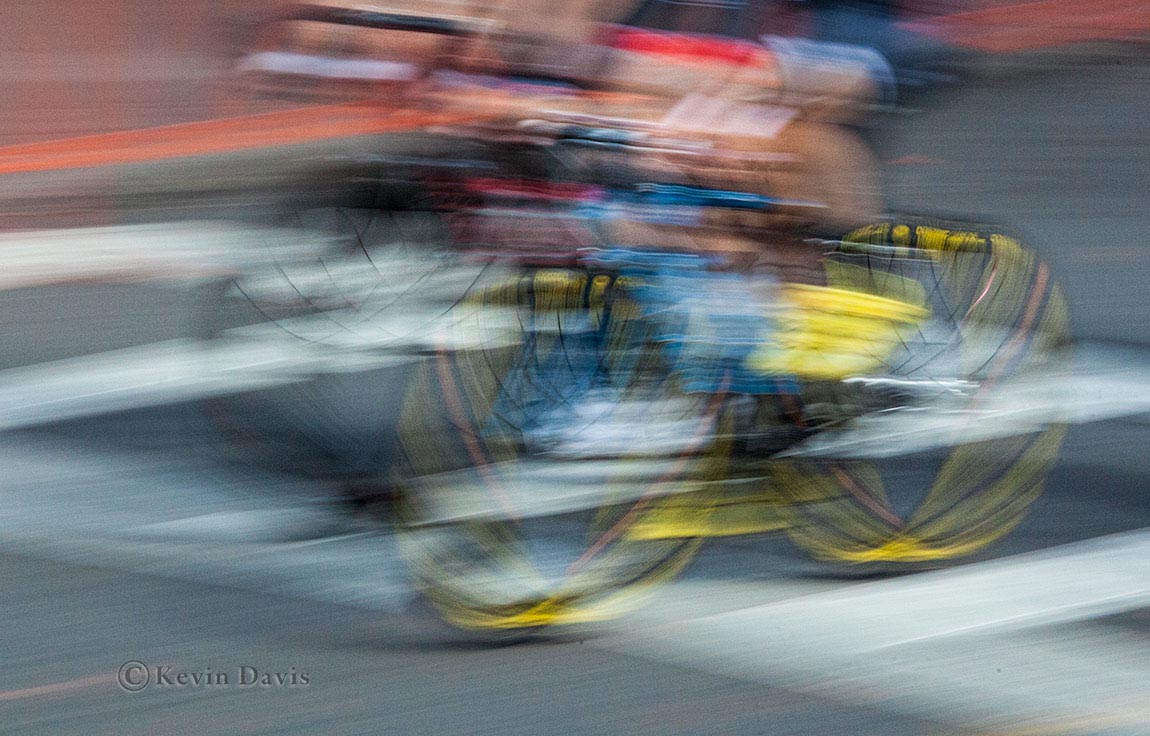
Most sports photography employs fast shutter speeds, to freeze the action. But where there is motion, I want to show that. A slow shutter speed allows movement to blur. Here are a couple examples from a bicycle race last weekend in Boston.
(click on either image for a larger view)
While it is tempting to quote specific shutter speeds that I use, it really doesn’t work that way. The shutter speed depends upon (1) the speed of the moving subject, (2) the angle at which the subject is approaching, and (3) how much blur I want. So I might start out somewhere between 1/30 to 1/100 second and then chimp the back of the camera to see what it looks like.
(Chimping means frequently reviewing captured images on the camera display panel. If it looks really good, you scream like a chimp.)
To get basic motion blur, you lock down the camera such that the background is sharp and the moving subject shows blur. Alternativley, you can pan the camera to follow the the subject, such that the subject does not blur but the background does. Another technique is to actively zoom the lens during the exposure, which you see in the first image here, using a shutter speed of 1/4 second. A shutter speed of 1/4 is quite long, but the subject here is moving head-on towards me. Compare that to the second image, the subject is moving side-to-side perpendicular to the camera and the shutter speed is 1/30 second.
The blur effects shown here is achieved entirely in the camera. As the subject does not stay in one spot, the light reflecting off the subject is diminished. In post-processing (e.g. Photoshop or Lightroom), it is typically necessary to selectively restore brightness, contrast, and color saturation. In the second image here, I have intentionally over-stated the contrast and color saturation.
With a bit of experimenting, you can get some interesting abstract results. Motion blur photography is not new, but it is a bit unusual. It has been said, if you want to excel, if you want to stand out in a crowd of talented people, don’t simply mimic what everyone else is doing.