Until now, 4K (also known as ultra-high-definition, or UHD) was the realm of cinema … movie theaters. But 4K televisions began to enter the retail stores in 2013. We will surely see more of this in 2014.
In parallel, we have been seeing consumer cameras that support 4K, many of them selling for less than $1000 US. This poses a technical challenge for small film makers … a data rate four times higher than HD. (May have to update your video-editing equipment.)
Here is the history of 4K cameras costing $5000 or less.
Blackmagic Production Camera (2012)
JVC GY-HMQ10 (2012)
GoPro Hero3 (2012)
GoPro Hero3+ (2013)
Sony PXW-Z100 (2013)
Sony FDR-AX1 (2013)
Sony A7s (2014)
JVC FDR-AX100 (2014)
JVC GY-LSX2 (2014)
Panasonic GH4 (2014)
Panasonic FZ1000 (2014)
The lens included with a GoPro Hero 3+ has a focal length of 2.5 mm and has a field of view akin to a 14mm lens on a full-frame DSLR. It is “fisheye”. You can set the camera to a narrow capture setting, but this will crop the image, discarding some of the pixels.
Replacing the lens mount in a GoPro Hero3+
Super wide is fine if you are attaching the GoPro to your helmet or a surfboard. For me, the stock Hero3 lens is too fisheye and I want a narrower field of view.
There are many available replacement lenses, but most lack the quality required to capture 10 megapixel images. Most lenses are good enough quality to capture 5 megapixel images. I found two companies that sell a 5.4mm lens, having a 60 degree field of view, and rated as being sufficient for 10 megapixel images: RageCams (USA) and Vision/Dimension (Germany).
On paper, these two products seem equivalent, but there are a few important differences.
The 5.4mm lens from RageCams is easier to install. The lens from Vision/Dimension requires disassembling the camera and replacing the lens mount.
If you do it yourself, the cost of a 5.4mm lens from RageCams is higher than the cost of a 5.4mm kit from Vision/Dimension.
If you don’t want to mess with the camera yourself, you can pay RageCams to do the replacement for you. The cost of parts and labor is more than the cost of the GoPro Hero3+ camera
The Vision/Dimension lens includes infrared filter for daylight use. The RageCams web site states that an IR filter will cost you an extra $55.
Huh? What’s the problem deal with the lens mount?
The lens mount is a standard M12 lens mount, a simple threaded barrel. To change the lens, you theoretically unscrew the existing lens and screw in another lens. However, if I understand this correctly, there is a subtle quirk to the GoPro lens mount, which may mean that your new replacement lens will not focus properly. The lens mount is a female-threaded tube, but apparently the full length of the tube is not threaded; the front-most part lacks threads. If your new replacement lens has a short barrel length, you will be able to screw it in, but the distance to the image sensor will be too close for proper image focus. The 5.4mm lens from RageCams has a slightly longer barrel than the same lens from Vision/Dimension.
Lens replacement options
Option 1:
Ship your GoPro Hero camera to RageCams and have them replace the lens. This is both the simplest option and the most expensive option.
Option 2:
Buy a replacement lens from RageCams and replace it yourself.
To grip the lens with a pliers, you first need to remove the decorative plastic ring on the outer body of the GoPro. This part is quite simple and you can find videos on YouTube that show how it is done.
The lens is fixed in place with a bit of thread-lock. To unscrew the lens, you probably have to apply heat to the lens with a heat gun (without melting anything). Again, there are helpful videos on YouTube.
Option 3:
Buy a replacement kit from Vision/Dimension and replace it yourself. This kit includes the lens and a lens mount that is fully threaded. Replacing the lens mount is a bit difficult www.vd-shop.de/instruction-replace-gopro-lens-a-80.html
Option 4:
Install an adapter that allows you to use almost any lens. While this enables the use of high-quality lenses and allows the use of variable-aperture lenses, it necessarily makes your GoPro physically larger and heavier. Refer to this link: www.back-bone.ca
I bought the Vision Dimension kit. While the price of this kit seems significantly less than cost of a comparable lens from RageCams, there are hidden costs. Shipping from Europe to the USA cost me $45 and then I received a bill from Federal Express for an import duty of $20. In the end, buying from Vision Dimension did not save me as much money as I had thought it would.
Looking at the photo at the top of this blog, you can see “10MP” (10 megapixel) is printed on the lens. Also printed on the lens (not visible in this photo) is “IR Cut”, indicating that a daylight IR filter is present.
Disassembling a $400 camera, that has really tiny parts, is not a task for the faint of heart. A video from Vision Dimension demonstrates the procedure; you can view that before making your decision. To avoid this hassle, pay a bit more money and buy the lens from RageCams.
If you replace the lens yourself …
You have somehow replaced the lens … and now need to adjust it for sharp focus.
Start by setting the approximate focus; load the GoPro app on an iOS or Android device to achieve a live preview of what the camera is seeing. When the focus looks good, here is an extra step to ensure that the focus is as good as possible.
Temporarily make a few markings on the outside of the lens; I attached five small pieces of white tape. Adjust the lens to each mark, one at a time, and capture a photograph.
Study the resulting photos at high magnification and pick the sharpest photo. Adjust the lens to the corresponding lens mark.
Repeat the procedure on a finer scale. I captured three photos, one on center, one slightly to the left, and one slightly to the right.
You do need a dab of glue or thread-lock to prevent the lens from turning inadvertently. You might put this on the threads before inserting the new lens. I was afraid that this might inhibit lens adjustment, so I adjusted the lens first, then unscrewed the lens, added a dab of glue to the threads, and re-inserted the lens. The trick to this is to count the number of revolutions when unscrewing the lens, so that you can easily get back to the point of sharp focus. Personally, I counted 13.5 turns of the lens. (In retrospect, the glue I used did not set quickly and I could have applied it before first inserting the lens.)
Finally, note that the new lens sticks out a bit further from the Hero camera body, compared to the original lens. It’s probably not going to fit in the waterproof housing. The Vision Dimension kit includes a spacer ring that you put between the Hero and the housing. The RageCams web site advises that you remove the foam cushion from the rear door of the housing.
In the end, I am disappointed with the image quality from the Hero3+. While I believe this is largely due to the camera, I have not as yet proven/disproven the claim that this lens is good enough for 10 megapixels.
1) FLASH TRIGGER GUIDE – MANUAL RADIO TRIGGERS
2) FLASH TRIGGER GUIDE – TTL & REMOTE MANUAL RADIO TRIGGERS
3) PORTABLE FLASHES WITH BUILT IN RADIO TRIGGERS
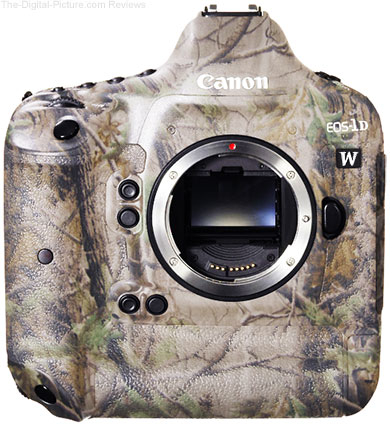
TheDigitalPicture.com breaks news of a top-of-the-line DSLR for wildlife photographers.
Reading some of the features, I arrived at … Birds in-flight focusing mode!? Wow! Animal Eye Tracking!? Amazing. A built-in sound generator to produce animal calls. Incredible … maybe literally, not credible.
But of course, today is April Fools day. Well played, Sean and Bryan.
A year ago, I almost bought an Epson 3880. Last week, I did buy an Epson printer, but opted for the 3000 instead of the 3880. Here is are a few reasons:
(1) the 3880 will print 17×22 paper, which is one size larger than the 3000
(2) the 3000 will feed both sheet paper and rolls
(3) the 3000 has built-in wi-fi
(4) the 3000 costs $300 less than the 3880 (after mail-in rebate)
(5) both the 3000 and 3880 use medium-size ink cartridges
specifically, 80ml volume (compared to 59ml for the R2000)
Between the years 2000 – 2010, Epson has been the standard bearer among semi-pro inkjet printers. Canon has since taken some of that market share from Epson. The Canon Pixma Pro-10 competes directly with the Epson 3000 and is comparably priced. The Canon may print a bit faster and includes 50 sheets of paper with the printer (worth $45).
Epson also offers larger printers (for 17″ wide and 24″ wide paper); Canon does not.
The real cost of a printer is not the printer itself, but the cost printing. The per-sheet cost is primarily a combination of paper and ink. For more info regarding per-sheet cost: http://www.redrivercatalog.com/cost-of-inkjet-printing.html
(The cost of paper can vary widely as there are many choices today for paper.)
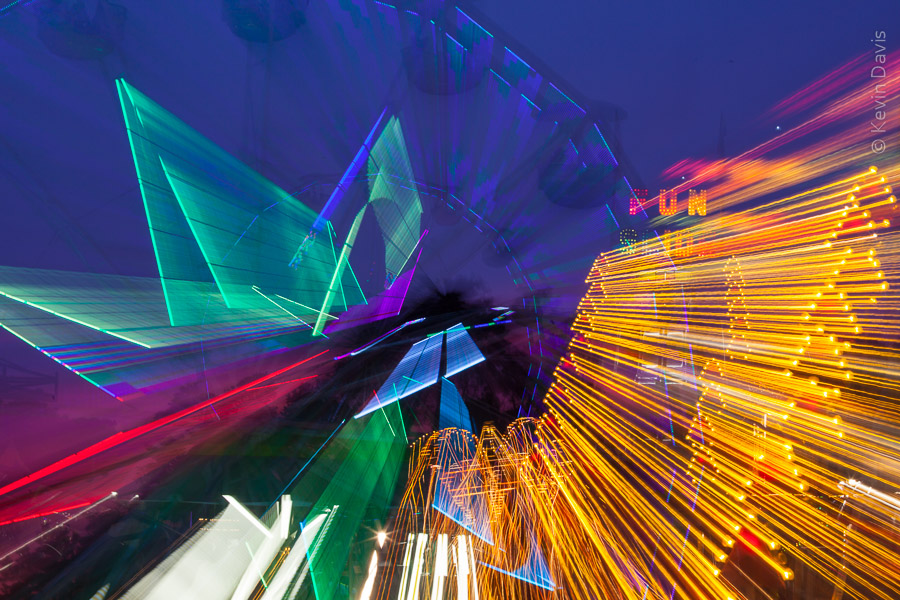
Bright colors. That’s pretty much what it’s all about when photographing amusement park rides. Daytime photographs pale in comparison to night photographs of the rides.
Long exposure of midway rides (at Washington County Fair)
This photo here is from the Washington County Fair (Rhode Island). Although there was a fabulous pink sunset, I did not see it in time, so missed that photo opportunity. In this photo here, there is just a hint of the pink color in the bottom left background.
The best time is dusk. Just after the sun sets, there is still some light in the sky, but it’s darker than the lights, resulting in some contrast.
OK, so … it’s dark. Can your camera make a photograph? Sure. But you may need a long exposure, longer than 1/30 second. This shutter speed for this photo here is 1.3 seconds.
A slow shutter speed implies the camera could move slightly during the exposure and mess up the photo. So you need to stabilize the camera. Tripod is the right solution to this problem, but in this example here I had a monopod (just one leg). With the camera on the monopod, I braced it against something solid. A telephone pole will do; in my case, it was an above-ground pool, on display near the midway.
The last ingredient in this photo is, of course, the zoom effect. With the camera set to 2-second delayed shutter. I pressed the shutter button and poised my hand on the zoom ring of the lens. When the shutter clicked open, I rotated the zoom ring.
One of those posts regarded the yet-to-be-available and much-to-be-desired Canon 200-400; that lens is now available.
MFT zoom lens without a teleconverterMFT lens with 1.7 teleconverter
This week, I have had two different needs for a long lens.
Photographing wildlife. I will be at a game ranch next week. I must choose and rent some long telephoto glass. (If this need arose more frequently, I would purchase/own it.) What lens choices available to me?
First, note that there is generally a trade-off between any fixed-focal-length lenses (non zoom) that have wide aperture (gathers more light) and zoom lenses, which provide variable focal length but sacrifice a bit with regard to aperture. I would love to have multiple long lenses at my disposal; but if I must choose one, then the flexibility of a zoom is the safe choice.
Zoom options. Top of the list is that new 200-400. Hands down, that is the lens I want to shoot with. The problem is the price tag; the rental fee is over $600 and purchase price is more than $10,000. This leaves me with a choice of the Canon 100-400 f/4.5-5.6L, Canon 100-300 f/4.5-5.6L, that same 100-300 plus a 1.4x teleconverter, or possibly a third party lens such as Sigma.
Multiple reviews across the internet all agree that the 100-300 is a superior lens compared to the 100-400. Unless you need the extra reach of 400mm. Apparently the 100-300 is not compatible with Canon teleconverters. So I chose the 100-400.
Photographing an ocean event from the shore. The event this week was the Greasy Pole challenge at the St. Peter’s Festival in Gloucester. For this event, I opted to test something new with a small camera, specifically, my micro four-thirds (MFT) camera, a Panasonic Lumix G3.
All micro four-thirds cameras use an image sensor that is the same size and is half the size of the sensor in my DSLR. A 200mm lens on the smaller camera is like putting a 200mm lens on the larger camera and then cropping the image to ½ size. It is called “crop factor”, but it implies that the smaller sensor size makes a 200mm lens seem like 400mm. Image quality of my MFT camera is very good, but significant image noise is present at ISO 800 (because the image sensor jams pixels into a much tighter space).
My zoom lens for MFT goes up to 200mm. For whatever reason, neither Olympus nor Panasonic offer a real teleconverter for MFT. So I tried a 1.7x teleconverter that threads on to the front of the lens. If we ignore the fact that the sensor is small, the result is akin to 1300mm. Or considering the small sensor size, it is like shooting a full-frame camera with a 680mm lens and then crop the image to one half size (you get fewer pixels, but it looks like zoom).
[Click on any of the included images to see a larger view.]
The sample images shown abive are (1) without the teleconverter and (2) with the teleconverter. The teleconverter is worse than I had hoped; it causes very significant loss of sharpness and contrast. Is this acceptable? No, not for me. But the teleconverter was a remnant piece of equipment (from a deceased video camcorder) that was collecting dust at home and cost me nothing to try it.
Without any teleconverter, but image is cropped
The last image shown here is shot without the teleconverter and then cropped to achieve the same perspective as though I had used the teleconverter. The result has far fewer pixels than originally captured by the camera. Using computer software, I then artificially increased the size of the image, to arrive at a 10-megapixel image with far better image quality than when shot with the teleconverter.
So, for situations like this one, where auto-focus is not particularly important, I come to the same conclusion as before. An old/used telephoto lens for any SLR, with an adapter to fit it onto a four-thirds or micro four-thirds camera.
And my best MFT solution that includes auto-focus, would be the Panasonic 100-300/4-5.6 Lumix G Vario (cost roughly $600).
An electronic flash strobe, powered by AA batteries, will slow down sooner than you or I expect. Recycle time, the time from one flash to the next, will become longer as power is drained from the batteries. (And if you use rechargeable batteries, those usually do not hold out quite as long as standard alkaline batteries.) How can we prolong optimum power for a flash? The short answer is: a better power source.
If you’re using a flash that’s built-in to your camera, then you are probably stuck. The only thing you can do is carry an extra supply of charged batteries and change the battery more frequently. The good news is you may be able to use a more powerful external flash, even though your camera already has a built-in flash. But to answer that for your particular camera, you have to check the owner’s manual.
If you’re using an external flash, powered by standard AA batteries, many flash strobes will allow you to use an alternate power source, instead of the the battery compartment built in to the strobe. There are a variety of possibilities and some can have a price tag much greater than the strobe.
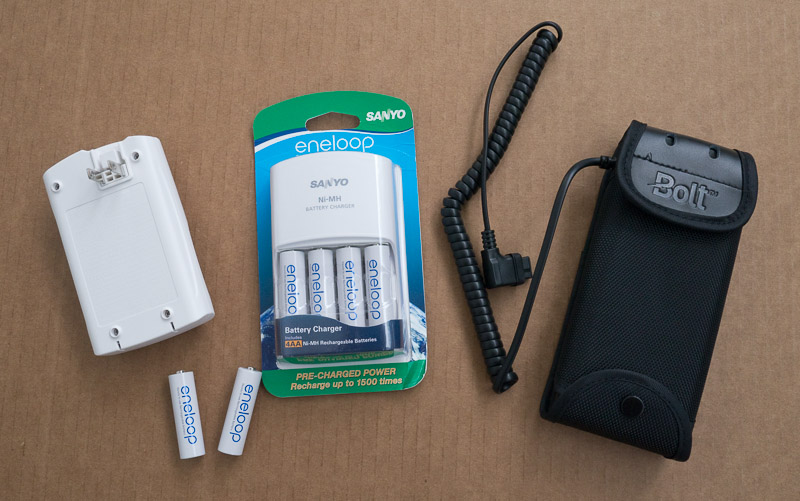
External battery pack for Canon flash
Typically, I am using a Canon 580EX2 strobe, which has a power socket allowing for an external power source. Canon sells an external battery pack CP-E4, which holds 8 AA batteries, twice as many as the built-in battery compartment of the 580EX2. However, with a retail price tag around $150, the CP-E4 seems over-priced. Seriously, it is a simple battery holder, no fancy electronics involved.
Thankfully, there are less-expensive 3rd-party equivalents. If you use one of these, it likely invalidates your Canon warranty and Canon will not guarantee that their products will function with a non-Canon battery pack. The 580EX2 instruction manual states: “If non-Canon, external power pack is used, it may cause malfunction.” Does that scare you? It shouldn’t. Canon is simply protecting themselves from liability if you happen to connect a defective power supply.
I’ve been using a Bolt CBP-C1 battery pack; like the Canon battery pack, the Bolt holds 8 AA batteries, but the price tag is half that of the Canon. It has proved to be durable and reliable for photographing sports, weddings, and stage performances. I have been using rechargable Sanyo Eneloop batteries (NiMH). Using just one set of batteries, I have not yet run out of power during any shoot.
One little trick to be aware of regarding the use of an external battery pack with the Canon 580EX2 strobe. When an external battery pack is connected, the strobe may rely in-part upon the external batteries and in-part upon batteries installed directly in the flash. If you have particularly weak batteries installed directly in the flash, the flash may fail when those batteries fail. You can change this. Among the cryptic custom function settings, you will find custom function 12. Set custom function 12 equal to 1 (on) and the flash will exclusively use the external battery pack.
Very excited to photograph freestyle ski jumping this week!
For photography, winter can be dull, particularly if there is no snow … the grey season, the season of sticks without leaves. But NOT this week. This is an international event sponsored by FIS, the international skiing authority. The ORDA has authorized official Press credentials, which allows me a bit more freedom of movement than regular spectators, to achieve shooting angles I need to create good images.
Because the freestyle ski jump competition is preceded by a mogul competition, I will arrive a day early in order to catch the mogul competition. Although I don’t “need” this shoot, I’m going to be right there and it could be fun (I simply haven’t thought about it much). One extra night’s lodging is all it takes … and maybe rent a pair of skis so I can reach the top & middle of the slope.
Logistical arrangements have required a significant investment of time.
Lens selection & rent
A couple of (smaller) equipment purchases
Contact ORDA for official Press credentials
Find a place to stay (difficult because I made a reservation only 1wk prior to the event)
Couple minor things regarding my car (before driving 500 miles)
(The weather forecast for Friday is *COLD*.)
I have selected a 70-200mm f4 zoom lens and the Canon EF 400mm f4 DO lens. Having never used the DO lens before, this is a bit of a gamble. However, at 4.27 lbs, the DO is significantly less weight than the 400mm f2.8 or even the 300mm f2.8.
While the weight of the 400mm DO is hand-holdable, I want a monopod so that I do not have to hand-hold it. But my cheap old monopod (really cheap) is not enough for this task. So I purchased a new monopod (Feisol). With this particular item in mind, I went to my local photography shop (Hunt’s Photo & Video) and looked at the other options (Benro, Induro, etc). Lucky for me they did stock the Feisol and that is ultimately the item I had in-hand when I left the store.
When used on snow, a monopod (or even a tripod) will punch a narrow hole in the snow and sink, because of the very narrow footprint. A few monopods do have an expanded “foot”, but the model I selected does not have this feature. So I cut up the plastic lid to a peanut butter jar and attached that to the bottom of the monopod.
Some photographers are very brand-loyal and biased, particularly regarding Nikon and Canon. All I can say is … thank goodness for Canon AND Nikon, competetively driving each other to create excellent cameras.
Here are a few highlights from the history of DSLR cameras.
(intentionally ignoring digital backs for medium format cameras)
1991 Kodak DCS-100 … first DSLR (based on a modified Nikon body)
1995 Canon/Kodak DCS 3 … Kodak digital camera back on a modified Canon body
1999 Nikon D1 ………. first practical/affordable DSLR for mass market
2001 Canon 1D ……… landmark for sports photography; 8 fps and reduced shutter lag
2002 Canon 1Ds …….. first DSLR with a full-frame sensor
2004 Fujifilm FinePix S3 Pro… first DSLR with live preview
2007 Nikon D3 …………. Nikon’s first Fx (full-frame) DSLR
2007 Canon 1DS mkIII .. 21 megapixels, first DSLR to exceed 18Mp
2008 Nikon D90 ……….. first DSLR to shoot 720 HD video
2008 Canon 5D mkII …. first DSLR to shoot 1080 HD video
2012 Nikon D3200 ……. 24 megapixels, Nikon’s first DSLR to exceed 18Mp