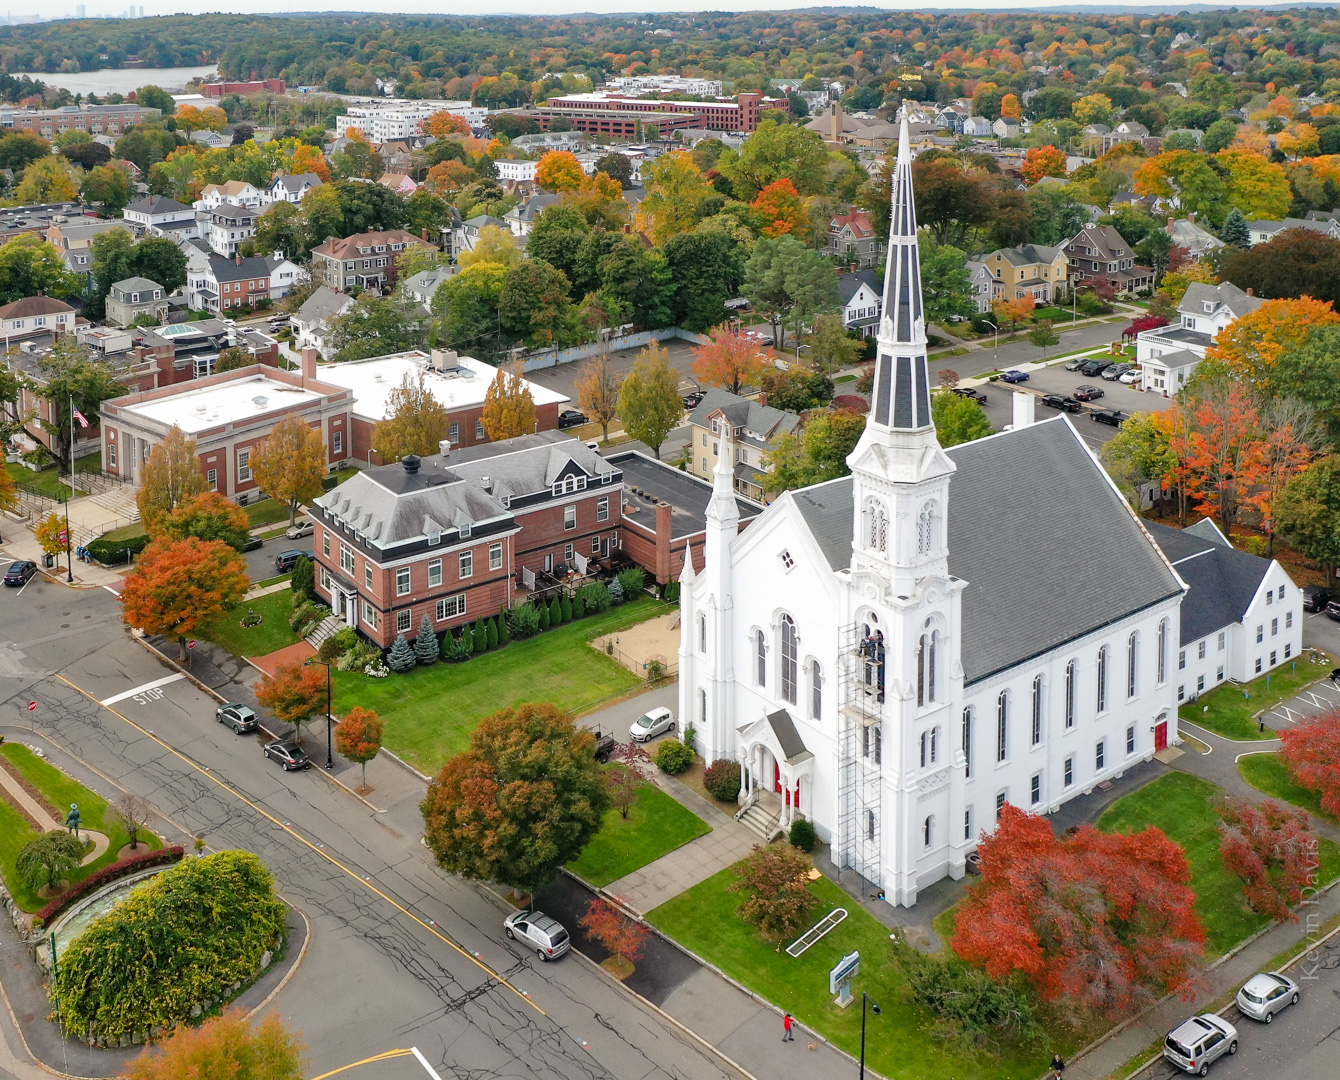
Mid-October 2018, I photographed Wakefield Massachusetts using an aerial drone. As the autumn colors were not well developed yet, I returned a week later to make the same photo again. That’s the first photo here, October 23, 2018.
Some renovation work was in progress that day. You can see scaffolding against the steeple and one of the tall windows is laying on the grass.
In the evening later that day, a lightning storm passed through the area and this presumably sparked the fire that destroyed the First Baptist Church. The next day, I again put the drone in the air to photograph the aftermath of the fire.
Today is the one-year anniversary of that fire, so I returned to again make the same photograph, but without the church.
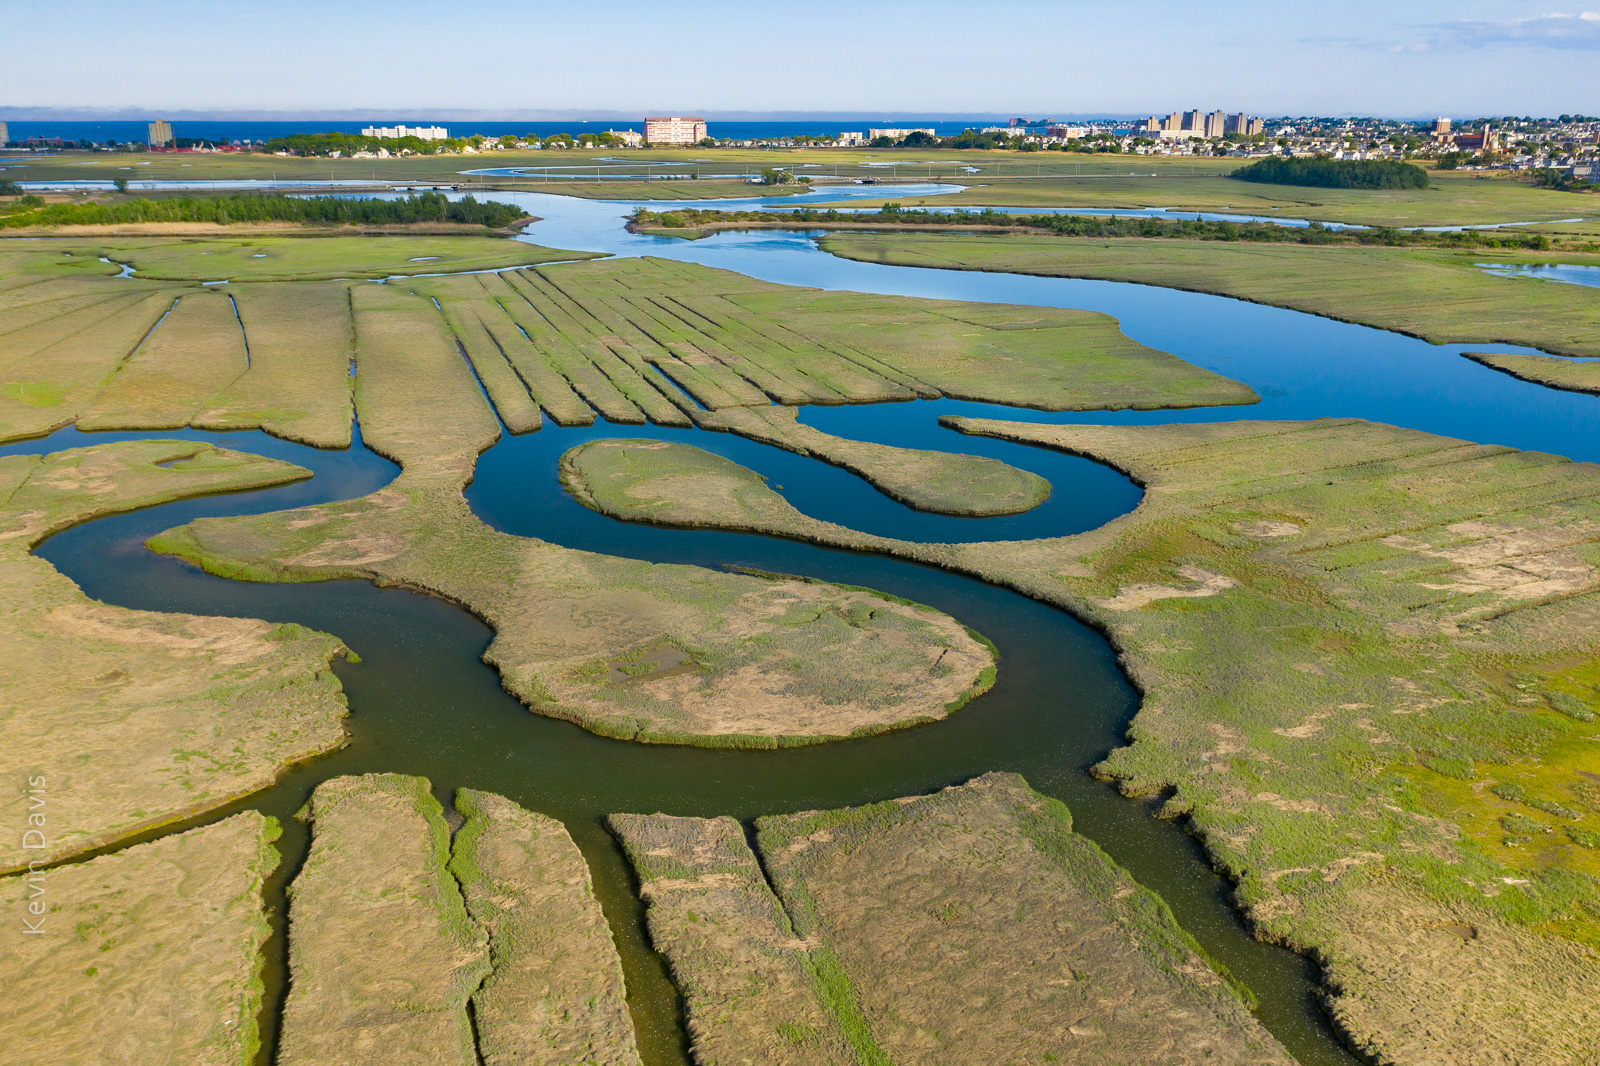
Rumney Marsh photographed with an aerial drone (sUAS)
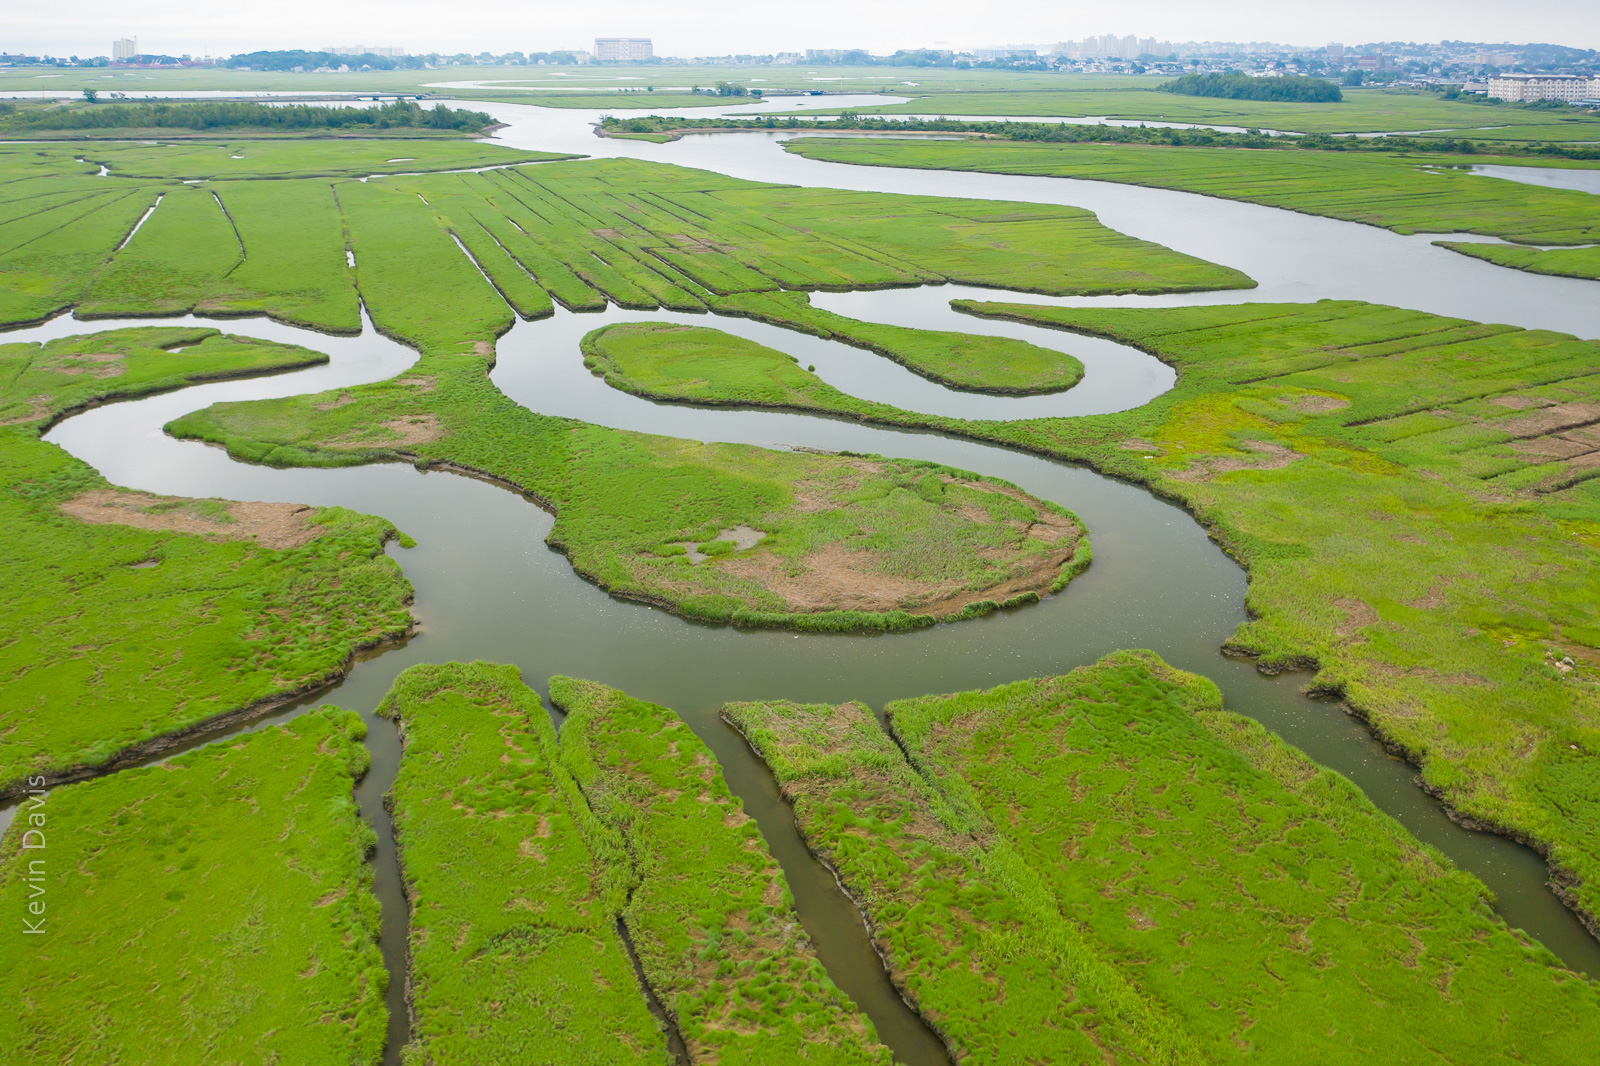
I first visited Rumney Marsh in the month of May. Although I discovered some great photo compositions, the marsh was mostly brown. Presuming that the grasses would fully transform the landscape into a greener palate, I vaguely planned to return some weeks later. Shown here below is my first image from the May visit:
Rumney Marsh in the month of May
.
This year, spring in New England has featured more rain than normal. Dry days are a bit like currency – have to spend them judiciously. Five or six weeks later I returned to the marsh on a dry day and found the green grasses covered the land, as expected. Unexpectedly, coastal clouds were lingering and the water reflected white sky (not blue sky).
Rumney Marsh (June) under cloudy skies
While that is a nice image, … I had imagined the water reflecting a blue sky. So, I returned later that same day after the clouds cleared away. That final image is shown at the top of this article.
In all three instances, the image required post-processing for HDR, particularly because the buildings on the horizon were too bright. So each of these three instances is a combination of multiple exposures, simply to control the dynamic range of light.
The day of the new Mavic 2 release one week ago, numerous sites and YouTube channels already had reviews prepared. DJI had judiciously provided new Mavic 2 drones to people who would do these reviews. I have no intention of rehashing that stuff. I am interested specifically in the camera performance. Because I am largely interested in image quality, we’re talking about the Mavic 2 Pro, not the Mavic 2 Zoom. As for video quality, we’ll have to leave that for another day.
For high-quality images, DJI now provides this choice: Phantom 4 Pro, Mavic 2 Pro, Inspire 2 with Zenmuse X5s, Inspire 2 with Zenmuse X7. The unique value proposition of any Mavic is that it folds down to a size that can fit in a camera bag. A Mavic drone and remote controller requires physical space similar to a DSLR camera body and a zoom lens.
For photographers, is the upgrade worth it, from Mavic Pro to Mavic 2 Pro?
Yes, after brief testing this morning, there is no doubt in my mind.
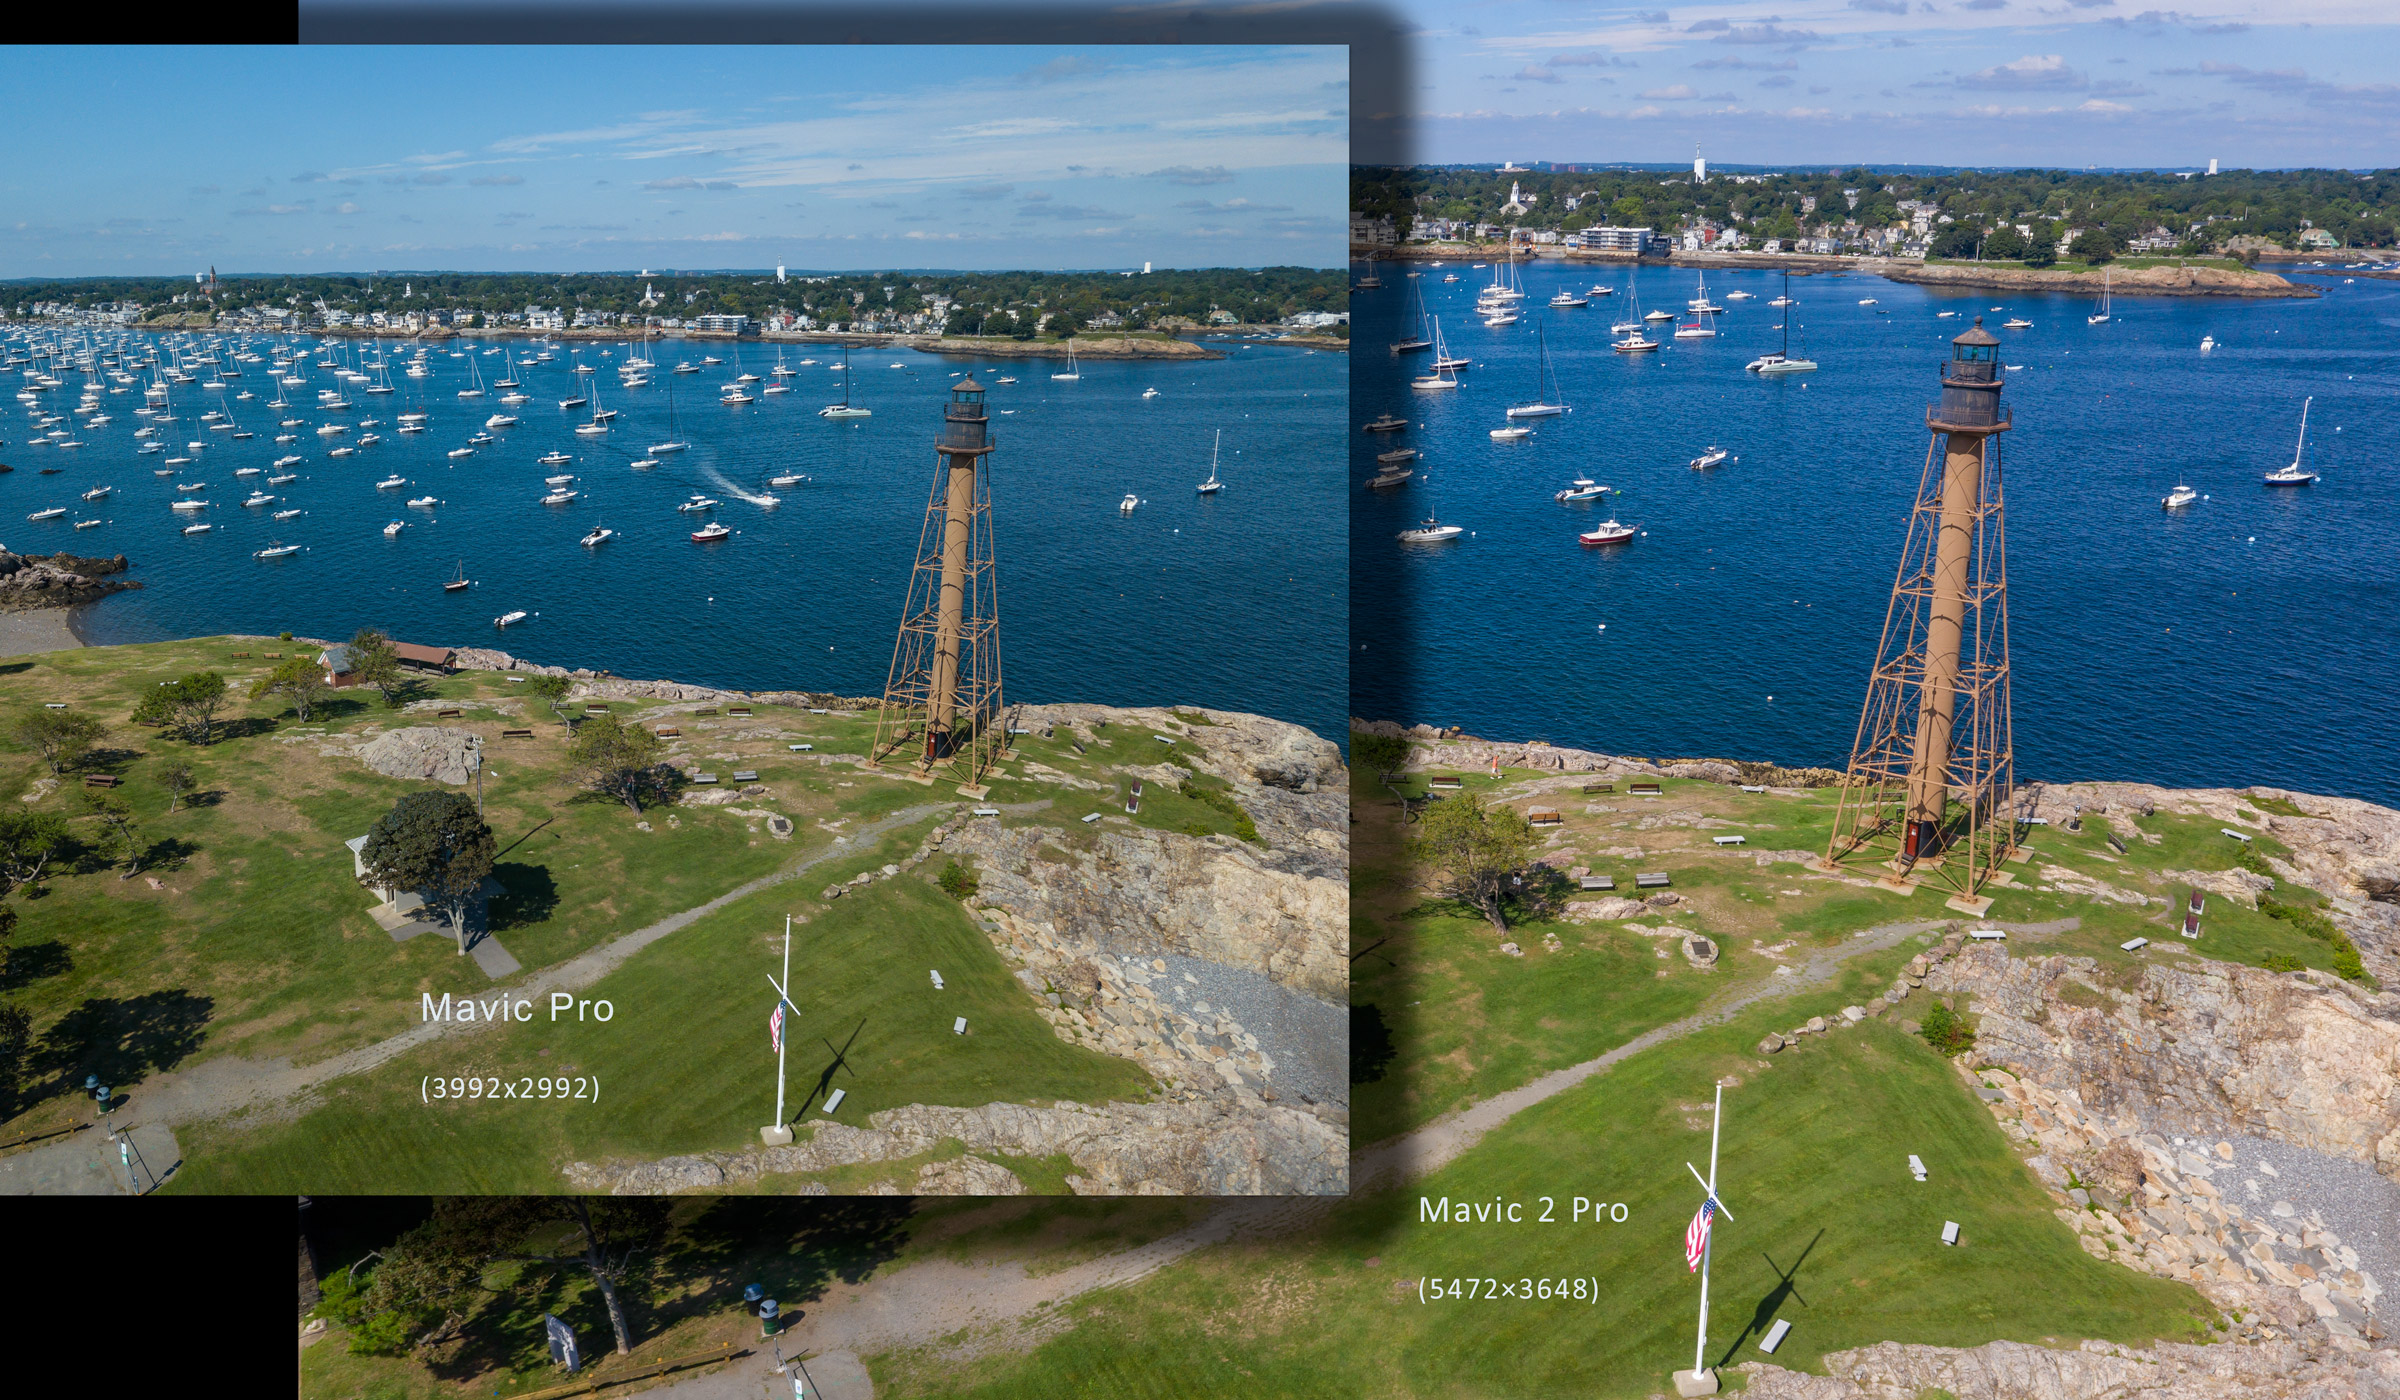
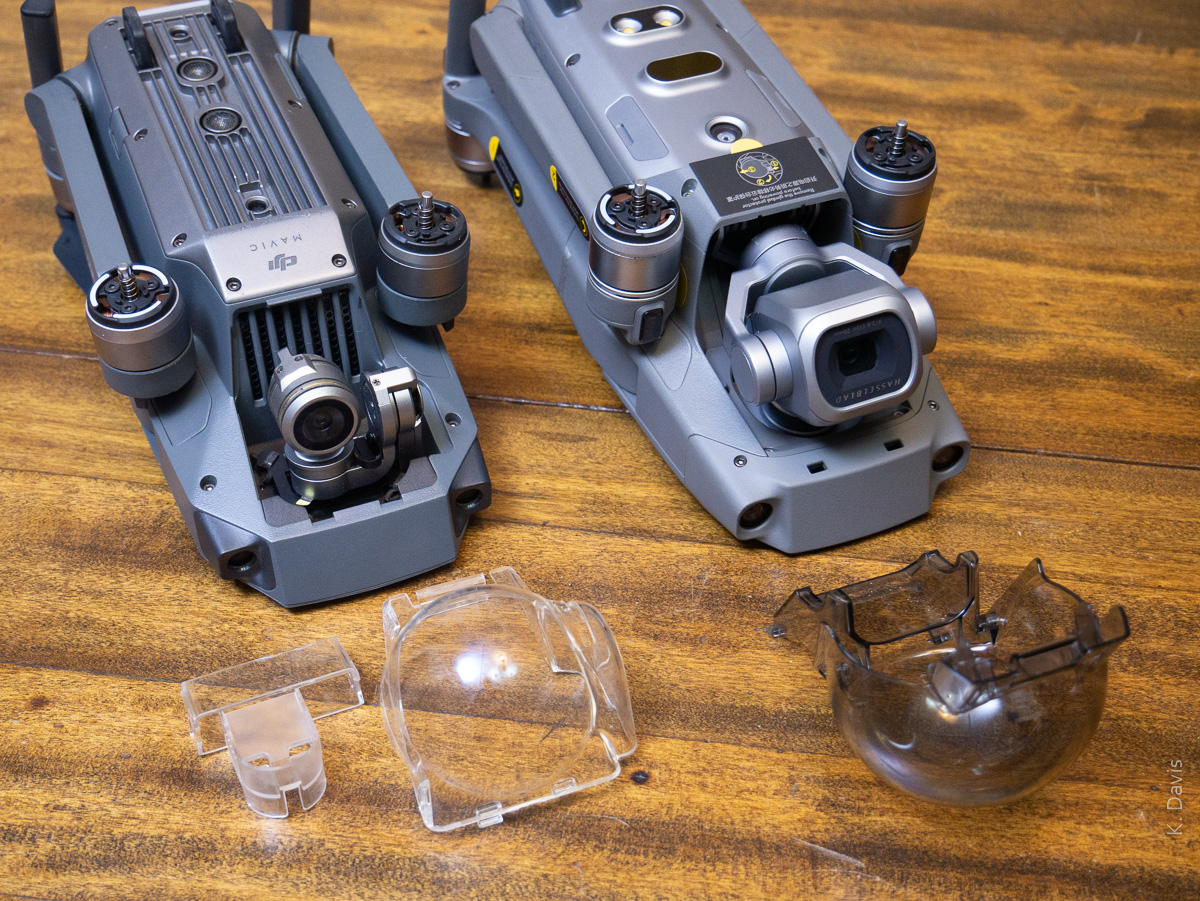
With the advent of Mavic 2 Pro, the camera difference between Mavic and Phantom has been erased. Both the variable aperture (f/2.8 to f/11) and the sensor resolution (5472×3648) are on par with the pre-existing Phantom 4 Pro and superior to the original Mavic Pro. Note that this is a 2:3 aspect ratio compared to a 3:4 aspect ratio of Mavic Pro, Mavic 2 Zoom, and Zenmuse X5s.
Note that camera is new and not exactly the same as P4P. DJI bought a majority stake in Hasselblad a couple years ago and this apparently is the first fruits of that partnership. (Yes, DJI essentially owns the legendary Hasselblad company.)
According to the numbers, the angle of view is a bit different, though I did not notice during actual use. Mavic 2 Pro provides a FOV equivalent to 28mm lens on a full-frame camera. This is narrower than the original Mavic Pro’s equivalent 26mm and narrower than the Phantom 4 Pro’s equivalent 24mm. Despite being less wide angle, vertical lines can still keystone strongly and you may choose to correct for that in post processing.
Here are the problems with Mavic Pro that I hope are improved with Mavic 2 Pro.
Dynamic range in the Mavic Pro was not very good. In high-contrast scenes, highlights can easily blow out and/or the shadows block up. To mitigate this, I have sometimes captured multiple RAW exposures and then post-processed for HDR.
Using RAW capture, if the highlights do not blow out entirely, the camera still fails to resolve details in the highlights. For example, houses with clapboard siding in full sun – the separation of the clapboards may be entirely absent in the image. This seems surprising to me … if the story is true that the RGB color space has finer granularity in the highlight range compared to the shadow range.
Image noise, particularly in shadows. To mitigate this, I have relied upon heavy-handed post-processing. While noise reduction in Adobe Lightroom is very good, there is a price to pay – higher levels of noise reduction can deteriorate details throughout the brightness range.
With high magnification, images lack sharpness. In post-processing, I have found it necessary to apply twice as much sharpening compared to my hand-held cameras.
Color from RAW images is typically worse than any other camera I have used (except perhaps GoPro Hero3) and the images require heavy-handed post-processing. Of course, RAW images from any camera will always require some degree of post-processing.
Blue/red chromatic aberrations. I commonly see this around white baluster railings. Lightroom’s ability to mitigate chromatic aberration typically fails to resolve the problem.
In summary, the Mavic 2 Pro does achieve small improvements in all of these problem areas. So let’s look at some actual images from the new Mavic 2 Pro compared to the original Mavic Pro.
Harbor photographed with both drones
In high-contrast situations such as this scene with white boats and white houses, Mavic 2 Pro still has difficulty retaining detail in the highlights, but is not so bad that it requires HDR techniques to overcome it. It is still necessary to reduce the exposure by 1/3 stop to protect the highlights (this does not jeopardize shadow details) and also apply highlight reduction in post-processing.
[Click on an image to see the full resolution.]
[Images shown here are all RAW and individually post-processed to the very best of my ability using Adobe Lightroom.]
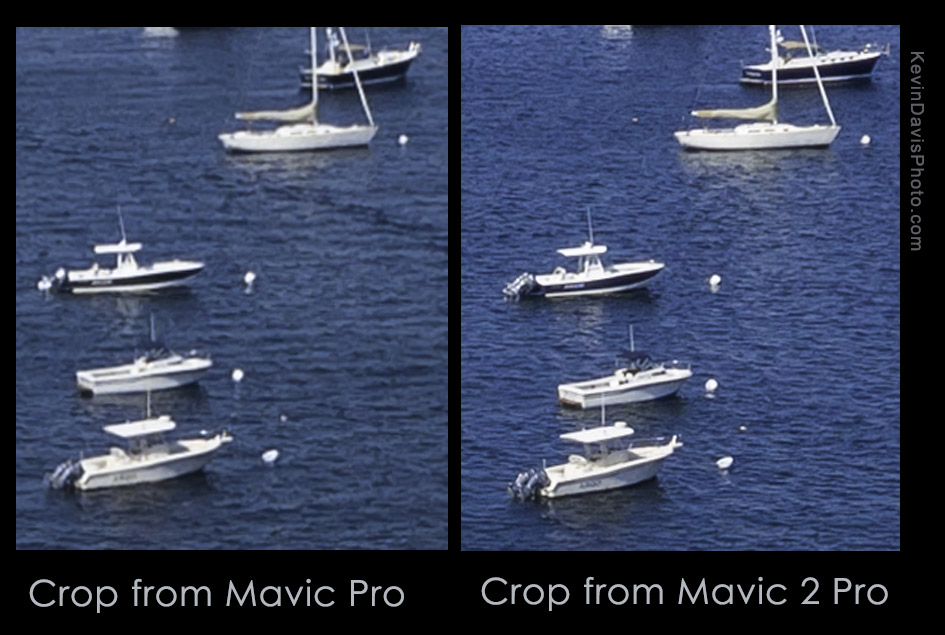
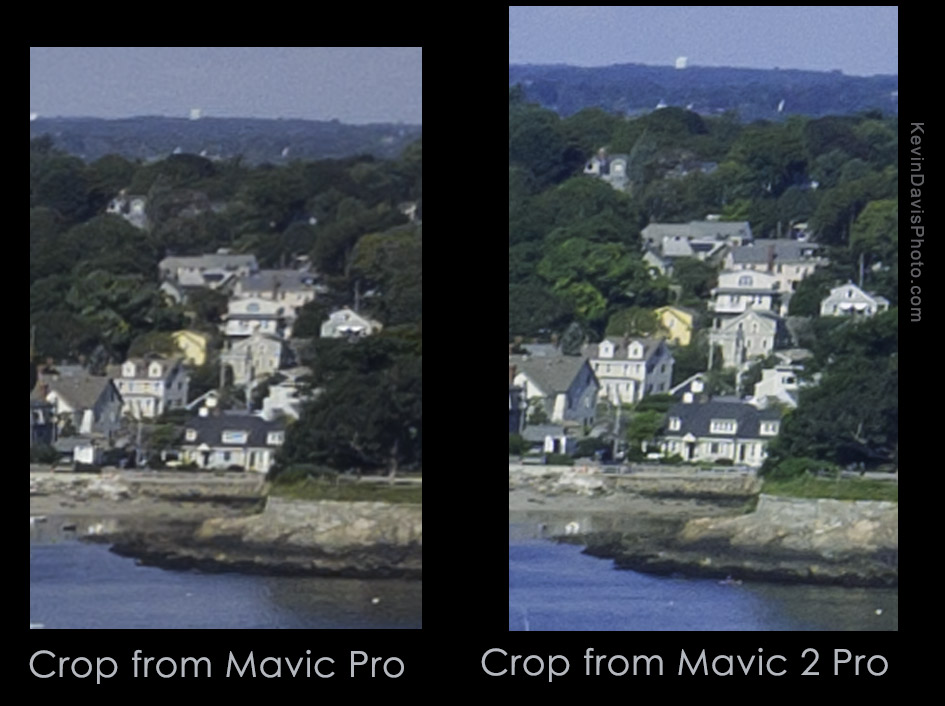
Detail in highlight areasImage sharpness
Noise reduction is still necessary but far less than with the original Mavic Pro.
Color of RAW images is much better, requires less correction.
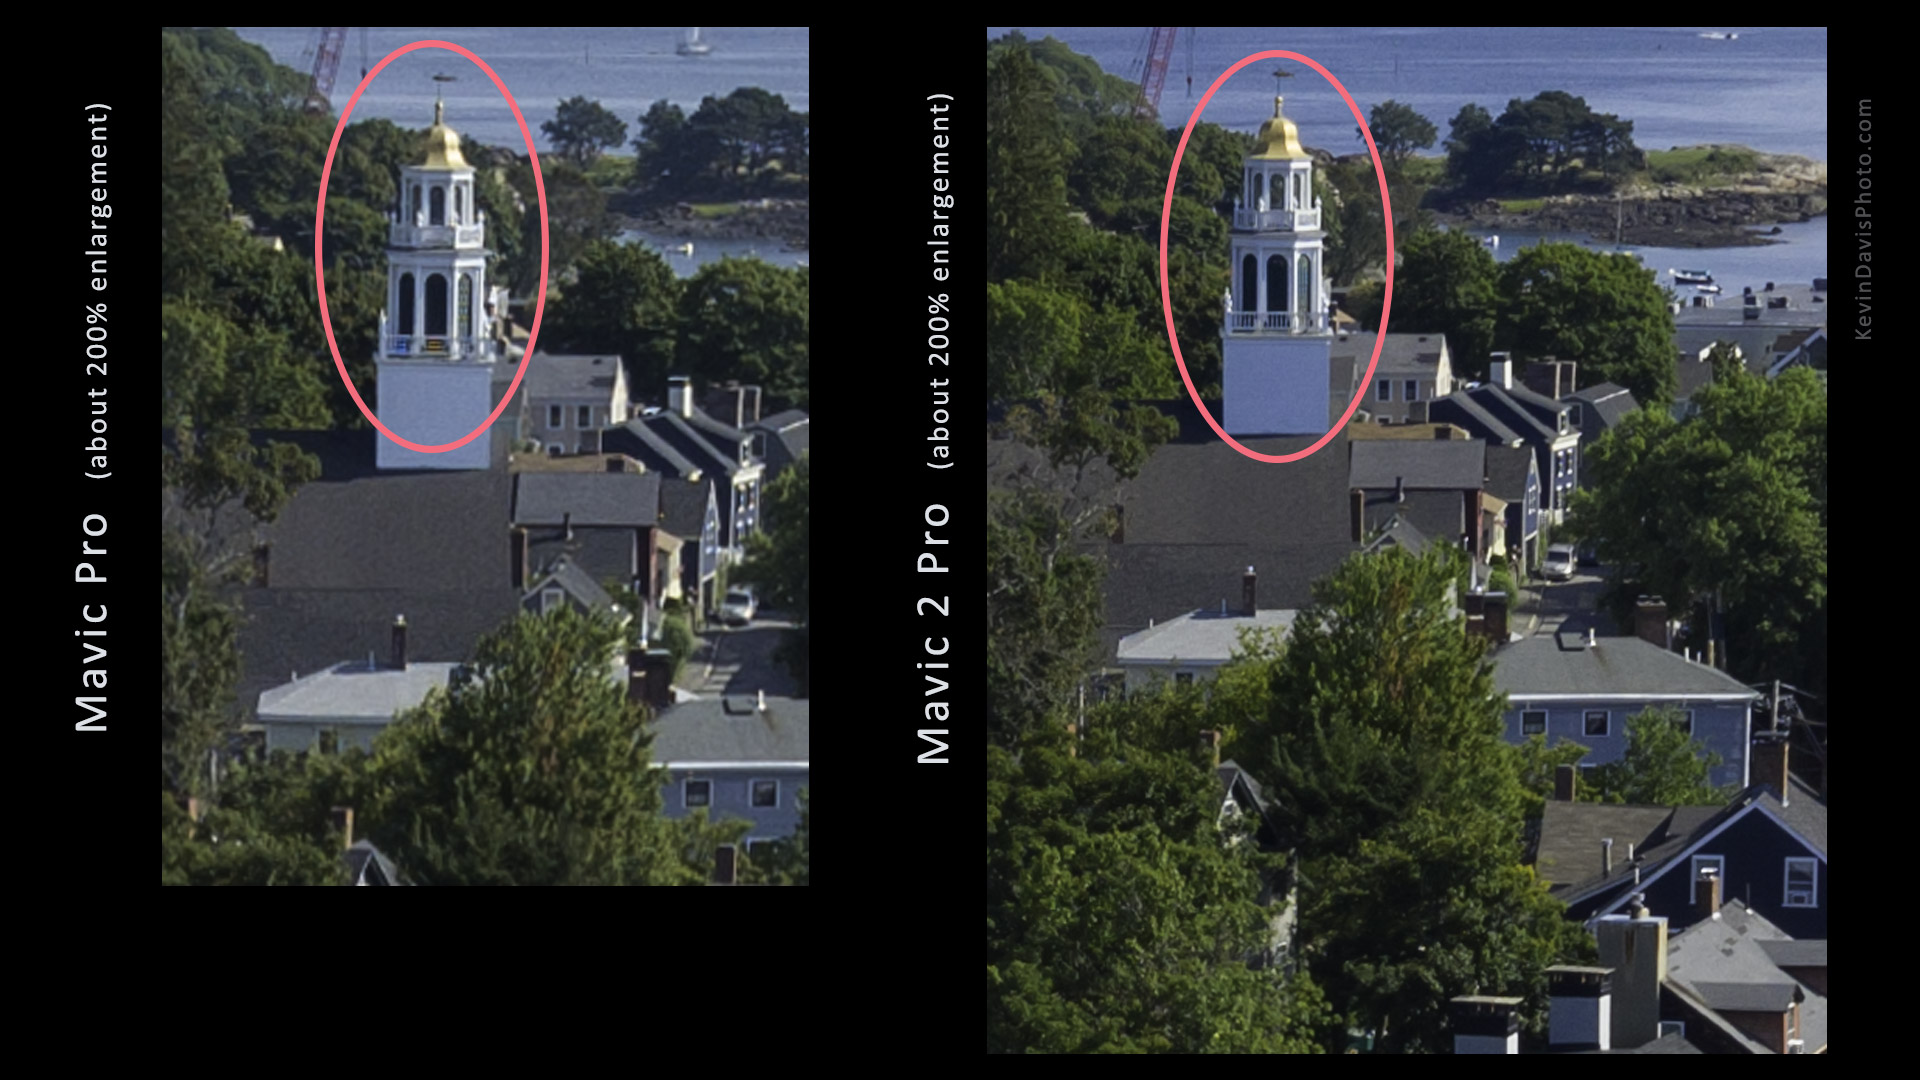
Here’s an example (not a particularly good one) that shows Mavic Pro was unable to resolve the balusters and suffered chromatic aberration. Mavic 2 Pro did not exhibit either of these problems.
Click on the image to see larger version
Finally, a few notes that do not regard image capture.
If you’ve ever fumbled with the gimbal clamp on the original Mavic Pro, or worse yet have forgotten to remove the clamp before powering on the drone, rest assured that the new Mavic 2 Pro does provide an improvement. The gimbal clamp is integrated into the protective dome cover – remove the dome necessarily removes the gimbal clamp. See the photo below showing both the Mavic Pro and the Mavic 2 Pro.
Gimbal clamp
Unlike the original Mavic Pro, the Mavic 2 includes 8GB on-board memory in addition to a micro SD slot. To access this memory from another device, connect a USB cable (included) to the Mavic 2 USB-C port and turn on power to the Mavic 2. (Remember to remove the gimbal clamp before turning on the Mavic.) After having inserted a micro SD card, the DJI GO app prompted whether to use that instead of the on-board memory. I am assuming that we must select one or the other and automatic switch-over is not supported, but I don’t know that for certain.
The transmission system between the drone and the controller is theoretically the most robust of any DJI product to date. Mavic 2 utilized second generation Occusync 2.0, while the Phantom line has yet to adopt the Occusync transmission system. Although Occusync 2.0 reportedly can operate at distances up to five miles, I personally have no need of that. Increased robustness of the signal is welcome, as I have seen unexplainable video signal loss when using the original Mavic Pro.
Photo/picture frames bought from a retail store often include a sheet of clear plastic. This may be the cheapest material possible and you may want to replace it with higher quality glazing.
In photo/picture framing, “glazing” is a generic term meaning a clear sheet protecting the artwork. It may be glass or acrylic, but I have never heard of clear plastic referred to as glazing.
When preparing a photo exhibit last year, some of the frames I purchased included clear plastic sheets and I opted to replace them with non-glare acrylic. However, at the last minute, I ran short of acrylic sheets and shipped two pieces with just the plastic that came with the picture frames.
If you try to buy glazing from a local frame shop or art-supply frame shop, be prepared for sticker shock; it can be very expensive. I buy clear acrylic sheets on-line.
The introductory photo here shows a recent delivery that included some Acrylite P99 and Acrylite OP3 P99. The shipping packages were ruggedly constructed with solid wood edges and built to the exact sizes for the sheets that I ordered.
Glass
Glass can be great, but has limitations. It typically offers the highest level of light transmission and the best resistance to scratches. However, it is both heavy and famously brittle – likely to break if dropped. Shipping framed artwork with glass is quite problematic.
Your local hardware store may sell sheet glass; some stores will cut it to any size you need. But this is typically thin glass for windows. Hardware stores do not generally sell non-glare or UV-resistant varieties intended for framing.
Anti-reflection (non-glare) glass
To reduce reflections/glare, AR glass may either have a surface coating or be laser-etched. Single-sided AR glass is conditioned on one side only. You place that side outward toward the room, while the smooth size faces your artwork. Therein lies the possibility of internal reflections, the artwork reflecting off the glass. Double-sided AR glass is conditioned on both sides; it is typically very expensive.
I have used double-sided etched glass, which was superb; but I later abandoned it because of the expense. For a single-sided AR glass, the brand name I trust is Tru Vue. (Tru Vue offers both glass and acrylic glazing products.)
UV-resistant glass
This protects your art from fading and discoloration due to UV light. This can be important if you intend to display the art in a location exposed to sunlight. It may also be important to protect old documents; it is commonly used in museum displays.
Clear Acrylic
Compared to plastic, acrylic will not turn yellow or brittle with age. Compared to glass, acrylic is less weight and very resistant to breaking. Acrylic is often sold as trade names such as Plexiglass, Lucite, Perpex, and Acrylite. (The technical name is PMMA … polymethyl 2-methylpropenoate or polymethyl methacrylate.)
Each acrylic sheet (weather purchased individually or as part of a complete frame) is typically coated on both sides with a thin protective skin that you must peel off. As this protective skin may be transparent, you may not initially know that it is present. Be sure to remove it before final assembly of your photo/picture frame; if you forget until after the sheet is in the frame, you will have to disassemble everything in order to peel the skin off.
As with glass, your local hardware store may sell clear acrylic sheets, but not non-glare and not UV-resistant varieties.
Clear acrylic sheets are available in different thicknesses. I’ve used 0.098” (1/10th inch) and 0.080”. The latter works perfectly well for sizes up to 20×30. I don’t really see the need for 1/10 inch.
Anti-reflection (non-glare) acrylic
Under the Acrylite brand, the anti-reflection version is called P99.
UV-resistant acrylic
Under the Acrylite brand, anti-reflective sheet products include FF3, UV3 and OP3. FF3 is manufactured with a casting process (not extruded) that is less expensive than the other two. OP3 filters out a bit more UV light than does UV3. Some third-party vendors neglect to inform you which specific product they are selling.
For a combination of both anti-reflection and UV-resistance – that is OP3 P99. I believe FF3 is only available with high-gloss surface, not non-glare.
Acrylic photo prints
A photograph can be directly printed onto a sheet of clear acrylic. This requires a unique sheet product with adhesion properties. Under the Acrylite brand, this is DP MR1.
January 23, 2018 – DJI officially announced the new Mavic Air, which again raises the bar for ease of use and safety for aerial drones. Having watched the announcement live this morning, here are the essential details I have noted (somewhat filtered according to what I find most interesting). So, for those interested in aerial drones or aerial photo/video with drones, here is what you need to know in 60 seconds.
Physical
Half the size of Mavic Pro and 41% lighter
Antennas concealed within the landing legs (away from the body)
8GB internal storage + SD card slot
USB type C port
Controller is pocketable, removable control sticks
Available in black, white, or red
Camera
1/2.3″ image sensor (same size as Mavic Pro and Phantom 3 Pro)
4K video
12MP still photos
HDR capture mode
360-degree panorama, auto stitching up to 25 images
New 3-axis gimbal, improved vibration dampening, better image stabilization
Flight control
Intelligent flight modes, including improved auto-tracking moving subject and two new quick-shot modes
Controllable with hand gestures (up to 19 feet)
Advanced pilot assist can automatically go around obstacles
More stable, can withstand wind speeds up to 22 mph
Fly Safe geo system – information about airspace restrictions
Pricing
$799 complete
$999 with accessories (extra battery, extra propellers, carrying case, etc)
Availability
Shipping Jan.29, 2018.
(I am guessing that demand will be high for this product and it will take some time for DJI to fulfill all the orders.)
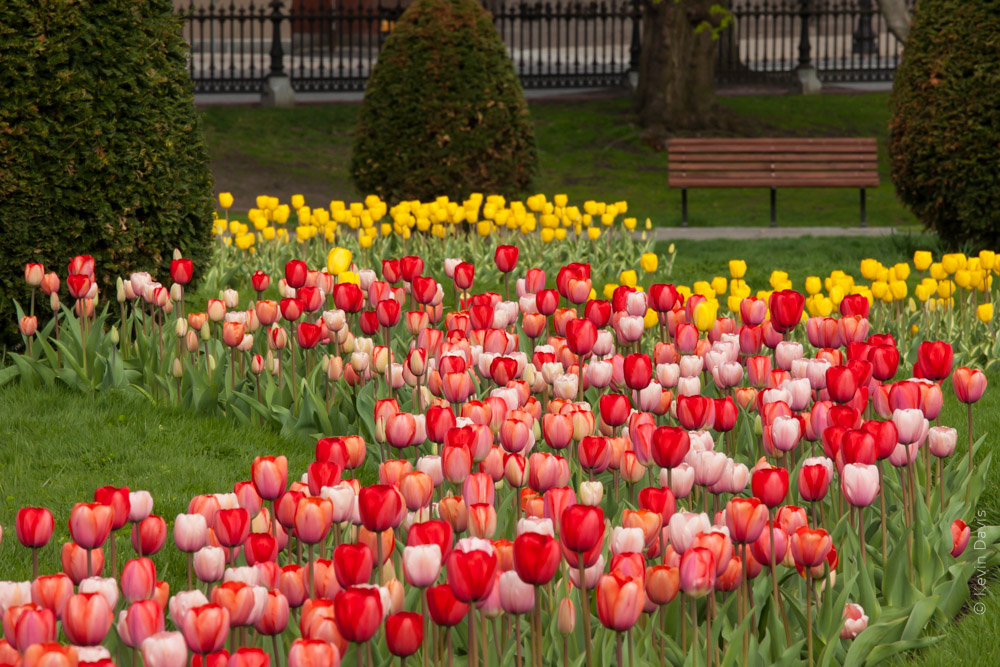
The tulips at Boston Public Garden. are an annual rite of spring. They are fun to photograph and I wanted to share some techniques with you.
This first image was shot at 7am on a Saturday morning. Early morning may be the only time when the garden isn’t swarming with people. To visually compress the distance, I used a 200mm lens.
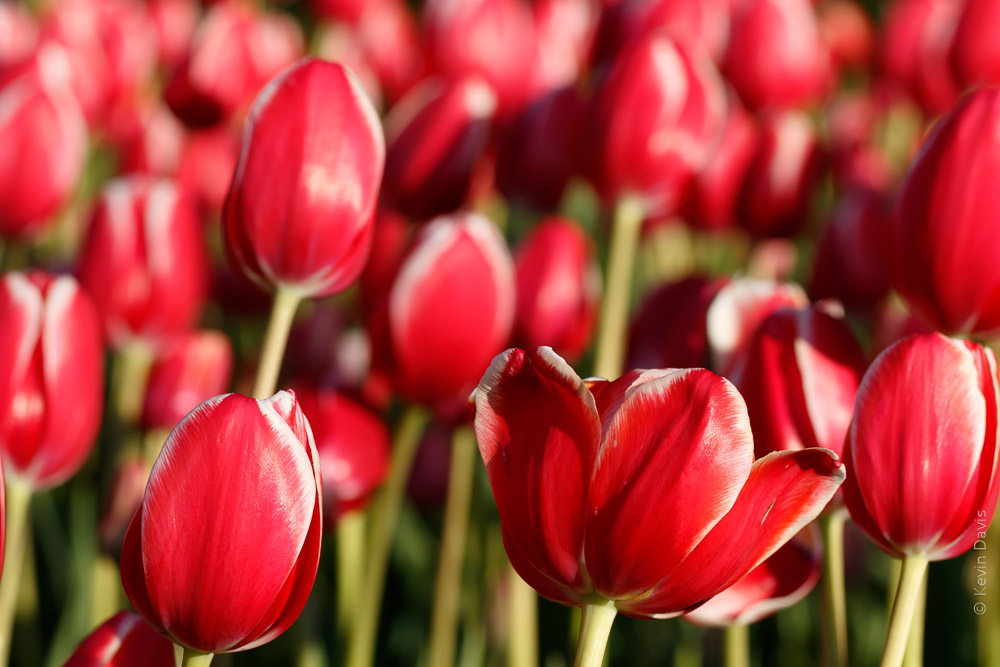
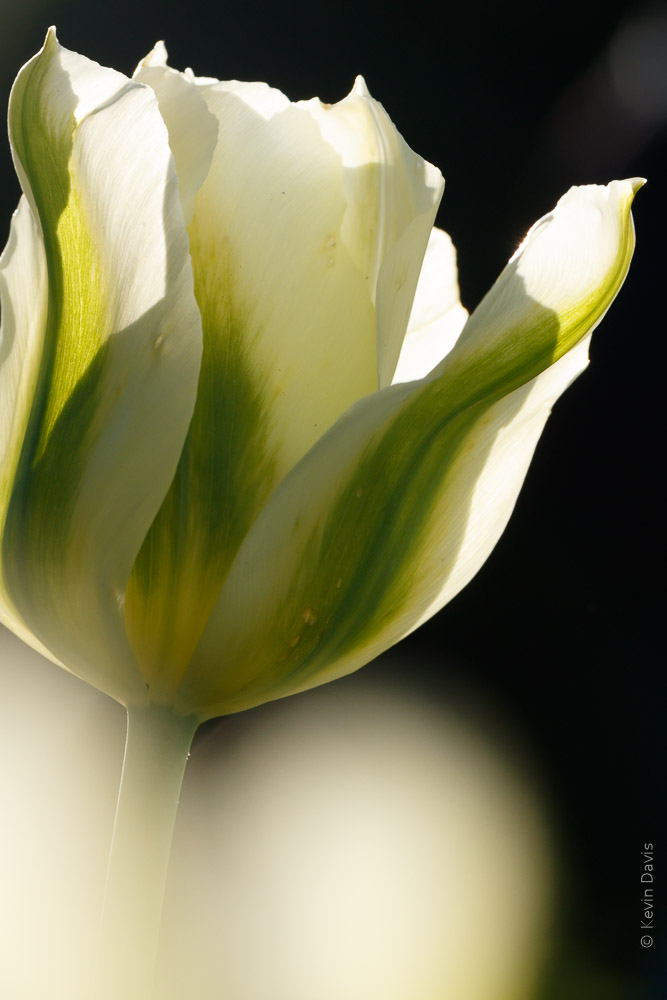
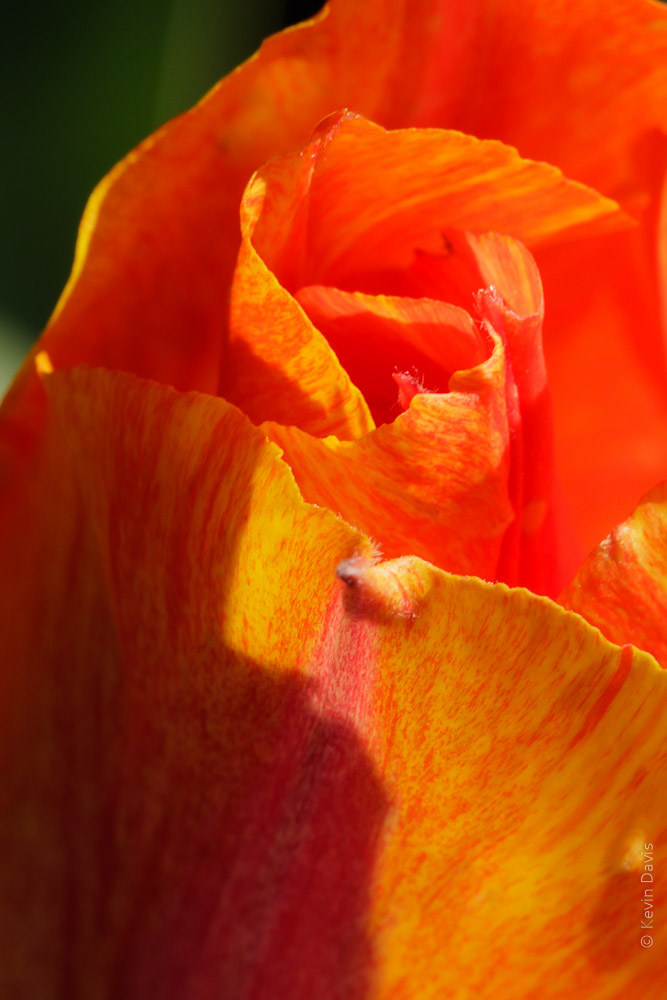
This next image is different for several reasons. Of course, this is a closer view. Using a 100mm macro lens at an aperture of f/7, the depth of field is shallow. I chose to fill the frame with flowers and exclude the surrounding environment. Also note that the light is very different. I shot this image after 6pm with the evening sun directly shining on the flowers from the side.
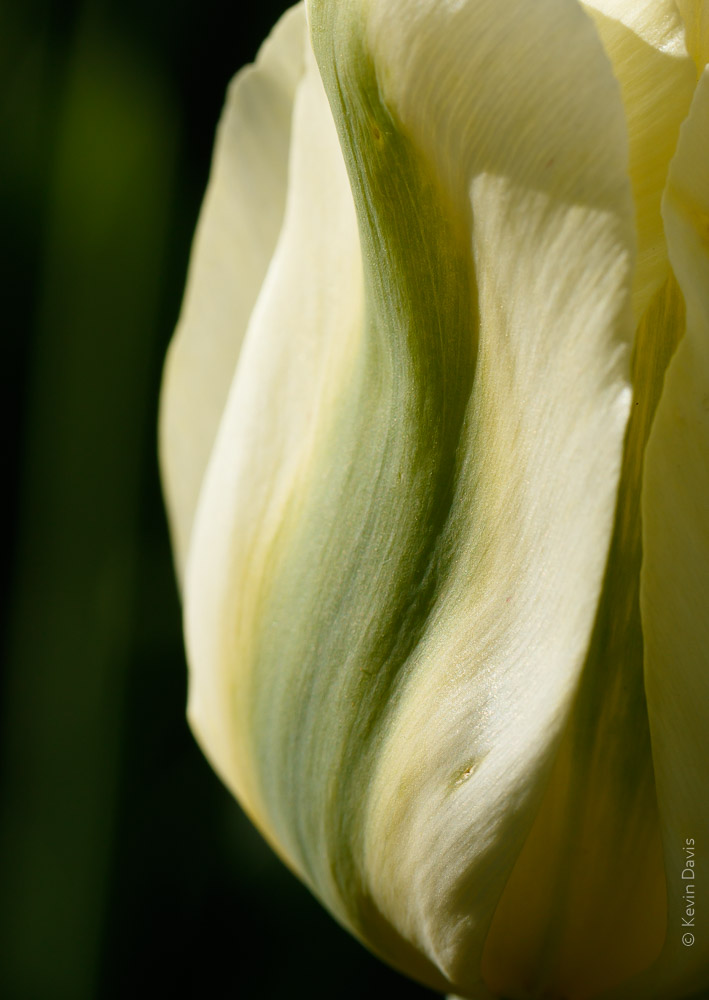
Getting even closer, the image becomes more abstract. The image is about color and texture; the concept of “tulip” begins to disappear. I specifically chose to use an evergreen shrub for the background, knowing it would fall away to black because this side of the shrub is in shadow. (You can dimly see a green tulip stem rising along the left side of the image.)
Taking a step back, not as close as the previous image, this is more obviously a tulip. Still working with the dark background, I’ve repositioned myself to achieve back-lighting from the setting sun.
Additionally, I chose to break a couple photography “rules”. Intentionally photographing through a foreground tulip creates a highlight in the bottom left. It was a gamble that I think paid off quite well. A viewer will naturally be drawn to the lower highlight and the upper highlight. After bouncing back and forth a few times, you eventually find the beautiful color and texture in between. I find that my mind dwells on this image longer than the others.
A combination of backlighting, dark background, and close-up abstract shape.
Upon thinking “how can I look at this subject with a different perspective?” I finished up the evening by looking down on the flowers from a steep angle, as the sun was soon to fall behind the buildings of Boston. I chose a more narrow aperture here, f 16, because I wanted to hold some depth of focus from foreground to background. And because a smaller aperture means less light entering the camera, I increased the ISO. Aperture priority, f/16, 1/160 sec, ISO 800, 100mm macro lens.
If you are a photographer or videographer and you are interested in the Mavic Pro drone primarily as a flying camera, then this article is for you. This is a run-down of camera controls and options, without discussing flight controls.
Documentation included with the Mavic Pro is minimal and help for the DJI Go app is non-existent.
First of all, let’s point out the obvious. The Mavic Pro has unmatched portability; it folds to a size that can fit in a large coat pocket. The gimbal that stabilizes the camera is probably the smallest in the world.
This drone can be flown using using the hand-held controller alone, or in conjunction wtih a smart-phone and the DJI Go app. You do need the Go app for access to numerous configurable options, but after configuring what you need, it is possible to fly with just the controller and no app. During flight, the Go app gives you a live video feed and camera exposure information, but you may not need to interact with the app except maybe to set the focus.
Not all available features shown here. These are just some features I wish to point out.
The Remote Controller
The hand-held controller includes quite a few camera controls, independent of any smartphone app.
Photo trigger (shutter button)
Start/stop video recording
Camera tilt
Exposure compensation
Custom button left (e.g. center focus)
Custom button right (e.g. AE lock)
5D button – up, down, left, right each has a different meaning that is configurable.
(For example, zoom in/out. It is a 2x digital zoom; there is no optical zoom.)
DJI GO app
The app shows real-time video and provides in-flight camera exposure information.
Real-time image view
Exposure histogram
Current exposure compensation setting (1/3 ev increments)
Over-exposure zebra stripes during video recording
Camera: ISO, shutter speed, white balance, remaining SD card number of photos
Video: resolution, FPS, remaining SD card recording time
The app provides extensive camera configuration options.
The app alerts you if a firmware update is available. The update can be applied with a simple touch; the download comes via your wi-fi, through the phone, down to the drone. The time to complete the upgrade was more than ten minutes and consumed about 18% of the drone battery charge.
Bearskin NeckCompare JPEG to RAW
Photo Quality
For photos, you can shoot RAW, JPEG, or RAW+JPEG. Of course, I recommend either RAW or RAW+JPEG.
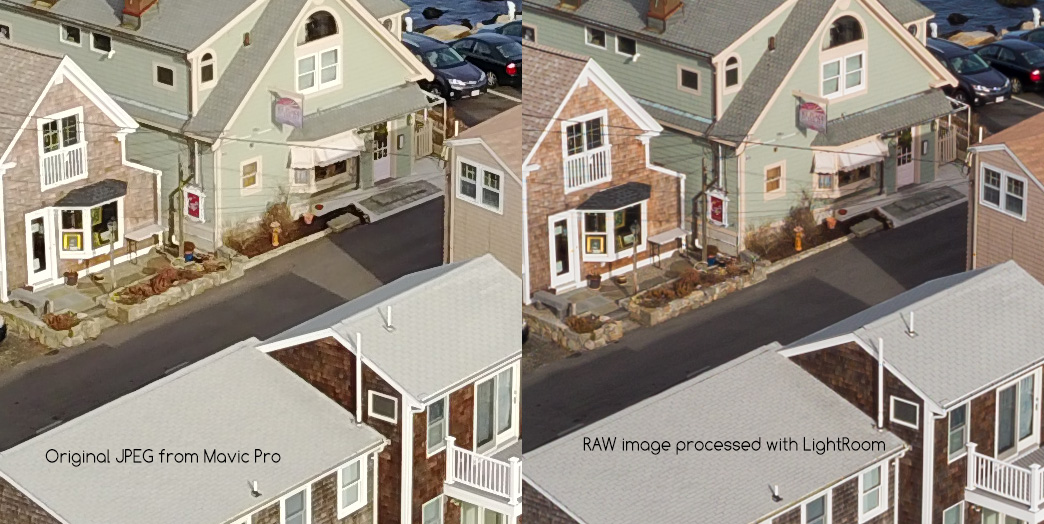
I shot the photo above (Bearskin Neck, Rockport MA) recently with the Mavic Pro set to record both JPEG and RAW. The second photo is a 200% crop from the center, comparing the original JPEG to the RAW file processed as I normally would in Adobe Lightroom. Overall, the JPEG is good. I think it is a bit green, looking at the short stone wall. Signs on the buildings are not legible in either case, but the JPEG is slightly worse than RAW.
With only a half dozen flights thus far, I have observed a couple specific image quality problems. For still photos, the very small image sensor is no match for a larger DSLR or MFT camera. I have read that the image sensor is Sony Exmore (wikipedia.org/wiki/Exmor), but I cannot confirm that. The maximum resolution is a respectable 12 megapixels, in 4×3 aspect ratio (4000×3000). You can choose to capture 16×9 ratio, but that is a crop down to 9 megapixels (I personally tested that just now; that’s real, not a guess.).
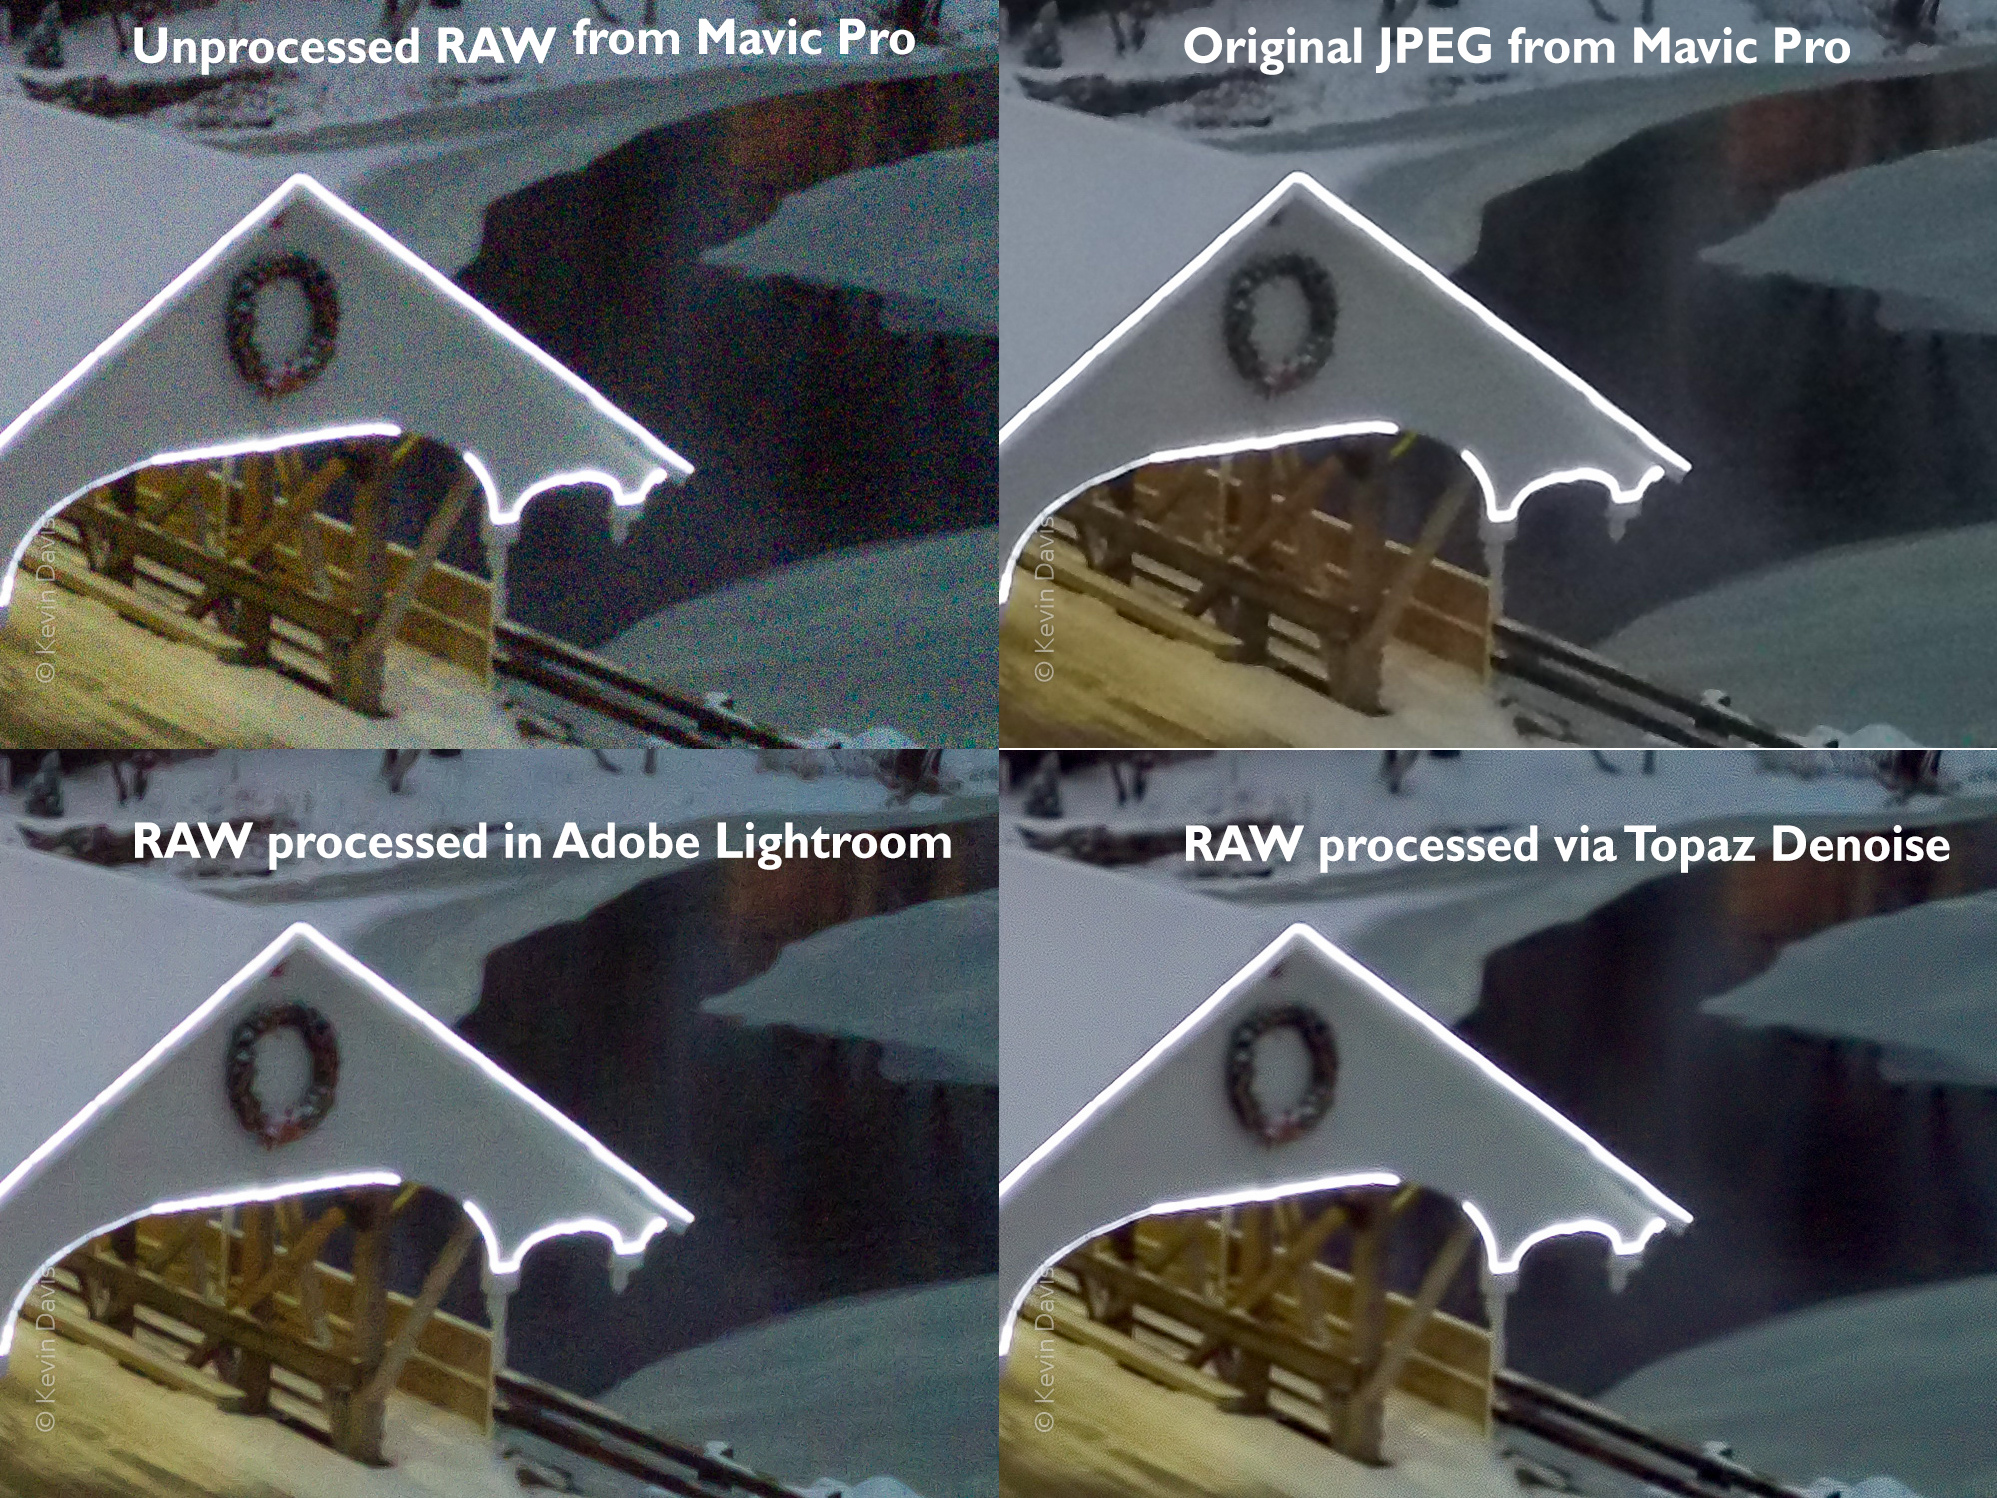
Photos can exhibit some amount of digital image noise at just about any ISO. Images shot during the low-light of dusk, around ISO 1600, exhibit a high amount of chroma noise. Samples are shown here below. For stills, Adobe Lightroom has the best noise reduction I know. While the JPEG processing in the Mavic does a reasonably good job of smoothing large areas, there is loss of detail inside the bridge. The Topaz Denoise plugin for Adobe is similar. Processing via Lighroom’s built-in noise reduction allows better control and retains better detail inside the bridge.
Video Quality
In good light, the video quality is probably on par with a GoPro Hero 3 or 4. Moire problems may occur when scenery includes detailed patterns, but I have not tested this with different capture resolutions. As with still photos, low light and high ISO exhibits a high amount of chroma noise. A product called Neat Video can do a good job of mitigating noise.
The video clip of the snowy mill (at the beginning of this article) was captured at 1080 without a problem. However, on a separate shoot, I did see a problem. Several people contributing to on-line forums have reported that 1080 does have problems, including a “pastel effect” which seems an apt description of the problem I saw. People experiencing problems at 1080 also report that the problem does not occur at higher 2.7K or 4K resolution. I have switched to shooting 2.7K and subsequently downsample to 1080 in post processing. However, the higher resolution does not support a frame rate faster than 30 fps; and downsampling does require additional compute time.
For video, I’ve been shooting the “None” color profile, modified with sharpness set to -1. Some pros are recommending two of the color profiles, DLOG (very flat) and ART (not as flat). Alternatively, some people have suggested color profile D-Cinelike and then customized to -2, -1, -1 (sharpness, contrast, saturation). All those suggestions create an intentionally flat result that necessitates some post-processing.
A clear plastic dome can optionally be used to protect the camera. Very first time I captured video with the Mavic Pro, I could see glare due to the plastic dome. Since then, I never fly with the dome attached. Potentially, I might use it if there some risk of water or dust in the air, for example, flying near a waterfall.
Pre-flight
Each time you fly, here’s the basic pre-flight steps:
1) Unfold the propeller arms and propellers
(Obviously, attach any propellers that you detached for transport/storage.)
2) Remove the camera gimbal clip
3) Optionally, connect your smart-phone to the hand-held controller
4) Turn on the controller and start the DJI Go app
5) Turn the antennae upwards, which is typically a 45-degree angle
6) Turn on the drone
7) To connect your phone with the drone, touch the “Camera” button on the DJI Go app
8) Check the aircraft status information, including available battery charge
9) If this is a different location than previous flight, calibrate the compass
10) Obviously, check your environment for obstacles or hazzards.
Make sure you are not in restricted airspace.
DJI includes a plastic clip to secure the camera gimbal when not in use. Always remove this clip BEFORE turning on the drone. If you fail to do so, the app warns of gimbal overload.
Initially, the Go app will display the “Aircraft Status”. Tap the “X” to close this display.
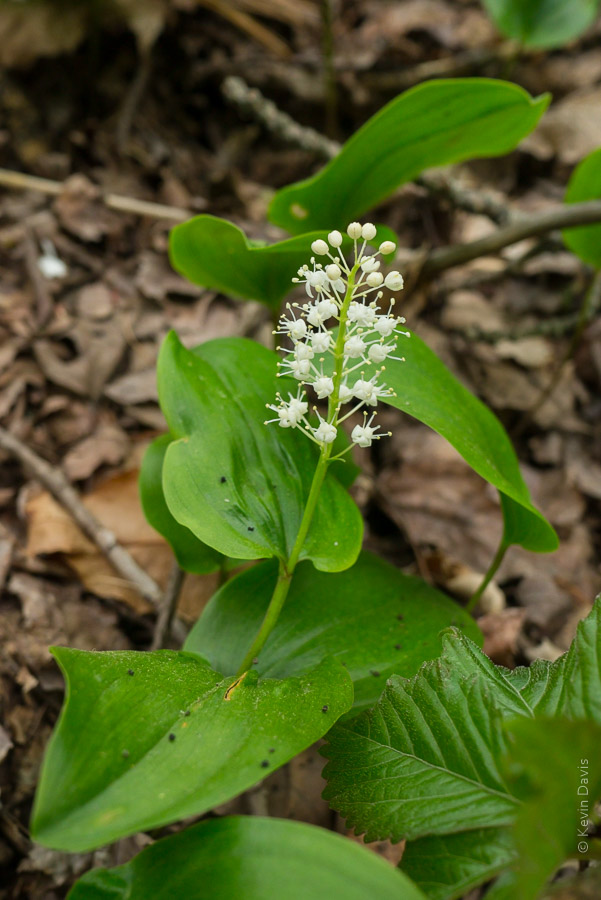
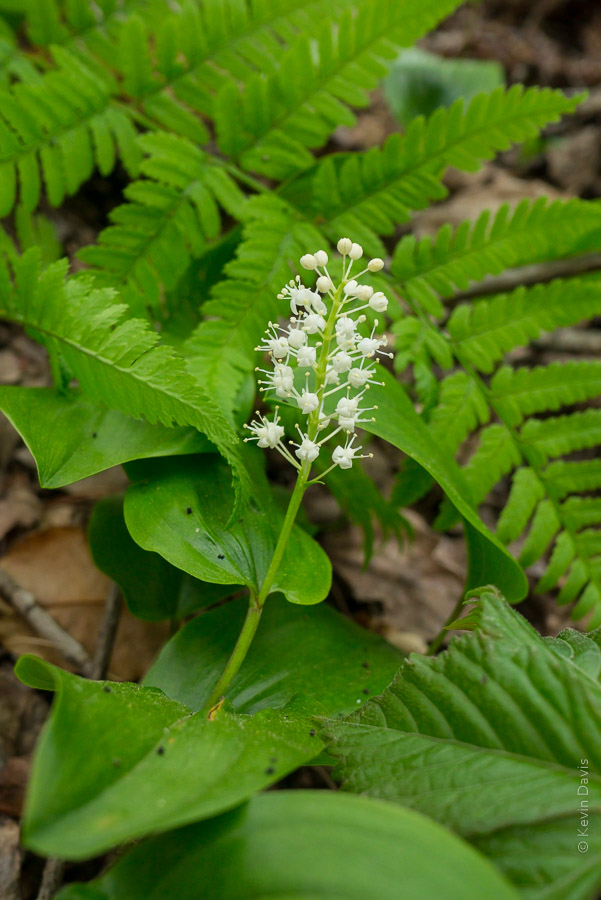
One of the most important aspects of wildflower photography is controlling the background. Finding a clean background, that is not distracting, can be challenging.
Controlling the background can sometimes be easy and sometimes difficult. Thinking about it just now, here are some considerations just off the top of my head.
Inspect around the flower to understand what will appear behind the flower
Choose if you want additional flowers in background or foreground
Watch out for distracting twigs or blades of grass; you can push them out of the frame
If the flowers are on long stems, you may be able to nudge the stem, either to achieve a better background or to place the flower in a more flattering light.
To fix a problematic background, consider placing some object behind the flower.
Consider placing the camera near the ground and shoot upwards at the flower
Consider filling the entire frame with the flower – no background
If you can’t achieve a good background, look for a different flower nearby
Canada MayflowerCanada Mayflower
One more thing … In your zeal, try not to trample the flowers. Leave them for someone else to enjoy.
Last October, I listed Drones for Under $2000. A week later, DJI announced a new quadcopter drone, Inspire 1, which was notable, but far above the $2000 price point. This week, DJI announced the third incarnation of it’s original Phantom, which now incorporates some features from Inspire but retains the more affordable price tag of the Phantom line. Here are the broad brush strokes.
Phantom 3 (DJI press release photo)
Phantom 3
Improved camera system supports video and stills. Phantom 3 “pro” supports 4K video resolution.
3-axis gimbal, similar to Phanom 2 Vision
The new gimbal seems to pan, unlike its predecessor on the Phantom 2 Vision+
Digital video downlink sends live video feed to your mobile device on the ground (up to 720p)
Downward-facing visual and ultrasonic sensors allow position hold without GPS (indoors), like the Inspire 1
Improvements in motors and motor control provide better stability and longer battery life.
Phantom 3 vs Inspire 1
Inspire 1 is larger than Phantom and can fly faster
Inspire 1 allows unobstructed 360 degree camera rotation – retracting landing struts will not obstruct the view.
Inspire 1 supports dual pilot operation.
Phantom is theoretically much more durable than Inspire
Phantom costs far less than Inspire
Phantom provides a slightly longer flight time.
Not to be left behind, 3D Robotics will soon release their new quadcopter, currently known as SOLO.
The term “drone” is commonly used in pop media, more common than alternative terminology UAS (unmanned aircraft system) or UAV (unmanned aerial vehicle). To my mind, a drone implies an automated military device – I prefer the term quadcopter.
As far as you or I are concerned, we serve as the remote pilots while standing on terra firma. We operate a radio transmitter while the copter is equipped with a matching radio receiver. Different radio systems are available and they are not all compatible. For example, some communicate via a 2.4 GHz radio frequency, while others utilize a 5.8 GHz. The differences are not limited to radio frequency alone.
Anything that is labeled as Ready-To-Fly (RTF) will include a radio transmitter that is compatible with the drone. If the product is not advertised as RTF, it may not include a transmitter, which is preferable for anyone who intends to re-use an existing transmitter they already have.
3D Robotics Iris+ … $750
3D Robotics RTF X8 … $1,350
Blade 350 QX – $470
DJI Phantom I … $400
DJI Phantom II Vison+ … $1,300
Gaui … 330X … $400
Gaui … 500X … $1,150
Gaui … 540H / hexcopter (6 rotors) … $600 does not include transmitter
Parrot AR drone … $300
Quantum Nova … $320
Quantum Venture … $400
TurboAce Matrix … $900
HUBSAN X4 H107C-HD
SteadiDrone QU4D … $1700
Walkera QR X350 … $400
Walkera QR 800 … $1,700
Walkera TALI h500 / hexcopter (6 rotors) … $1900
For aerial photography purposes, you need a stable device that is easy to control – consider electric copters only. Gas-powered machines are loud, extremely fast, and potentially very dangerous.
The rotational force of a single-rotor will tend to rotate the entire machine; this is why traditional helicopters have a small tail rotor, to counteract the rotational force. Coaxial dual-rotor designs solve the rotational force problem by spinning two rotors in opposite directions, but this reduces the total lifting force. Multi-rotor copters, with four or more independent rotors, solve the rotational problem by spinning half the rotors in a clockwise rotation and the other rotors in counter-clockwise rotation.
I expect (but have not verified) that all of the copters listed above are capable of lifting a small camera. In the cases of some smaller copters, I had doubts and so did not include those in this list.
Please note that most of these copters will rely upon rechargeable LiPo batteries, for which I offer two tips. A single battery might give you eight minutes of flight or twenty minutes of flight – so do have more than one battery. These batteries are relatively high power devices and there have been stories of such batteries causing fire, sometimes during the charging process. Do use protective LiPo storage bags such as LiPo Safe.
The most commonly used camera for these copters is a GoPro 3 or newer (e.g. Go Pro 3, Go Pro 3+, or GoPro 4). Personally, I have used the Hero 3+ Black Edition; while I find that it captures great video, I am not impressed by the still image JPEGs. Listed here are some of the available small “action cameras”, all of which I expect are primarily intended for video.
CamOne Infinity
Contour+2
ContourROAM3
Drift Ghost-S
Garmin VIRB Elite
Gear-Pro HD Sport Action Camera
GoPro HERO3+
GoPro HERO4
Ion Air Pro 3
JVC GC-XA2
Mobius Action Camera Pro
Polaroid XS100i
Polaroid Cube
Replay XD Prime X
Sony AS20
Sony HS100V
The last component for aerial photography is perhaps the first component to select when building a new system. A motorized/computerized gimbal is necessary for aerial video, to remove the unwanted effects of aircraft movement. The gimbal holds the camera, detects aircraft movement, and automatically moves the camera to counteract the aircraft movement. Without one of these devices, your level horizon will be ruined anytime the copter moves left or right. Gimbals are often designed to match the size and weight of specific cameras. So, if you are thinking of using a specific camera, you need to be sure that you can get a gimbal that accommodates that camera.


 Mavic Pro")