The lens included with a GoPro Hero 3+ has a focal length of 2.5 mm and has a field of view akin to a 14mm lens on a full-frame DSLR. It is “fisheye”. You can set the camera to a narrow capture setting, but this will crop the image, discarding some of the pixels.
Super wide is fine if you are attaching the GoPro to your helmet or a surfboard. For me, the stock Hero3 lens is too fisheye and I want a narrower field of view.
There are many available replacement lenses, but most lack the quality required to capture 10 megapixel images. Most lenses are good enough quality to capture 5 megapixel images. I found two companies that sell a 5.4mm lens, having a 60 degree field of view, and rated as being sufficient for 10 megapixel images: RageCams (USA) and Vision/Dimension (Germany).
On paper, these two products seem equivalent, but there are a few important differences.
- The 5.4mm lens from RageCams is easier to install. The lens from Vision/Dimension requires disassembling the camera and replacing the lens mount.
- If you do it yourself, the cost of a 5.4mm lens from RageCams is higher than the cost of a 5.4mm kit from Vision/Dimension.
- If you don’t want to mess with the camera yourself, you can pay RageCams to do the replacement for you. The cost of parts and labor is more than the cost of the GoPro Hero3+ camera
- The Vision/Dimension lens includes infrared filter for daylight use. The RageCams web site states that an IR filter will cost you an extra $55.
Huh? What’s the problem deal with the lens mount?
The lens mount is a standard M12 lens mount, a simple threaded barrel. To change the lens, you theoretically unscrew the existing lens and screw in another lens. However, if I understand this correctly, there is a subtle quirk to the GoPro lens mount, which may mean that your new replacement lens will not focus properly. The lens mount is a female-threaded tube, but apparently the full length of the tube is not threaded; the front-most part lacks threads. If your new replacement lens has a short barrel length, you will be able to screw it in, but the distance to the image sensor will be too close for proper image focus. The 5.4mm lens from RageCams has a slightly longer barrel than the same lens from Vision/Dimension.
Lens replacement options
Option 1:
Ship your GoPro Hero camera to RageCams and have them replace the lens. This is both the simplest option and the most expensive option.
Option 2:
Buy a replacement lens from RageCams and replace it yourself.
To grip the lens with a pliers, you first need to remove the decorative plastic ring on the outer body of the GoPro. This part is quite simple and you can find videos on YouTube that show how it is done.
The lens is fixed in place with a bit of thread-lock. To unscrew the lens, you probably have to apply heat to the lens with a heat gun (without melting anything). Again, there are helpful videos on YouTube.
Option 3:
Buy a replacement kit from Vision/Dimension and replace it yourself. This kit includes the lens and a lens mount that is fully threaded. Replacing the lens mount is a bit difficult
www.vd-shop.de/instruction-replace-gopro-lens-a-80.html
Option 4:
Install an adapter that allows you to use almost any lens. While this enables the use of high-quality lenses and allows the use of variable-aperture lenses, it necessarily makes your GoPro physically larger and heavier. Refer to this link: www.back-bone.ca
I bought the Vision Dimension kit. While the price of this kit seems significantly less than cost of a comparable lens from RageCams, there are hidden costs. Shipping from Europe to the USA cost me $45 and then I received a bill from Federal Express for an import duty of $20. In the end, buying from Vision Dimension did not save me as much money as I had thought it would.
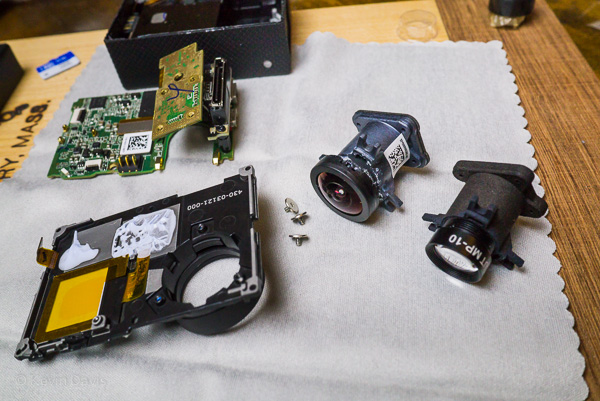
Looking at the photo at the top of this blog, you can see “10MP” (10 megapixel) is printed on the lens. Also printed on the lens (not visible in this photo) is “IR Cut”, indicating that a daylight IR filter is present.
Disassembling a $400 camera, that has really tiny parts, is not a task for the faint of heart. A video from Vision Dimension demonstrates the procedure; you can view that before making your decision. To avoid this hassle, pay a bit more money and buy the lens from RageCams.
If you replace the lens yourself …
You have somehow replaced the lens … and now need to adjust it for sharp focus.
- Start by setting the approximate focus; load the GoPro app on an iOS or Android device to achieve a live preview of what the camera is seeing. When the focus looks good, here is an extra step to ensure that the focus is as good as possible.
- Temporarily make a few markings on the outside of the lens; I attached five small pieces of white tape. Adjust the lens to each mark, one at a time, and capture a photograph.
- Study the resulting photos at high magnification and pick the sharpest photo. Adjust the lens to the corresponding lens mark.
Repeat the procedure on a finer scale. I captured three photos, one on center, one slightly to the left, and one slightly to the right.
You do need a dab of glue or thread-lock to prevent the lens from turning inadvertently. You might put this on the threads before inserting the new lens. I was afraid that this might inhibit lens adjustment, so I adjusted the lens first, then unscrewed the lens, added a dab of glue to the threads, and re-inserted the lens. The trick to this is to count the number of revolutions when unscrewing the lens, so that you can easily get back to the point of sharp focus. Personally, I counted 13.5 turns of the lens. (In retrospect, the glue I used did not set quickly and I could have applied it before first inserting the lens.)
Finally, note that the new lens sticks out a bit further from the Hero camera body, compared to the original lens. It’s probably not going to fit in the waterproof housing. The Vision Dimension kit includes a spacer ring that you put between the Hero and the housing. The RageCams web site advises that you remove the foam cushion from the rear door of the housing.
In the end, I am disappointed with the image quality from the Hero3+. While I believe this is largely due to the camera, I have not as yet proven/disproven the claim that this lens is good enough for 10 megapixels.