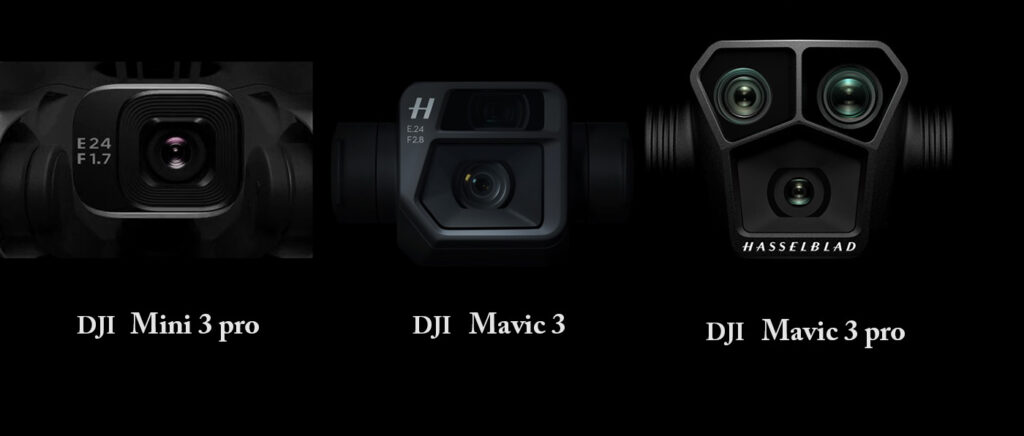
I have one surpassing criteria for an aerial drone …. image quality. This month, DJI introduced two new iterations of their drones, the Inspire 3 and the Mavic 3 pro. Personally, the first thing I need to know is how the camera compares to previous models. Lacking actual real photos from a new drone that I have not used, I must begin by comparing camera specifications. Digging up information can be surprisingly difficult because I’m seeking very specific fundamental parameters and sifting out the chaff is tedious.
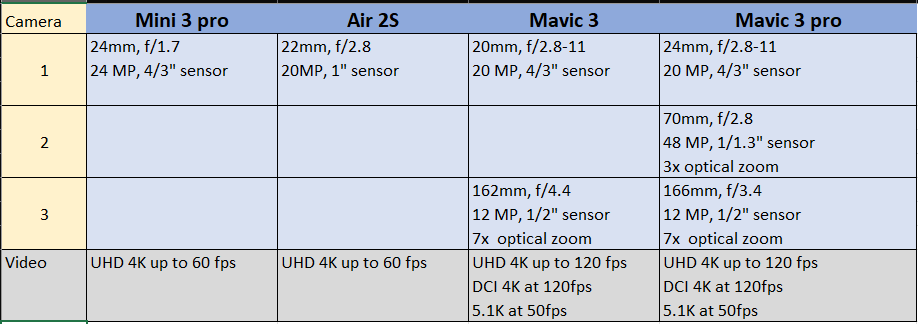
Someone online recently asked which was the best for photography (which I presume excludes video). My answer was this: “Two words – variable aperture.” But I confess that I am particularly interested in the new 70mm lens with resolution of 48 MP.
I dug through the camera specifications online and composed this simple table of just the fundamental parameters.
Years ago, still-photo quality was my only concern, but today video quality is also a factor. Frankly, for the purposes of the video that I shoot, video quality is comparable across most DJI drones. I personally do not need 120 fps, nor do I require 5.1K. I do require DLOG recording.
With all digital cameras, my general practice is to capture RAW images instead of JPEG. Particularly when photographing with DJI Mavic 3 aerial drone, I not only capture RAW but additionally I frequently utilize exposure bracketing and HDR post-processing.
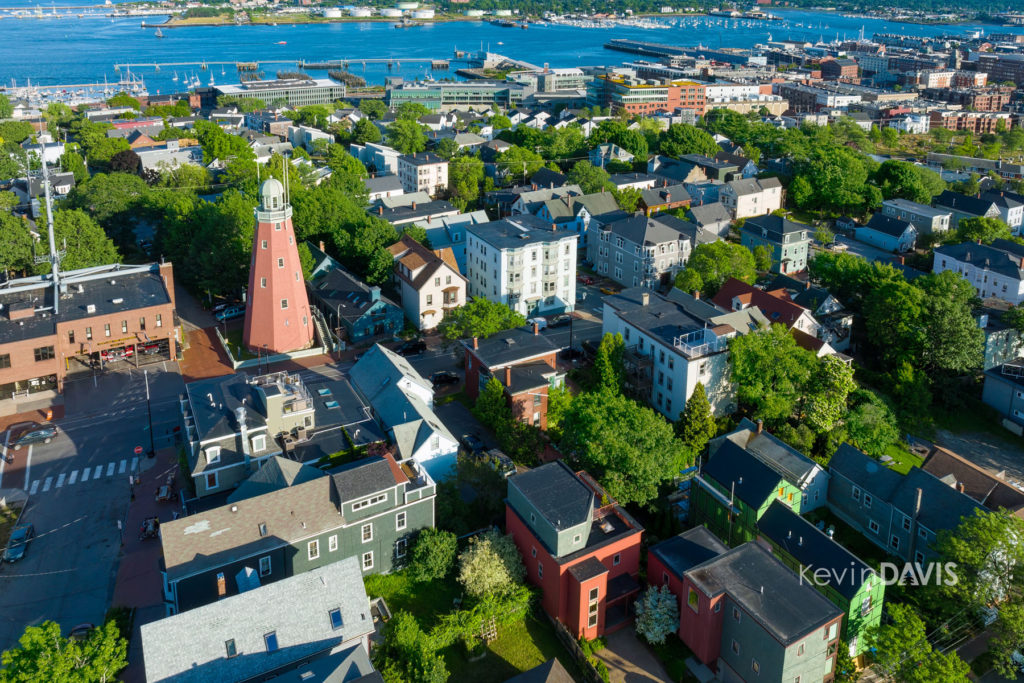
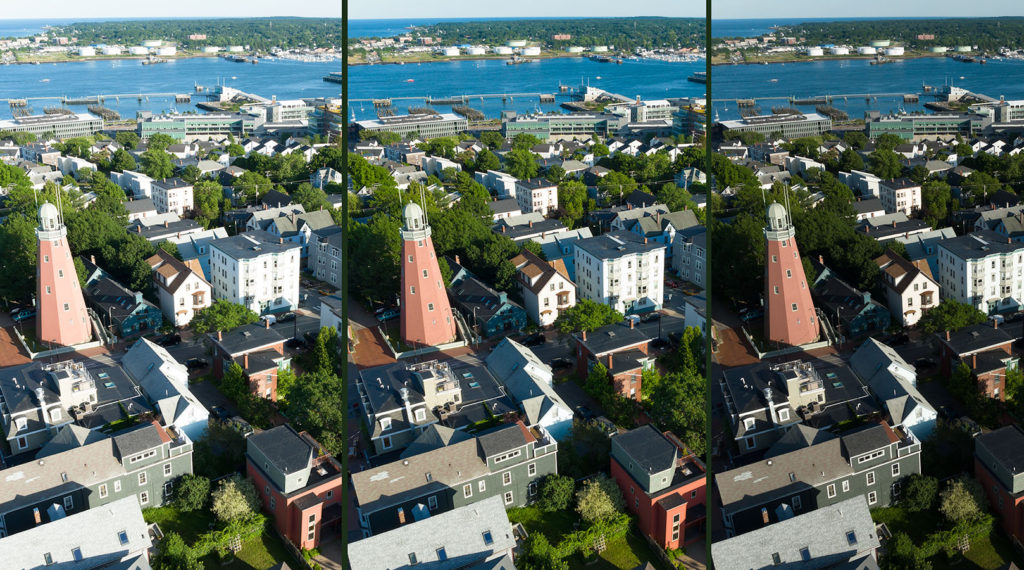
Portland Maine
The image shown here is the result of post-processing with Adobe Photoshop.
Having used the original DJI Mavic Pro, Mavic 2 pro, and Mavic 3, all have exhibited similar difficulty holding fine details in the highlights. This commonly occurs with architectural details under full sun; highlight details are easily lost. My solution is to use exposure bracketing and HDR post-processing; this means the original capture includes the best exposure, then two other exposures, one that is a bit brighter and one that is a bit darker. For the example, the photo here. I expected in advance that the highlights were at risk of getting lost; in retrospect, yes it was true.
The original three exposures are shown below. The best exposure is in the middle. As has been typical of Mavic 1,2, and 3, architectural details in white buildings have not been fully captured. The second problem is that the green trees are too dark. That second problem can be remedied in post-processing without much difficulty. However, if details in the highlights are blown out, recovering this can be difficult or impossible.
Initially, I perform basic adjustments in Adobe Lightroom and then open all three using “Open as layers in Photoshop”. That opens the three separate files as ProPhoto RGB (16-bit color depth) and with the adjustments made in Lightroom. Once opened in Photoshop, select all three layers and choose “Auto-align layers” in case the drone may have moved slightly between exposures. The best exposure I move to the bottom layer. From the other two exposures, I select specific parts of the image and these are overlayed over the bottom layer, effectively replacing problem areas.
Because the darkest exposure has retained all details in the highlights, I select the brightest areas from this exposure. Typically, this can be accomplished with either Photoshop’s built-in “Color range” selection. Once that selection is made, I often need to tweak it a bit, manually deselecting some areas that were selected but I don’t want those areas selected. Then feather the selection and convert it to a layer mask.
Using the brightest exposure, I similarly selected the green trees. That proved to be more difficult and I spent much time tweaking that selection. This selection is also converted to a layer mask. This replaces the overly dark trees in the base layer with a brighter version. Of course, you might use tools such as brightness or tone curve to lighten the trees in the base image, but the underexposed trees are more prone to luminance noise. Leveraging the brighter exposed trees does not suffer from noise, but is a bit more work to achieve.
There are alternative methods. I sometimes use Raya Pro by Jimmy McIntyre.
The final image is a composite assembled from three separate exposures of the same scene. I save this layered file as TIFF, but you can also save it as PSD (Photoshop format). I may merge all layers and export a JPEG file, but I keep the layered file. Commonly, I do return to this file and make further adjustments. For example, I may decide later that one or more of the exposures has noticeable noise or is not sufficiently sharp. The layered file allows me to make adjustments to the individual exposures.
The day of the new Mavic 2 release one week ago, numerous sites and YouTube channels already had reviews prepared. DJI had judiciously provided new Mavic 2 drones to people who would do these reviews. I have no intention of rehashing that stuff. I am interested specifically in the camera performance. Because I am largely interested in image quality, we’re talking about the Mavic 2 Pro, not the Mavic 2 Zoom. As for video quality, we’ll have to leave that for another day.
For high-quality images, DJI now provides this choice: Phantom 4 Pro, Mavic 2 Pro, Inspire 2 with Zenmuse X5s, Inspire 2 with Zenmuse X7. The unique value proposition of any Mavic is that it folds down to a size that can fit in a camera bag. A Mavic drone and remote controller requires physical space similar to a DSLR camera body and a zoom lens.
For photographers, is the upgrade worth it, from Mavic Pro to Mavic 2 Pro?
Yes, after brief testing this morning, there is no doubt in my mind.
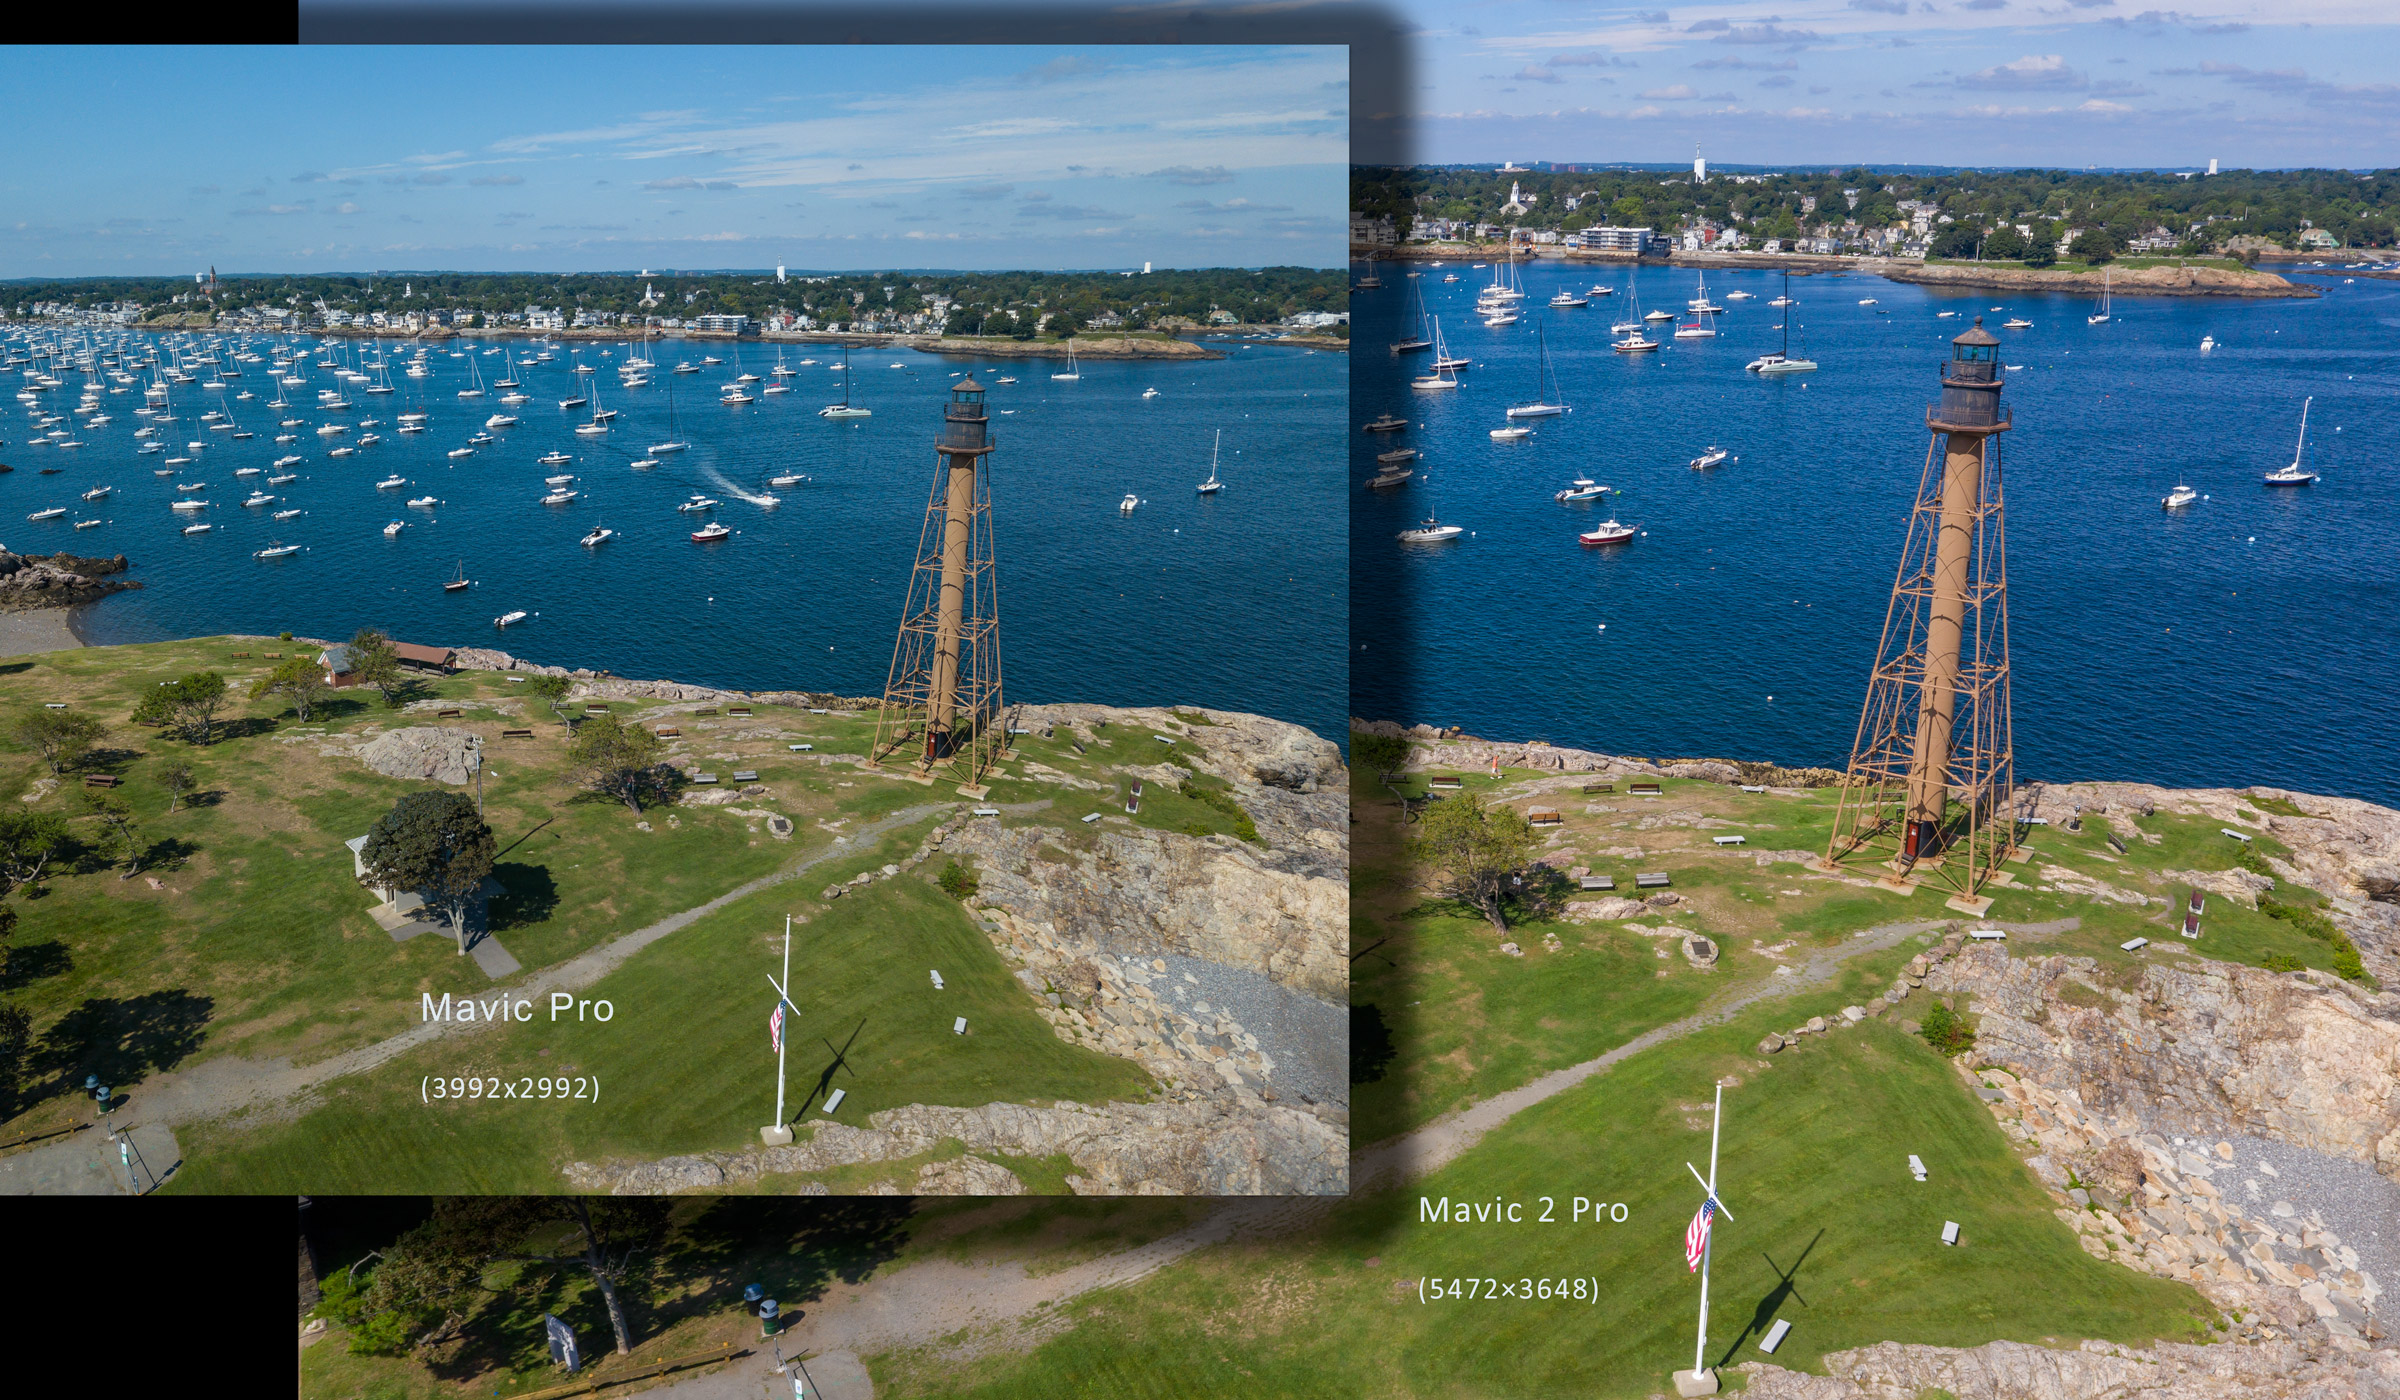
With the advent of Mavic 2 Pro, the camera difference between Mavic and Phantom has been erased. Both the variable aperture (f/2.8 to f/11) and the sensor resolution (5472×3648) are on par with the pre-existing Phantom 4 Pro and superior to the original Mavic Pro. Note that this is a 2:3 aspect ratio compared to a 3:4 aspect ratio of Mavic Pro, Mavic 2 Zoom, and Zenmuse X5s.
Note that camera is new and not exactly the same as P4P. DJI bought a majority stake in Hasselblad a couple years ago and this apparently is the first fruits of that partnership. (Yes, DJI essentially owns the legendary Hasselblad company.)
According to the numbers, the angle of view is a bit different, though I did not notice during actual use. Mavic 2 Pro provides a FOV equivalent to 28mm lens on a full-frame camera. This is narrower than the original Mavic Pro’s equivalent 26mm and narrower than the Phantom 4 Pro’s equivalent 24mm. Despite being less wide angle, vertical lines can still keystone strongly and you may choose to correct for that in post processing.
Here are the problems with Mavic Pro that I hope are improved with Mavic 2 Pro.
Dynamic range in the Mavic Pro was not very good. In high-contrast scenes, highlights can easily blow out and/or the shadows block up. To mitigate this, I have sometimes captured multiple RAW exposures and then post-processed for HDR.
Using RAW capture, if the highlights do not blow out entirely, the camera still fails to resolve details in the highlights. For example, houses with clapboard siding in full sun – the separation of the clapboards may be entirely absent in the image. This seems surprising to me … if the story is true that the RGB color space has finer granularity in the highlight range compared to the shadow range.
Image noise, particularly in shadows. To mitigate this, I have relied upon heavy-handed post-processing. While noise reduction in Adobe Lightroom is very good, there is a price to pay – higher levels of noise reduction can deteriorate details throughout the brightness range.
With high magnification, images lack sharpness. In post-processing, I have found it necessary to apply twice as much sharpening compared to my hand-held cameras.
Color from RAW images is typically worse than any other camera I have used (except perhaps GoPro Hero3) and the images require heavy-handed post-processing. Of course, RAW images from any camera will always require some degree of post-processing.
Blue/red chromatic aberrations. I commonly see this around white baluster railings. Lightroom’s ability to mitigate chromatic aberration typically fails to resolve the problem.
In summary, the Mavic 2 Pro does achieve small improvements in all of these problem areas. So let’s look at some actual images from the new Mavic 2 Pro compared to the original Mavic Pro.
Harbor photographed with both drones
In high-contrast situations such as this scene with white boats and white houses, Mavic 2 Pro still has difficulty retaining detail in the highlights, but is not so bad that it requires HDR techniques to overcome it. It is still necessary to reduce the exposure by 1/3 stop to protect the highlights (this does not jeopardize shadow details) and also apply highlight reduction in post-processing.
[Click on an image to see the full resolution.]
[Images shown here are all RAW and individually post-processed to the very best of my ability using Adobe Lightroom.]
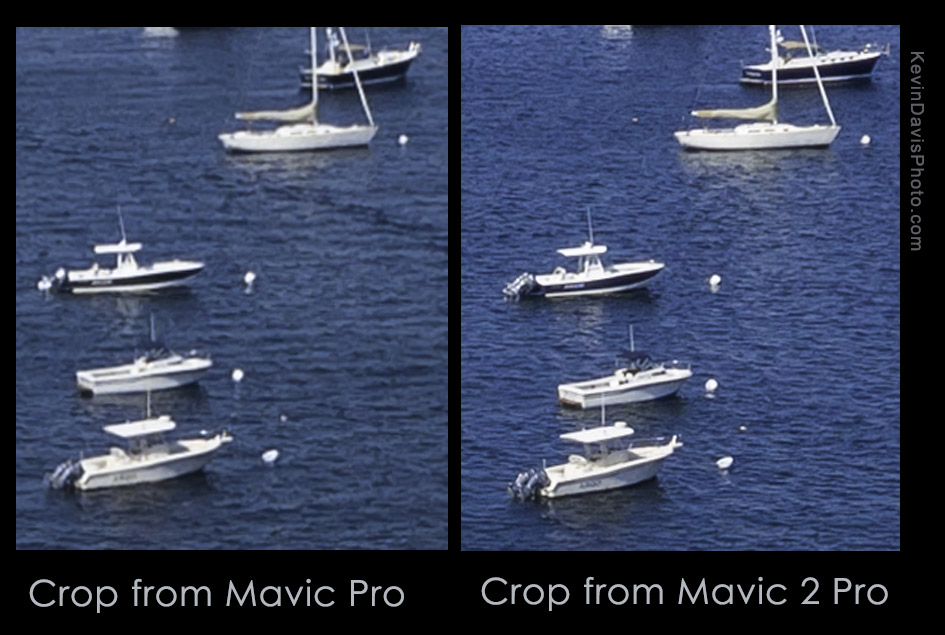
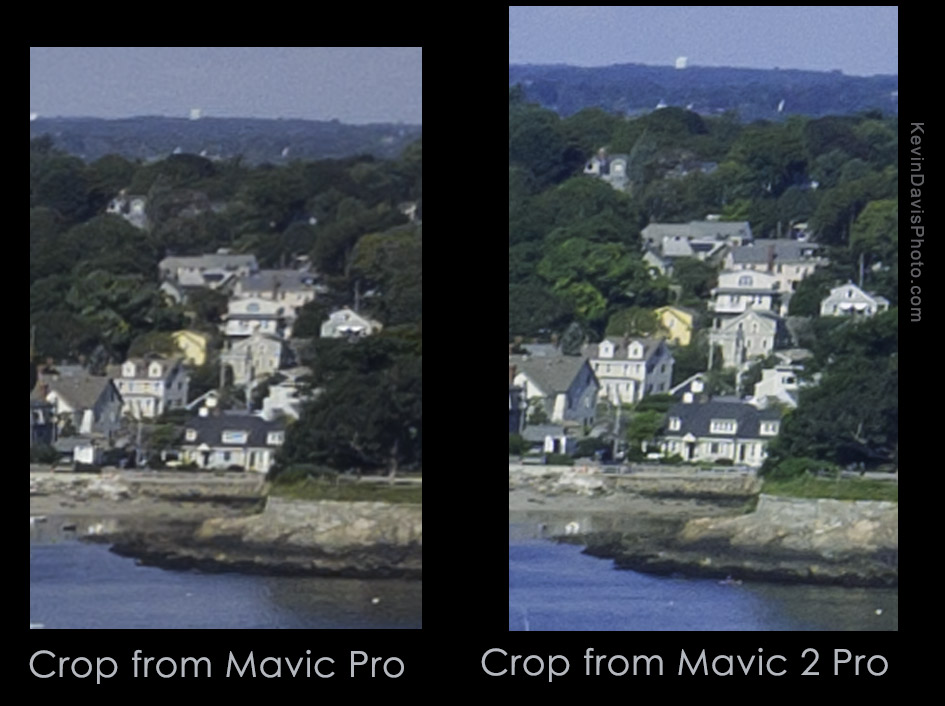
Detail in highlight areas
Image sharpness
Noise reduction is still necessary but far less than with the original Mavic Pro.
Color of RAW images is much better, requires less correction.
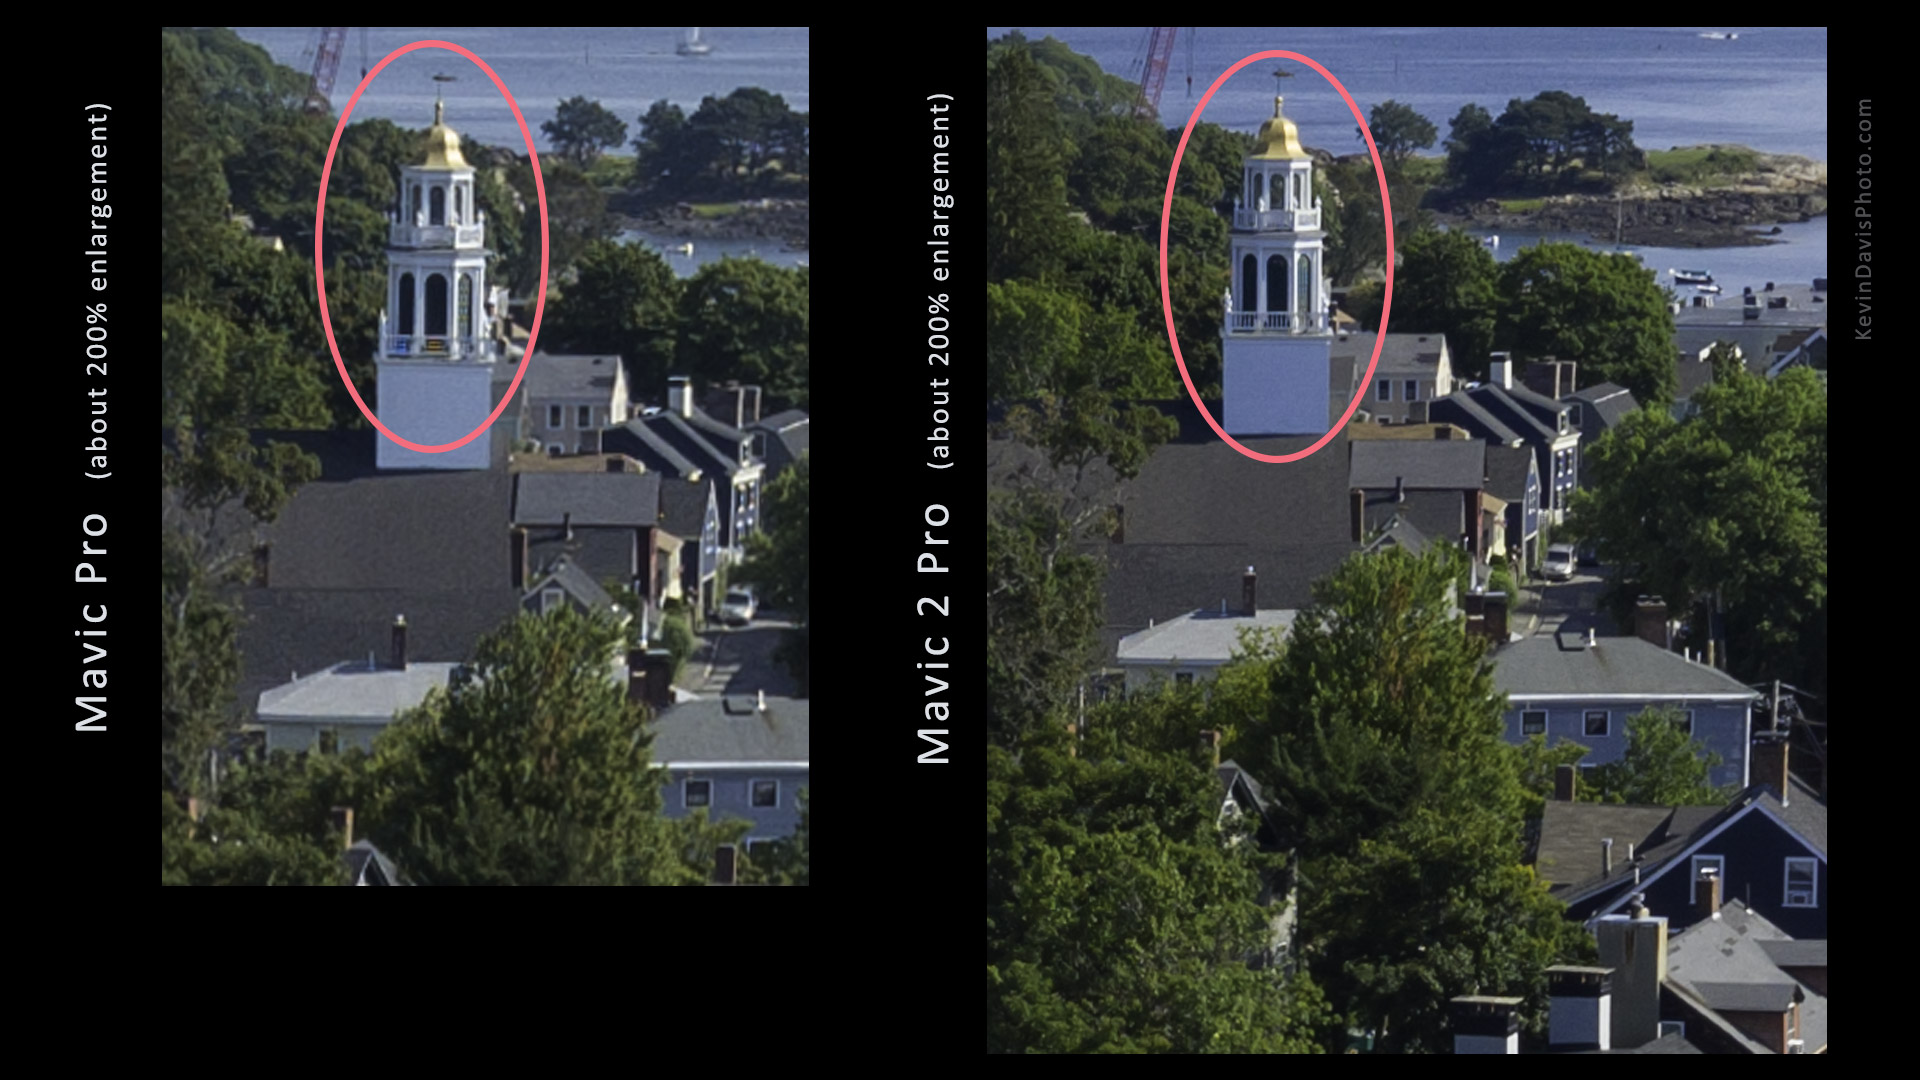
Here’s an example (not a particularly good one) that shows Mavic Pro was unable to resolve the balusters and suffered chromatic aberration. Mavic 2 Pro did not exhibit either of these problems.
Click on the image to see larger version
Finally, a few notes that do not regard image capture.
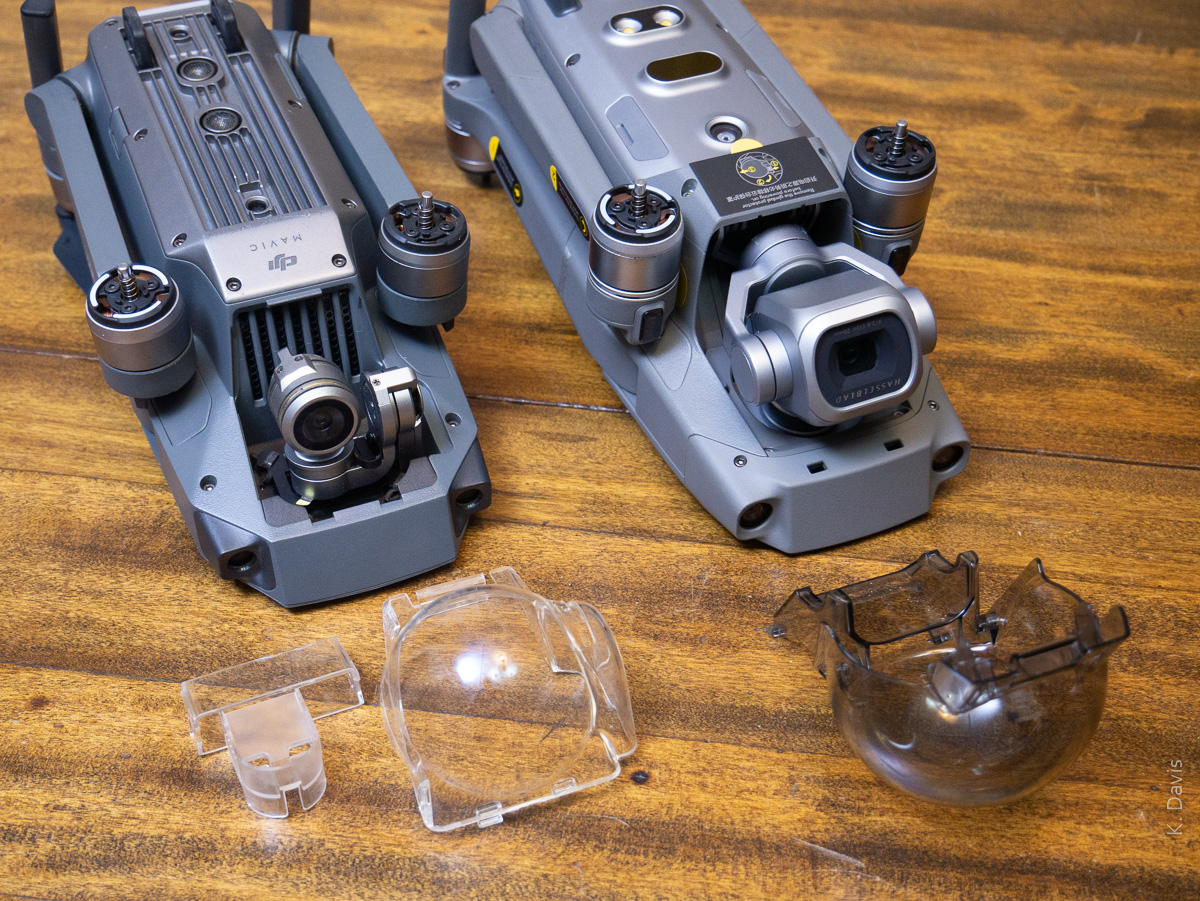
If you’ve ever fumbled with the gimbal clamp on the original Mavic Pro, or worse yet have forgotten to remove the clamp before powering on the drone, rest assured that the new Mavic 2 Pro does provide an improvement. The gimbal clamp is integrated into the protective dome cover – remove the dome necessarily removes the gimbal clamp. See the photo below showing both the Mavic Pro and the Mavic 2 Pro.
Gimbal clamp
Unlike the original Mavic Pro, the Mavic 2 includes 8GB on-board memory in addition to a micro SD slot. To access this memory from another device, connect a USB cable (included) to the Mavic 2 USB-C port and turn on power to the Mavic 2. (Remember to remove the gimbal clamp before turning on the Mavic.) After having inserted a micro SD card, the DJI GO app prompted whether to use that instead of the on-board memory. I am assuming that we must select one or the other and automatic switch-over is not supported, but I don’t know that for certain.
The transmission system between the drone and the controller is theoretically the most robust of any DJI product to date. Mavic 2 utilized second generation Occusync 2.0, while the Phantom line has yet to adopt the Occusync transmission system. Although Occusync 2.0 reportedly can operate at distances up to five miles, I personally have no need of that. Increased robustness of the signal is welcome, as I have seen unexplainable video signal loss when using the original Mavic Pro.
January 23, 2018 – DJI officially announced the new Mavic Air, which again raises the bar for ease of use and safety for aerial drones. Having watched the announcement live this morning, here are the essential details I have noted (somewhat filtered according to what I find most interesting). So, for those interested in aerial drones or aerial photo/video with drones, here is what you need to know in 60 seconds.
Physical
Half the size of Mavic Pro and 41% lighter
Antennas concealed within the landing legs (away from the body)
8GB internal storage + SD card slot
USB type C port
Controller is pocketable, removable control sticks
Available in black, white, or red
Camera
1/2.3″ image sensor (same size as Mavic Pro and Phantom 3 Pro)
4K video
12MP still photos
HDR capture mode
360-degree panorama, auto stitching up to 25 images
New 3-axis gimbal, improved vibration dampening, better image stabilization
Flight control
Intelligent flight modes, including improved auto-tracking moving subject and two new quick-shot modes
Controllable with hand gestures (up to 19 feet)
Advanced pilot assist can automatically go around obstacles
More stable, can withstand wind speeds up to 22 mph
Fly Safe geo system – information about airspace restrictions
Pricing
$799 complete
$999 with accessories (extra battery, extra propellers, carrying case, etc)
Availability
Shipping Jan.29, 2018.
(I am guessing that demand will be high for this product and it will take some time for DJI to fulfill all the orders.)
 Mavic Pro")