Toying around with some software filters, I arrived at a painterly effect that I really love … in just 5 minutes. I’m not trying to put painters out of business – just having fun.
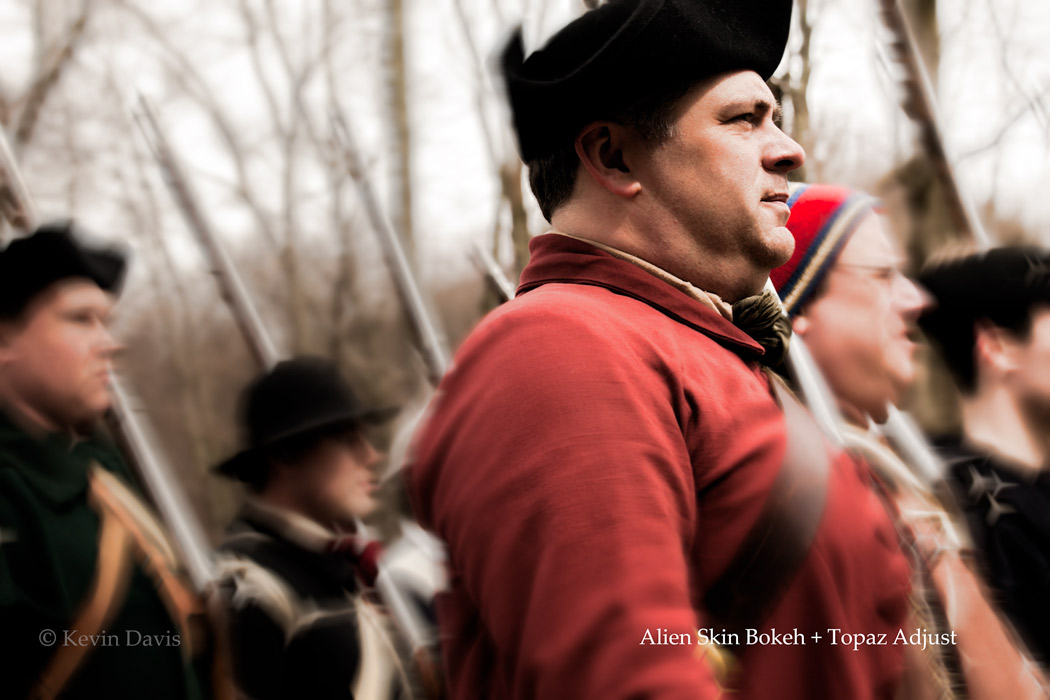
I started with an image from Lexington Massachusetts this past Patriots Day weekend. My first experiment did not yield a compelling result. Tried a second image, applied different filters, and shown here are all the phases of transformation.
The second step is done with Topaz Adjust. Adjust is one of my favorite tricks for adding a bit of “pop” to an image that seems a bit dull, however, here I used a preset called “Low key”, which I have never found any use for until today.
Processed with Bokeh, then Topaz Adjust, preset = Low Key
The last step is an painterly effect using Snap Art by Alien Skin.
Click on the image to see the larger view!
Processed with Bokeh and Adjust, then Snap Art
That was rather easy. Honestly, such experimental transformations are usually more difficult and end up with a result I don’t love … so, delete. I really like this one.
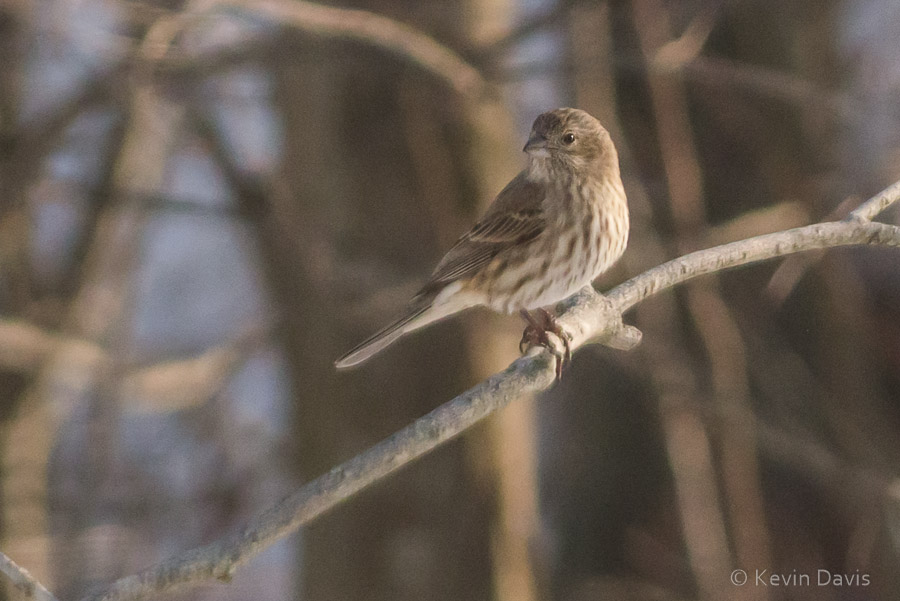
Last winter, I did a bit of backyard bird photography. Attached here is one of those images, where the bird looks quite good, but the background is distracting. As this was shot from my kitchen window, there was nothing I could do about the background (except maybe hang an artificial backdrop in the background trees
original image – shot with a MFT 45-200 zoom at f/8
Perhaps the background would be less distracting if the depth of focus was more shallow. A wider aperture might do the trick. This image was shot at f/8. The widest aperture on the lens is f/5.6.
Enter … a software filter called Bokeh2, by Alien Skin. The term ‘bokeh’ refers to the characteristics of an out-of-focus lens. Some lenses have a more visually appealing bokeh than others. The Bokeh 2 software simulates the bokeh effect and includes several presets that emulate specific lenses. So here is an edited version of the image, using Bokeh 2 to simulate an aperature of f/2.8 to soften the background and make it a bit less distracting.
Background softened using Bokeh 2
Although this does not entirely remedy the distracting background, it does reduce the distraction by softening it. You might achieve a similar effect with a basic Gaussian Blur filter, but Bokeh 2 aims to simulate characteristics of real lenses. This would be very significant if the background here had specular highlights, as real optical bokeh has a different effect than simple blur.
Maybe you wanted a web domain name <YourName>.com, but it was taken by someone else. This conflict is being blown apart, beginning in 2014 and onward. There are more than 1600 applications to create new top level domain names.
Think about what your new domain name could be.
<YourName>.music, <YourName>.blog, <YourName>.cool, <YourName>.tech, <YourName>.now
At a glance, here are just some of the proposed new domains
http://www.1and1.com/new-top-level-domains
I can easily imagine there will be millions of dollars spend on securing new domain names.
Just think how many people will want to own HipHop.music or HowTo.book
A year ago, I almost bought an Epson 3880. Last week, I did buy an Epson printer, but opted for the 3000 instead of the 3880. Here is are a few reasons:
(1) the 3880 will print 17×22 paper, which is one size larger than the 3000
(2) the 3000 will feed both sheet paper and rolls
(3) the 3000 has built-in wi-fi
(4) the 3000 costs $300 less than the 3880 (after mail-in rebate)
(5) both the 3000 and 3880 use medium-size ink cartridges
specifically, 80ml volume (compared to 59ml for the R2000)
Between the years 2000 – 2010, Epson has been the standard bearer among semi-pro inkjet printers. Canon has since taken some of that market share from Epson. The Canon Pixma Pro-10 competes directly with the Epson 3000 and is comparably priced. The Canon may print a bit faster and includes 50 sheets of paper with the printer (worth $45).
Epson also offers larger printers (for 17″ wide and 24″ wide paper); Canon does not.
The real cost of a printer is not the printer itself, but the cost printing. The per-sheet cost is primarily a combination of paper and ink. For more info regarding per-sheet cost: http://www.redrivercatalog.com/cost-of-inkjet-printing.html
(The cost of paper can vary widely as there are many choices today for paper.)
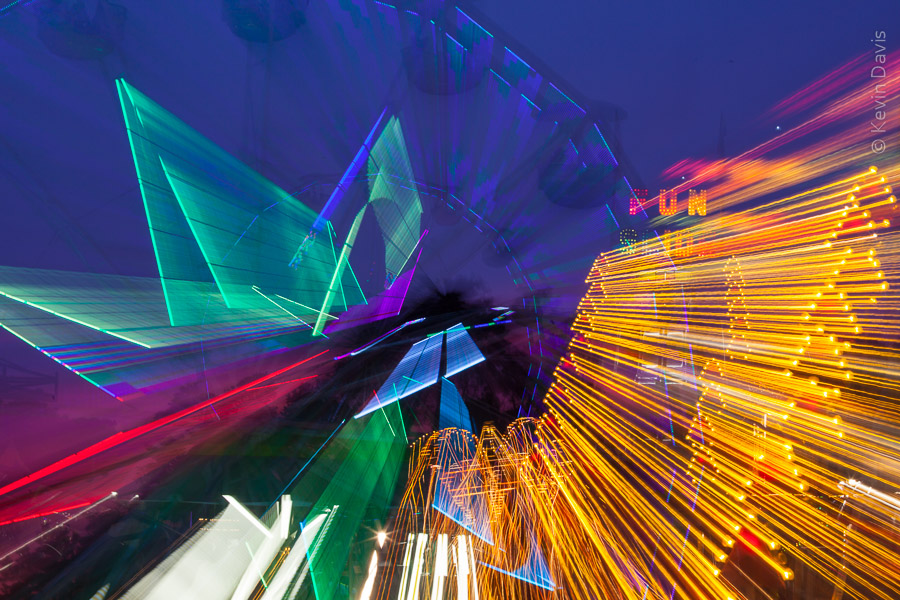
Bright colors. That’s pretty much what it’s all about when photographing amusement park rides. Daytime photographs pale in comparison to night photographs of the rides.
Long exposure of midway rides (at Washington County Fair)
This photo here is from the Washington County Fair (Rhode Island). Although there was a fabulous pink sunset, I did not see it in time, so missed that photo opportunity. In this photo here, there is just a hint of the pink color in the bottom left background.
The best time is dusk. Just after the sun sets, there is still some light in the sky, but it’s darker than the lights, resulting in some contrast.
OK, so … it’s dark. Can your camera make a photograph? Sure. But you may need a long exposure, longer than 1/30 second. This shutter speed for this photo here is 1.3 seconds.
A slow shutter speed implies the camera could move slightly during the exposure and mess up the photo. So you need to stabilize the camera. Tripod is the right solution to this problem, but in this example here I had a monopod (just one leg). With the camera on the monopod, I braced it against something solid. A telephone pole will do; in my case, it was an above-ground pool, on display near the midway.
The last ingredient in this photo is, of course, the zoom effect. With the camera set to 2-second delayed shutter. I pressed the shutter button and poised my hand on the zoom ring of the lens. When the shutter clicked open, I rotated the zoom ring.
Recently, a friend shared a NBC news report stating that new technology allows criminals to locate your child from a photo you posted on the internet. If you took the photo in your home, the exact location is available to everyone. If you took the photo at your local park, that location is available to anyone.
Please don’t be overly alarmed. There is nothing New here to be afraid of.
1) All digital cameras attach information to photos, such as camera settings. The GPS location is very common in “smart phones” but is also included in some consumer cameras (not phones).
2) As noted in the news report, smart phones allow you to either turn off location information entirely (which would undermine some map applications) or simply eliminated it from photos.
3) The report states that this is “new” technology. But please note two important things. The NBC news report is from 2010. Embedding location data has been supported by iPhone since 2008.
4) Probably true for video also.
5) You can always remove data attached to a photo. One such app for Android devices, called Image Privacy. For iOS, you might try deGeo or Photo Check.
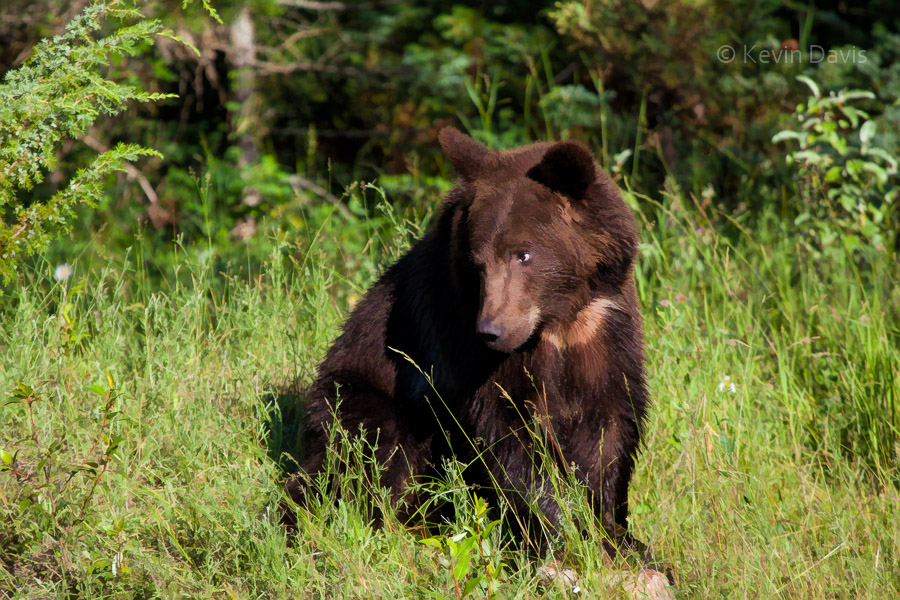
Here is a before/after of Bruno the grizzly bear. The first image is straight from camera, without any filters applied.
Unmodified straight from camera
.
And here is a modified version using a painterly filter by Topaz Labs.
I don’t do this sort of thing a lot, but I like the effect here on Bruno’s fur.
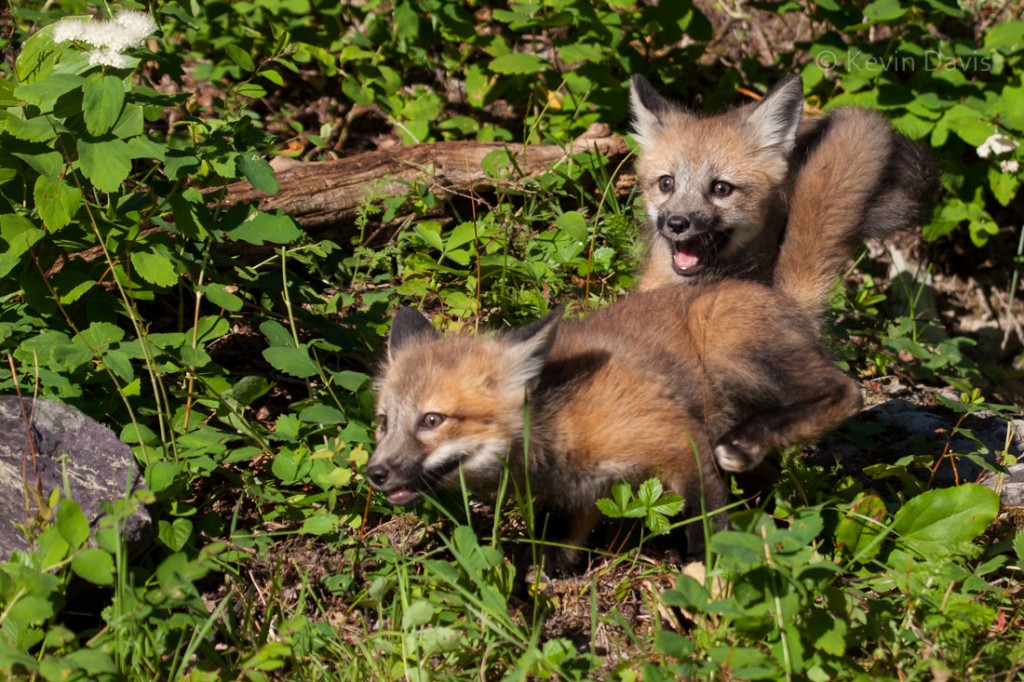
When I heard about this photography opportunity, I could not ignore it. Everyone loves baby animals! A 3-day workshop with leader Jeff Wendorff, to photograph baby animals at a game ranch in Montana.
Wolf cubs, Red Fox cubs, Bobcat kits, a 4-month-old Tiger, and more. The cuteness factor is very high.
I discovered limitations of my camera equipment that I had known before; particularly, my ability to quickly select a focus point. In this regard, I have never considered the Canon 5D2 to be cumbersome, but I found here that the controls are not quite agile enough. The common technique of focus, then recompose, takes 2 seconds and that’s not fast enough. The wolf cubs were particularly difficult; they are very energetic and very fast.
All totaled, I shot somewhere around 3400 photos. By comparison to some other folks, that’s not a lot.
After editing, I had fewer than 1000 images. (I should probably do another round of editing and cut that number in half.) Images were rejected for a variety of reasons. Maybe my composition cut off the tip of a tail. Maybe the animal’s ears were pointing in an odd way. Sometimes there is nothing particularly wrong with the image, but I have a similar image that is slightly better. Delete the weaker image because there is no point in keeping both images.
[ Click on either image to see a larger view. ]
The workshop included a 4th day, just in case foul weather might interfere with the workshop, though this wasn’t necessary the week we were there. So we had the option to photograph some other animals, including adult animals and a 1.5-year-old Grizzly Bear.
Of the 3.5 days, two days are jam-packed busy. The other 1.5 days are still busy but not as exhausting.
Not only is Jeff Wendorff (jeffwendorff.com) an expert at photographing wildlife, but he also has an excellent relationship with the staff at the game ranch.
One of those posts regarded the yet-to-be-available and much-to-be-desired Canon 200-400; that lens is now available.
MFT zoom lens without a teleconverterMFT lens with 1.7 teleconverter
This week, I have had two different needs for a long lens.
Photographing wildlife. I will be at a game ranch next week. I must choose and rent some long telephoto glass. (If this need arose more frequently, I would purchase/own it.) What lens choices available to me?
First, note that there is generally a trade-off between any fixed-focal-length lenses (non zoom) that have wide aperture (gathers more light) and zoom lenses, which provide variable focal length but sacrifice a bit with regard to aperture. I would love to have multiple long lenses at my disposal; but if I must choose one, then the flexibility of a zoom is the safe choice.
Zoom options. Top of the list is that new 200-400. Hands down, that is the lens I want to shoot with. The problem is the price tag; the rental fee is over $600 and purchase price is more than $10,000. This leaves me with a choice of the Canon 100-400 f/4.5-5.6L, Canon 100-300 f/4.5-5.6L, that same 100-300 plus a 1.4x teleconverter, or possibly a third party lens such as Sigma.
Multiple reviews across the internet all agree that the 100-300 is a superior lens compared to the 100-400. Unless you need the extra reach of 400mm. Apparently the 100-300 is not compatible with Canon teleconverters. So I chose the 100-400.
Photographing an ocean event from the shore. The event this week was the Greasy Pole challenge at the St. Peter’s Festival in Gloucester. For this event, I opted to test something new with a small camera, specifically, my micro four-thirds (MFT) camera, a Panasonic Lumix G3.
All micro four-thirds cameras use an image sensor that is the same size and is half the size of the sensor in my DSLR. A 200mm lens on the smaller camera is like putting a 200mm lens on the larger camera and then cropping the image to ½ size. It is called “crop factor”, but it implies that the smaller sensor size makes a 200mm lens seem like 400mm. Image quality of my MFT camera is very good, but significant image noise is present at ISO 800 (because the image sensor jams pixels into a much tighter space).
My zoom lens for MFT goes up to 200mm. For whatever reason, neither Olympus nor Panasonic offer a real teleconverter for MFT. So I tried a 1.7x teleconverter that threads on to the front of the lens. If we ignore the fact that the sensor is small, the result is akin to 1300mm. Or considering the small sensor size, it is like shooting a full-frame camera with a 680mm lens and then crop the image to one half size (you get fewer pixels, but it looks like zoom).
[Click on any of the included images to see a larger view.]
The sample images shown abive are (1) without the teleconverter and (2) with the teleconverter. The teleconverter is worse than I had hoped; it causes very significant loss of sharpness and contrast. Is this acceptable? No, not for me. But the teleconverter was a remnant piece of equipment (from a deceased video camcorder) that was collecting dust at home and cost me nothing to try it.
Without any teleconverter, but image is cropped
The last image shown here is shot without the teleconverter and then cropped to achieve the same perspective as though I had used the teleconverter. The result has far fewer pixels than originally captured by the camera. Using computer software, I then artificially increased the size of the image, to arrive at a 10-megapixel image with far better image quality than when shot with the teleconverter.
So, for situations like this one, where auto-focus is not particularly important, I come to the same conclusion as before. An old/used telephoto lens for any SLR, with an adapter to fit it onto a four-thirds or micro four-thirds camera.
And my best MFT solution that includes auto-focus, would be the Panasonic 100-300/4-5.6 Lumix G Vario (cost roughly $600).
A beautiful morning Thursday in Beverly Massachusetts. I was there not to make photographs, but to get my car repaired. By some accounts, Beverly is the birthplace of the U.S. Navy. In recent news, it is the home of Angie Miller, a finalist in the American Idol singing competition.
After breakfast with a friend and a bit of research at the library, I walked the short distance to Dane Street Beach. A chilly wind was coming in off the ocean, but that didn’t stop some folks from sunbathing.
Returning from the beach, I did not have a “camera” with me, but I did have a mobile phone that has a camera built in. Thought about maybe making a few photographs, but the time was almost noon and the light was bad.
What is “bad light”? It is a term that outdoor photographers sometimes use. “Bad light” is often caused by bright sun directly overhead; it results in high contrast and hard-edged shadows. If you look at a shadow (shadow cast by a tree or a person’s nose, it doesn’t really matter), the edge of the shadow can be a sharp transition from dark to light, or a softer gradual transition. Great weather for a picnic usually implies deep shadows with hard edges.
So, what is a photographer to do when the light is harsh? First, you can make photographs in some shady spot; within the shade, the contrast is not as high, shadows are more subtle or perhaps disappear entirely (everything is under the same shadow).
Second, you might photograph subjects that are naturally high contrast. So, on my walk back to the auto repair shop, I shot the two photos attached here.


")