How to Print Photographs

How to Print Photographs

You have three primary options for printing digital photographs on paper; I will offer a bit of insight to each of these.

  1. Have a photo lab print it onto photographic paper
  2. Have a photo lab print it via inkjet printing
  3. Print it yourself via inkjet printing

_1280502

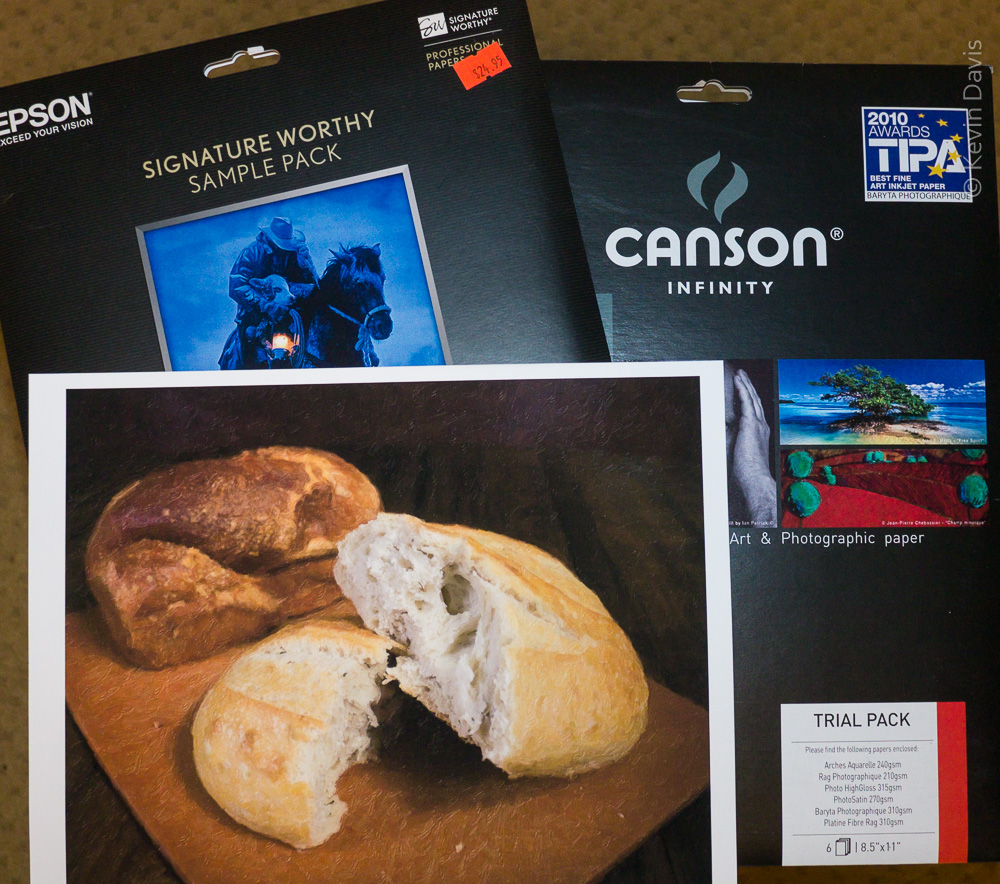
Photo lab – print on traditional photographic paper

Traditional photographic paper has been used since before digital photography existed.  Embedded within the paper, a chemical process reacts to light.  With the advent of digital photography, the method of projecting the image onto the paper has changed, but the paper itself is basically the same technology as was used forty years ago.  Once the paper has been exposed to light, it must be processed through several chemicals, washed, and dried.  Though it may seem to be a complex process, the process is typically done by machines and is inexpensive.  Because a the image is formed by a chemical change within the paper, no ink or dye is applied to the paper surface.

The light sensitive paper (produced by Kodak, Fujifilm, Ilford, and others) is available with a glossy surface, matte surface, of something in between, typically referred to as semi-gloss or luster.  Some paper produces black & white (a.k.a. grey-tone) image, while other papers produce a color image.  Metallic color paper is a widely available option that has reflective specs embedded in the paper; an image on metallic paper can be quite stunning, but should be displayed under very good light to achieve the best effect.

Photo lab – print via inkjet printing

Inkjet paper is a far more simple material compared to light-sensitive paper.  There is no chemical process built into the paper; it is basically just paper, made from wood fiber, cotton fiber, etc.  However there are many options available with varying characteristics of surface sheen, surface texture, tonality, brightness, and contrast.  Each photo printing lab will offer a limited range of paper options, papers with which they have experience and of which they understand the characteristics.  If you are uncertain which paper to choose, you can discuss this with the lab, particularly considering the specific image(s) you want to print.

Though I can print images on my own inkjet printer, I have sometimes chosen to use a professional print lab for a few different reasons.

  1. Printing can be a pain.  For example, when printing on thick paper, I have to feed paper into my printer one sheet at a time.
  2. To print on a paper size larger than my own printer capability.
  3. To experiment with some different papers, without buying a full package of that paper.

Just because you send your images to a professional print lab, doesn’t guarantee that what the print will look like the image on your display screen … what you see is what you get (wysiwyg).  You still need to do some work BEFORE you send your image to the lab.  The necessary preparation is the same as printing it yourself, so jump ahead to Print it yourself.

Photo lab – print via dye sublimation

Dye sub printing is far less common than other methods.  I have not used it and we’ll just leave it at that.

Print it yourself

As inkjet printers are widely available for personal and business use, making photo prints is entirely within your grasp.  If you are unsatisfied with prints made by photo labs, you can take matters into your own hands.

Manufacturers of inkjet paper may offer a sample pack containing a variety of different papers.  See the image at top of this post.

Most digital photographs are represented via RGB color space … red, green, blue.  In general, inkjet printers do Not use RGB inks.  This implies that a conversion is necessary.  Your printer likely will attempt this conversion.  Your computer software may also attempt this conversion.  Very possibly, the resulting print will not be quite as you hoped.

How can we best insure that the print will be as we expect?  Achieving a good print requires a few steps BEFORE sending the digital image to print.

Color-manage your computer display

In general, most computer displays do not render colors accurately.  What you see on your display screen can be very different to what comes out of your printer.  To insure that your display is accurate, use a device called a colorimeter.  This device measures the actual colors coming out of your display screen and then places a correction table into your computer so that colors are corrected.  The two most popular brands are ColorMunki (by Xrite) and Spyder (by DataColor).

Who you gonna trust?

You can either trust your printer to manage color properly, or trust your computer application to manage color properly.  If both are trying to manage colors, then that’s going to be a problem.  Pick one or the other.

If you choose to trust your printer, then be certain that your computer application (that which is sending the image to the printer) is Not managing color.  Then, depending upon the ink and paper you choose to use, you may need to update the RIP firmware of your printer, if that is even possible.

The more common approach is to control color within the computer application.  In the printer settings, disable the printer’s own color processing.  With this feature disabled, the job of insuring correct color is entirely in the realm of the computer software application.  Not all applications have this ability.  (I generally print from Adobe Lightroom or Adobe Photoshop.)

Three things can impact print color:  the specific printer are you using, the specific ink, and the specific paper.  For example, you might be using a warm-tone paper or a bright-white paper.   A “color profile” includes everything your computer application needs to make a print using the specific combination of printer + ink + paper.  For example, if I am printing with an Epson 3880 printer, with Epson ink, printing on Canson Infinity Photo Satin paper, the paper manufacturer provides a “color profile” absolutely free.  After downloading the color profile from the paper manufacturer, I can specify this color profile when sending an image to my printer; this insures that the colors are rendered accurately for that specific combination of printer, ink, and paper.

Color profile selection in Lightroom

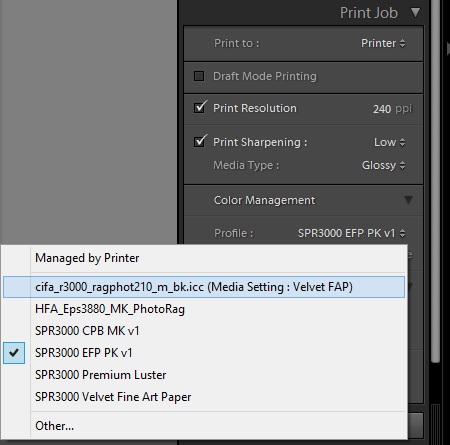
In the screen snapshot here (Lightroom), notice that the first option is “Managed by Printer”; the remaining options are all different color profiles, meaning the printer is Not managing color.

If the paper manufacturer does not have a color profile for your specific printer+ink combination, then you have a problem.  You might experiment with some available profiles and find one that that seems to produce good results.  Else, you have to make your own color profile.  This requires the use of a colorimeter.  This may or may not be the same device you used to profile your display screen.  The difference here is that the device must measure light reflecting off printed paper rather than measure light emanating from a display screen.  If you want to, you could print on a white paper shopping bag – there is no color profile for that, but you could potentially make your own using a colorimeter.


Bread Art (Photographing Bread)

For the purpose of illustrating a theme, I was recently offered the task of photographing bread.

Final image (digitally modified using photoshop)

Here are the steps in making this image.

Although I originally thought this shoot might require actually baking my own bread, I quickly discarded that thought and went to my local market.  The market sells specialty loaves that are far more attractive than anything I can make.  So I purchased two different loaves of bread.

Initially, I photographed the unbroken/unsliced loaves.  Then I thought to slice the bread, but instead chose to tear it in half for a more natural look.  Good call.

Original bread photo unmodified

After photographing for a half hour, this is the image I chose as the best.
Compare this original to the final image (shown before it).  For a larger view, click on either image.

In Photoshop, I copied the image onto two new layers and applied a different filter to each layer.  The first is a stylized using a plugin by Topaz Labs. But the effect is largely obscured by the next layer above it.

The next layer applies an artistic painting look using a plugin filter called Snap Art by Alien Skin.   Through the use of a layer mask, the effect is not applied to the inside of the bread loaf.  See the layers panel snapshot below.  Where the mask is dark, you see the underlying layer.

Finally, to highlight the bread, I created a darkened vignette using a curves layer.  The final image is shown at the beginning of this blog post.

U9A3235_bread_art-layersHere is a look at my layers in Photoshop.


Photography promo card

Here’s a marketing/promotional item I created recently.

Accordion card
Accordion card


This accordion card has 5 pages front & back, for a total of 10 faces.  The five images you can see on this side are scenic photos.  The other side has four event photos, two sporting events, and two non-sport.  The last panel has info about me, including my contact info.

The quality of the piece is excellent.  I am very pleased with how it printed.  It was printed by Miller’s Lab on “classic felt” paper, 130# / 325 GSM.  Each folded card is 3.5 x 5″. In retrospect, I am very happy with the size; small enough to fit in any pocket, yet large enough that the photo quality is clearly evident.  Although Millers does offer an optional coating on the felt paper, I had their paper samples in hand and judged that a coating wasn’t necessary; I am glad for that decision. Unfortunately, the lab does not fold them, as you can see the flattened cards in the background of the photo here.  I had to fold them all.  Envelopes are provided.

Here are a few vendors that provide accordion cards.
# of pages / # of panel faces / dimensions

Apollo      …     4  /  8  /  4.25×5.5″
Miller’s    …     5  /  10  /  3.5×5.5″
Miller’s    …     3  /  6  /  4.25×5.5″
Miller’s    …     3   / 6  /  5×5″
H+H        …     4  /  8  /  4×5.5″
Bay Photo  …  3  /  6  /  5×7


Winter Light (photography)

Winter Light (photography)

The grey season.  In the northeast, wintertime without snow is a drag, particularly for outdoor photographers.  I need some snow here.  Not just on the ground – we need snow sticking to tree branches.

This winter has brought a fair amount of precipitation, but it’s been rain rather than snow.  What little snow we’ve seen has quickly washed away as snow turned into rain. So here are a few shots from last winter.

Old grist mill, in winter


The first is an old grist mill. It is pretty – I hope that much is obvious. However, the light may not be obvious. The orientation of the mill and surrounding trees doesn’t catch much direct sunlight. The sun is setting on the other side of those trees. The light is what it is and there’s no changing it.

In photography, we have to be aware of the orientation of the subject with regard to the light.   When the light on the subject is not what we would prefer, you can sometimes move the subject, but not if the subject is a building.  You can sometimes move the light, but not if the light happens to be the sun.  You might come back at a different time of day, when the sun is in a different position.  However, I believe this mill is in shadow of the trees both morning and evening.

Church at sunset
Church at sunset

Sometimes, in outdoor photography, using only available light, there’s nothing you can do to change the light on the subject. But you might find a different subject to photograph. Across the street, a church was catching the light of the setting sun. So, I photographed the church. And next to the church is a historic one-room schoolhouse. Nice light, eh?


(To see a larger view, click on any image. )

One-room schoolhouse

I included this last image (schoolhouse) in a recent 2015 wall calendar.

Memory Cards – What Speed Do I Need?

Memory Cards – What Speed Do I Need?

CF, SD, and micro SD memory cards

The photo here shows some of the memory cards I have used in my digital cameras.  The oldest is the SD card at center, rated at 20MB/sec.  The newest and fastest is at the top (SanDisk, CF card), rated at a maximum speed of 120 MB/sec.

Historically, CF cards have supported faster data transfer (read and write) than SD cards.  The reason is simple – a CF card can transfer 16 bits all at once, whereas a SD card can only transfer 4 bits at once.  Count the electrical contacts on an SD card – there are 9 pins.  Count the pin holes on a CF card – there are 50 pins.

SD-class-symbolsStandard SD cards (SDHC, SDXC) are deemed UHS class I.  A recent evolution of the SD card format has introduced SDXC UHS class 3.  These cards have 7 additional electrical contacts and allow faster data transfer up to a theoretical limit of 300 MB/sec (equal to the limit for CF cards).  These cards should be backward compatible with older cameras that support only the 9-pin UHS-I interface, but you will not see the speed advantage of the faster interface.

For historical reasons, the maximum speed of a memory card may be shown as a multiplier, such as 100x, 266x, etc.  The baseline is 150 KB/sec.  So 300x means 45 MB/sec (45,000 KB/sec).

Instead of an”x” rating, CF cards will typically be labelled with a simple speed rating in MB/sec.  For SD cards, a speed class rating is newer than the old “x” rating .  Class 6 means that the card can support at least 6 MB/sec.  Class 10 means 10 MB/sec or more.

The speed class rating has been supplanted by the UHS speed class rating (Ultra High Speed).  UHS Class 1 means the card will support a write speed of 10 MB/sec or better.  UHS Class 3 (a.k.a. U3) means the card will support a write speed of 30 MB/sec or better.

 How fast does a memory card need to be?

Writing to the card and reading from the card are really two different considerations.  If you’re capturing 1080 HD compressed video, a momentary burst up to 30 MB/s is possible, but the sustained data rate is not that high.  You need a Class 10 card.  For 4K ultra-HD video recording, you need UHS Class 3.  If your card can’t quite keep up, your camera will likely abort recording.

If you are a sports photographer, capturing ten images per second may amount to 300 MB/sec but this speed need not be maintained constantly.  If your card cannot keep up, your camera will report “busy” for a second or two, during which new images cannot be captured.

At the end of the day, you need to upload the photos and video to a computer.  That’s when you want to have the fastest speed reading from a card.

 Card Readers

For years, photographers relied upon Rob Galbraith (http://robgalbraith.com) for his work measuring the read/write speeds of both memory cards and card readers.  Then Rob moved to a full-time job and could no longer maintain the database.  Recently there has been an update, seen here by PhotoShelter:

http://blog.photoshelter.com/2014/10/photoshelter-card-reader-database-why-you-should-upgrade/

Three tables are presented.  The first shows data transfer rate when reading from memory cards to a 2013 Mac Pro.  The second is the same, but using a 2014 Macbook Pro.  The third table regards XQD cards, which are new and relatively uncommon (notably, the Nikon D4 supports XQD cards).  Higher number means faster data copy – the numbers are MB/sec.

The fastest card readers for (SD and CF cards) are:

The best speed requires that you connect the card reader to a USB 3.0 port on your computer.  USB 2.0 is limited to 50 MB/sec, while USB 3.0 is limited to 145 MB/sec.

“You’re wasting time and not using your expensive gear to its full potential if you haven’t upgraded your cards and readers in the past two years or so.”
(Photoshelter, Allen Murabayashi)

I don’t entirely agree with Mr. Murabayashi.  If you haven’t upgraded your cameras, then you probably don’t need to update your cards and readers.  My general practice is to always buy new cards when I buy a new camera.


Giant Pumpkin – world record

Giant Pumpkin – world record

Giant pumpkin weigh-off competition

As recently as 1983,  the world record for largest pumpkin was still less than 500 lbs.

Just twenty-nine years later, 2012, the world record had increased four fold … 2009 lbs, established at the Topsfield Fair.  The first pumpkin ever to weigh more than one ton.

The photo here shows the giant pumpkin weigh-off competition at the 2012 Deerfield Fair.  A new world record was established, but the record only lasted one day, as the record was beaten the very next day at Topsfield Fair.  (Happily, I was preset at both these competitions.)

In 2014, the title moved to Europe.  2323 lbs, grown in Switzerland.


#giantpumpkin

Drones for Aerial Photography, under $2000

Drones for Aerial Photography, under $2000

Kevin flying a DJI Phantom

The term “drone” is commonly used in pop media, more common than alternative terminology UAS (unmanned aircraft system) or UAV (unmanned aerial vehicle).   To my mind, a drone implies an automated military device – I prefer the term quadcopter.

As far as you or I are concerned, we serve as the remote pilots while standing on terra firma.  We operate a radio transmitter while the copter is equipped with a matching radio receiver.  Different radio systems are available and they are not all compatible.  For example, some communicate via a 2.4 GHz radio frequency, while others utilize a 5.8 GHz.  The differences are not limited to radio frequency alone.

Anything that is labeled as Ready-To-Fly (RTF) will include a radio transmitter that is compatible with the drone.  If the product is not advertised as RTF, it may not include a transmitter, which is preferable for anyone who intends to re-use an existing transmitter they already have.

  • 3D Robotics Iris+  … $750
  • 3D Robotics RTF X8 … $1,350
  • Blade 350 QX      – $470
  • DJI Phantom I … $400
  • DJI Phantom II Vison+ … $1,300
  • Gaui … 330X … $400
  • Gaui … 500X … $1,150
  • Gaui … 540H  / hexcopter (6 rotors) …  $600 does not include transmitter
  • Parrot   AR drone … $300
  • Quantum Nova … $320
  • Quantum Venture … $400
  • TurboAce Matrix … $900
  • HUBSAN  X4  H107C-HD
  • SteadiDrone QU4D … $1700
  • Walkera QR X350 … $400
  • Walkera QR 800 … $1,700
  • Walkera TALI h500  / hexcopter (6 rotors) … $1900

For aerial photography purposes, you need a stable device that is easy to control – consider electric copters only.  Gas-powered machines are loud, extremely fast, and potentially very dangerous.

The rotational force of a single-rotor will tend to rotate the entire machine; this is why traditional helicopters have a small tail rotor, to counteract the rotational force.  Coaxial dual-rotor designs solve the rotational force problem by spinning two rotors in opposite directions, but this reduces the total lifting force.  Multi-rotor copters, with four or more independent rotors, solve the rotational problem by spinning half the rotors in a clockwise rotation and the other rotors in counter-clockwise rotation.

I expect (but have not verified) that all of the copters listed above are capable of lifting a small camera.  In the cases of some smaller copters, I had doubts and so did not include those in this list.

Please note that most of these copters will rely upon rechargeable LiPo batteries, for which I offer two tips.  A single battery might give you eight minutes of flight or twenty minutes of flight – so do have more than one battery.  These batteries are relatively high power devices and there have been stories of such batteries causing fire, sometimes during the charging process.  Do use protective LiPo storage bags such as LiPo Safe.

The most commonly used camera for these copters is a GoPro 3 or newer (e.g. Go Pro 3, Go Pro 3+, or GoPro 4).  Personally, I have used the Hero 3+ Black Edition; while I find that it captures great video, I am not impressed by the still image JPEGs.  Listed here are some of the available small “action cameras”, all of which I expect are primarily intended for video.

  • CamOne Infinity
  • Contour+2
  • ContourROAM3
  • Drift Ghost-S
  • Garmin VIRB Elite
  • Gear-Pro HD Sport Action Camera
  • GoPro HERO3+
  • GoPro HERO4
  • Ion Air Pro 3
  • JVC GC-XA2
  • Mobius Action Camera Pro
  • Polaroid XS100i
  • Polaroid Cube
  • Replay XD Prime X
  • Sony AS20
  • Sony HS100V

The last component for aerial photography is perhaps the first component to select when building a new system.  A motorized/computerized gimbal is necessary for aerial video, to remove the unwanted effects of aircraft movement.  The gimbal holds the camera, detects aircraft movement, and automatically moves the camera to counteract the aircraft movement.  Without one of these devices, your level horizon will be ruined anytime the copter moves left or right.  Gimbals are often designed to match the size and weight of specific cameras.  So, if you are thinking of using a specific camera, you need to be sure that you can get a gimbal that accommodates that camera.


Forest Service fee for any photography in national parks ?

Forest Service fee for any photography in national parks ?

Bicyclist making a photograph at Glacier National Park


The National Forest Service wants to charge you a large fee to make photographs on national lands (national forests or national parks).    The proposal covers “still photography and commercial filming” … without any further clarification, that seems to include you making a photo with your camera phone.

The proposal, an iterative evolution of past interim proposals because past efforts have been unclear.

>>   Federal proposal regarding still photography and commercial filming

Do check it out ASAP.  The Forest Service is accepting public comments until November 3rd.  You can easily provide your input on-line at the link above.  I did.


Canon EOS 7D mark II … is finally real

Canon EOS 7D mark II (image from Canon press release)

A month ago, I wrote of the Canon rumor mill and the forthcoming EOS 7D mk II.  Today, Canon officially announced that camera.

  • With 65 auto-focus points, your subject can anywhere in the frame (far away from center) and still achieve focus
  • Low-light shooting to ISO 16,000  (push it to ISO 51,400, but with added noise)
  • Excellent auto-focus in low light
  • Burst shooting at 10 frames-per-second
  • HD video at 60 frames-per-second
  • Uncompressed HD video output via HDMI connector
  • Built-in intervalometer  (with any other Canon DSLR, an external Canon intervalometer costs $130)
  • Priced less than $2000

—>    Canon EOS 7D mark II – first impression

—>    Scott Kelby’s first impression of the 7D mk II

I have been using the 5D mk II and chose not to upgrade to the 5D mk III when that was released (about 18 months ago).  The 7D mk II is the camera I was expecting and need for video and sports applications. (I do wish it had a tilting LCD screen.) On some points, Nikon’s cameras may still have an edge over the Canon 7D mk II.  For example, the recently announced Nikon D750 includes Wi-Fi, a tilting LCD screen, may yet have better image quality at ISO 12,800.  Yet, the 7D mk II price tag is $500 less than the D750 !

The whole Canon vs. Nikon thing is so over-done.  Both companies succeed in pushing each other to  new heights.  Fact is … my lenses and other accessories are all Canon and I don’t care if a particular Nikon camera has one additional feature.  Cameras are like shoes … the most important feature is how it feels to you.


The Next Big Thing – The “Buzz” Around New Cameras

Regarding possible upcoming cameras, the rumor mill regarding Canon cameras is ridiculous. Back in 2007, the rumors were circulating about the upcoming EOS 5D mark-II, which was not actually available until 2009.  Sometimes, I wonder if the manufacture is secretly feeding the anticipation buzz.

OLYMPUS DIGITAL CAMERA

I am patiently awaiting the EOS 7D mark-II, a revision of the 7D.  Over the past 12 to 18 months, rumors have been cropping up every month and the predictions just keep slipping further out, month by month.  The latest rumor suggests the camera will be announced the Photokina show in September 2014.


Why 7Dm2?  Because it promises a few features that would be useful to me.  First, faster auto-focus and high-speed shooting for sports (maybe 10 frames/second), similar or better than the existing 7D model. Second, auto-focus for video similar to the 70D, which was released several months ago.
These features are not curiosities that I simply “want”; these are limitations in my current DSLR, which I seriously need to remedy.

Canon to make Big Splash in September

If the camera is announced in September, there is only a very small chance that it would actually be available to purchase by end of this year.