Flowers blooming on Cherry trees is a harbinger of spring because Cherry trees bloom first, before other flowering trees. While these blooms are a much anticipated spectacle, predicting when the cherry trees will bloom … is difficult business.
From Macon Georgia to Boston Massachusetts, you can visit well-known groves of cherry trees. The trees bloomed in Georgia last week. Unfortunately, I missed it because of car trouble.
The very first blooms appeared in Macon GA around March 10. The very first blooms appeared in Washington D.C. just a few days ago.
The general blooming of Cherry trees in Washington D.C. has not happened yet, but should begin by end of this week. Midweek temperatures this week are still cool with overnight temperatures close to freezing. The current weather forecast tells that the temperature will warm this Thursday. So, blooms should be popping this coming weekend.
The best-known location around D.C. is the tidal basin, shown in the photo above. As you can see in this late-day photo, it can draw a dense crowd. You will not find crowds like this early in the morning.
Here’s one of my favorite photographs (from the coast of Maine) printed on canvas and mounted in a custom frame that I designed and constructed. As the print is on canvas rather than paper, there is no glass in front of the print.
As there are many options available for displaying photograph prints, here is a video to share some methods that I have used:
Paper
Traditionally, photographs are printed on paper, either a light-sensitive paper or an inkjet paper. Because such a print is typically not durable, the displayed print is protected behind a sheet of glass or acrylic (a.k.a. plexiglass). Furthermore, the print should not be placed directly against the glass/acrylic and the common separator is matboard, with an opening cut in the middle to show the print. The mat also provides visual space around the print, separating it from the frame; consequently, the outermost frame has larger dimension of height and width.
Note: Alternatively, you can use small spacer (instead of matboard) and the frame is then sized to exactly fit the dimensions of the print.
A print on paper is either adhered to a backer board or possibly suspended using an archival hinge. Collectively, the backer board, print, matboard, and glazing (glass or acrylic) are commonly inserted into the frame in one of two ways. If using a sectional aluminum frame, assemble three sides, slide the materials into the frame, and then attach the fourth piece of the frame. Any other frame is typically fully assembled first and the materials then inserted from the back side.
Canvas
The print shown here was printed by by Artistic Photo Canvas (APC). Having experienced their very good service and products, I recommend APC.
Canvas prints are commonly stretched around a wood stretcher frame. The result has a thickness unlike paper prints and that calls for a different type of framing. One common method is called a floating frame. Though this is “L” shaped like a regular picture frame (for paper prints), the foot of the L is behind the print rather than in front. The canvas print is inserted from the front and secured with screws from behind.
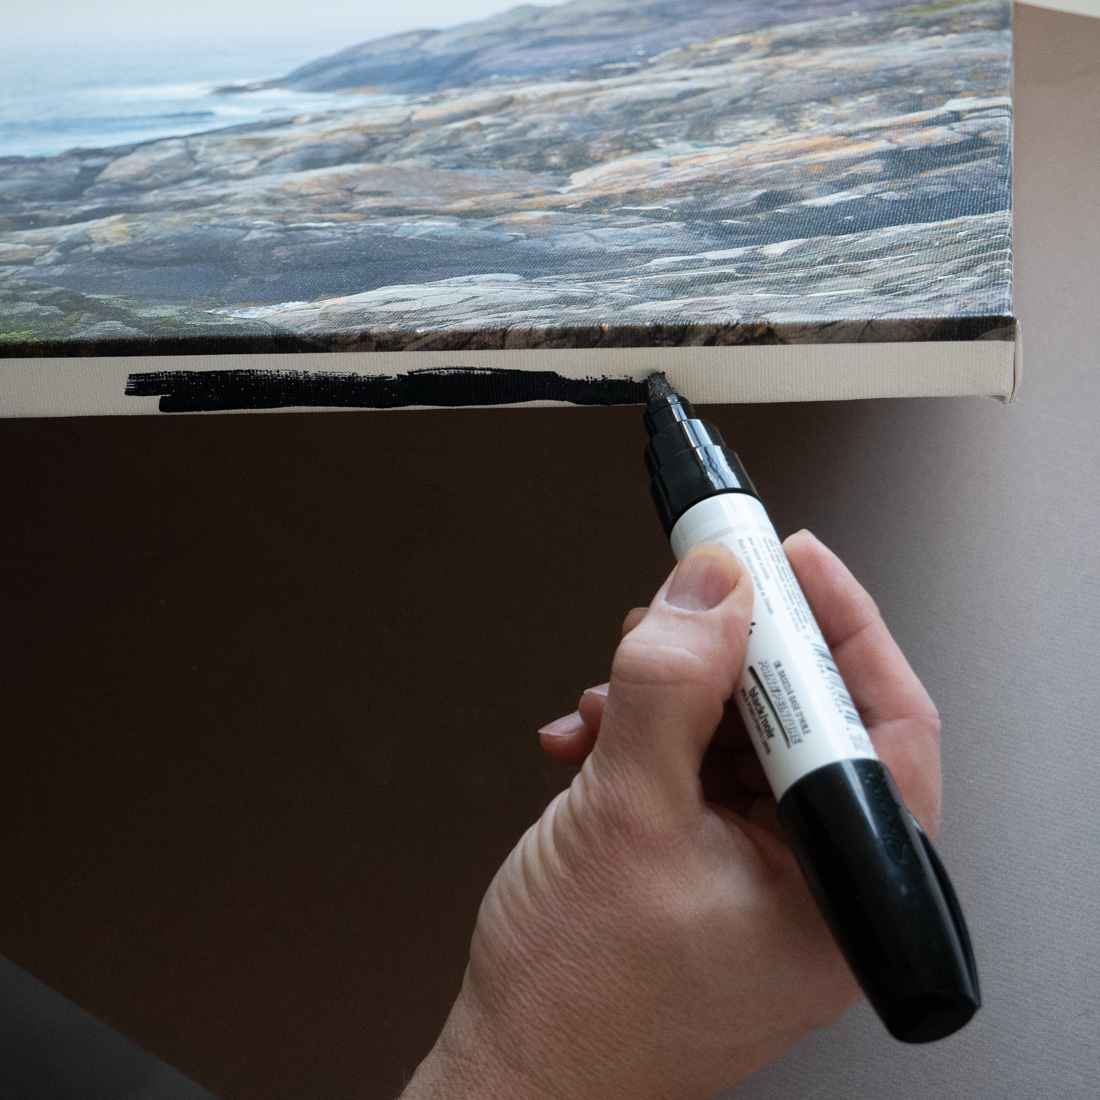
The floating frame allows for a gap around the perimeter of the canvas such that the print seems to float within the frame, without touching the frame. Depending upon the width of the gap, the edges of the canvas may be visible. For the particular print shown at the beginning of this article, I darkened the white sides of the canvas using an oil paint pen, shown here in the photo below.
Use an oil paint pen to darken the edges of a stretched canvas
Aluminum
Unlike a print on paper, which needs to be protected behind glazing, a print on aluminum provides a flat print that is inherently durable and does not need to be protected.
Typically, the cost of an aluminum print is 2.5x to 3.5x the cost of an inket print on paper. I checked ten vendors; the cost of a 20×30 aluminum print ranged from $22 to $140. I see no reason why some vendors charged more than $100. Before ordering a print on aluminum, I recommend that you shop around.
Custom Picture Frames
If you’ve ever taken a photo, drawing, or painting to a frame shop, you probably know that framing can be very expensive. I have sometimes invented my own frames; here’s more information:
The day of the new Mavic 2 release one week ago, numerous sites and YouTube channels already had reviews prepared. DJI had judiciously provided new Mavic 2 drones to people who would do these reviews. I have no intention of rehashing that stuff. I am interested specifically in the camera performance. Because I am largely interested in image quality, we’re talking about the Mavic 2 Pro, not the Mavic 2 Zoom. As for video quality, we’ll have to leave that for another day.
For high-quality images, DJI now provides this choice: Phantom 4 Pro, Mavic 2 Pro, Inspire 2 with Zenmuse X5s, Inspire 2 with Zenmuse X7. The unique value proposition of any Mavic is that it folds down to a size that can fit in a camera bag. A Mavic drone and remote controller requires physical space similar to a DSLR camera body and a zoom lens.
For photographers, is the upgrade worth it, from Mavic Pro to Mavic 2 Pro?
Yes, after brief testing this morning, there is no doubt in my mind.
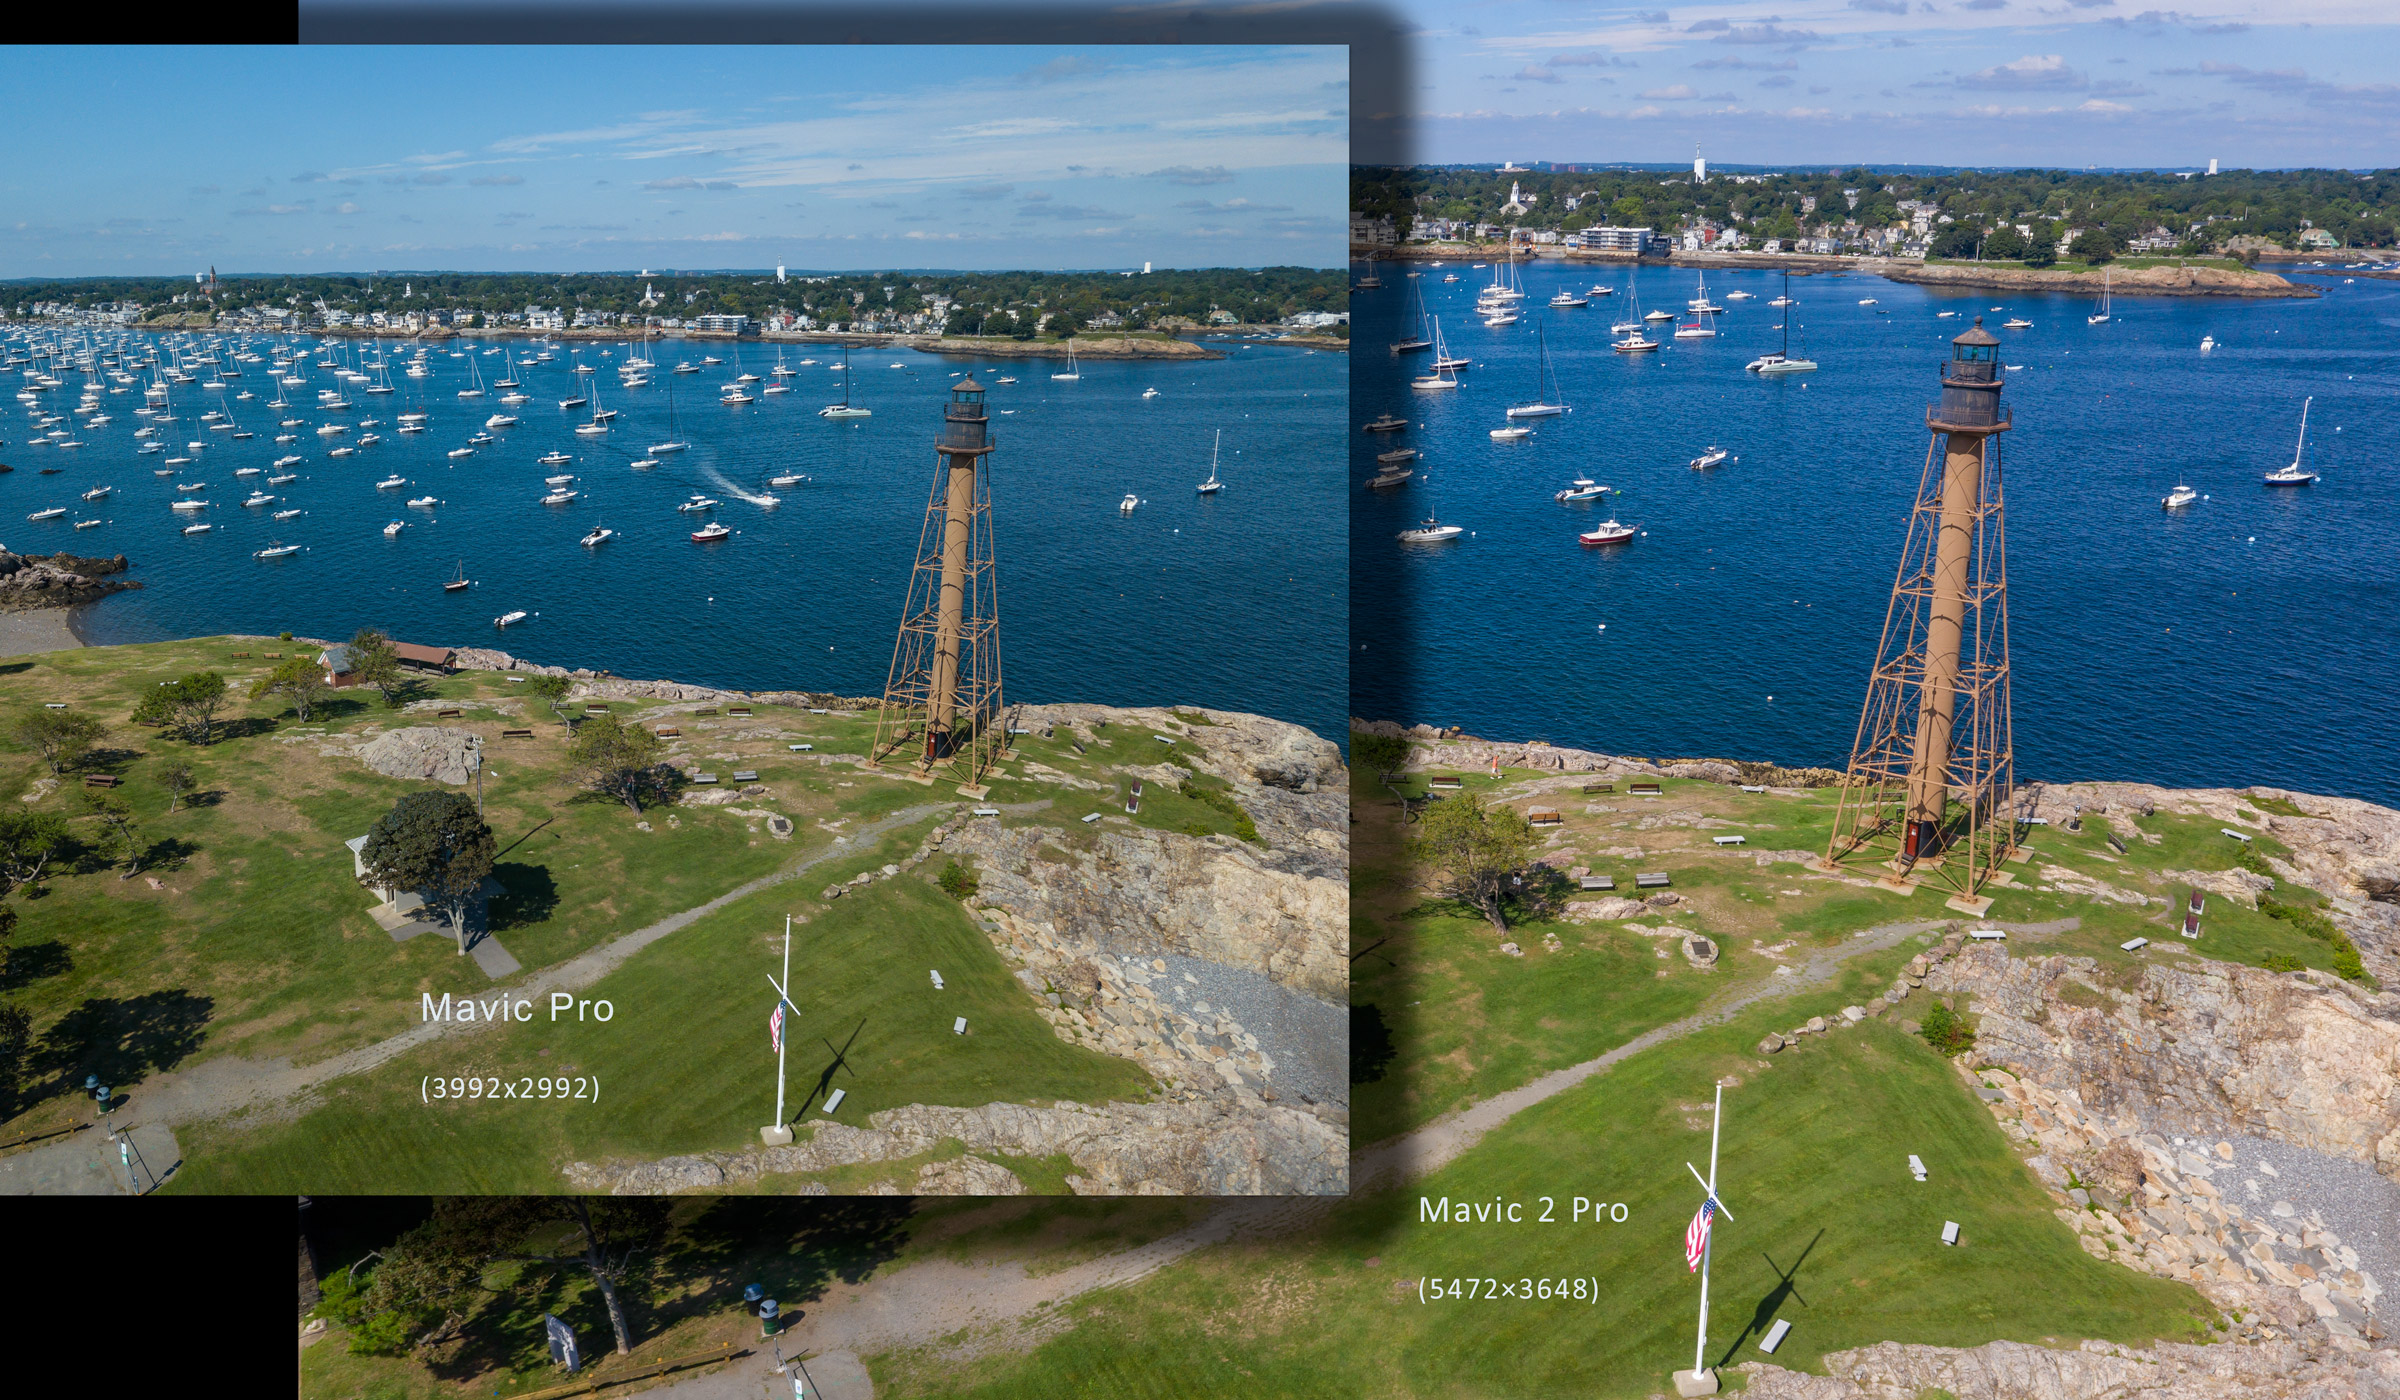
With the advent of Mavic 2 Pro, the camera difference between Mavic and Phantom has been erased. Both the variable aperture (f/2.8 to f/11) and the sensor resolution (5472×3648) are on par with the pre-existing Phantom 4 Pro and superior to the original Mavic Pro. Note that this is a 2:3 aspect ratio compared to a 3:4 aspect ratio of Mavic Pro, Mavic 2 Zoom, and Zenmuse X5s.
Note that camera is new and not exactly the same as P4P. DJI bought a majority stake in Hasselblad a couple years ago and this apparently is the first fruits of that partnership. (Yes, DJI essentially owns the legendary Hasselblad company.)
According to the numbers, the angle of view is a bit different, though I did not notice during actual use. Mavic 2 Pro provides a FOV equivalent to 28mm lens on a full-frame camera. This is narrower than the original Mavic Pro’s equivalent 26mm and narrower than the Phantom 4 Pro’s equivalent 24mm. Despite being less wide angle, vertical lines can still keystone strongly and you may choose to correct for that in post processing.
Here are the problems with Mavic Pro that I hope are improved with Mavic 2 Pro.
Dynamic range in the Mavic Pro was not very good. In high-contrast scenes, highlights can easily blow out and/or the shadows block up. To mitigate this, I have sometimes captured multiple RAW exposures and then post-processed for HDR.
Using RAW capture, if the highlights do not blow out entirely, the camera still fails to resolve details in the highlights. For example, houses with clapboard siding in full sun – the separation of the clapboards may be entirely absent in the image. This seems surprising to me … if the story is true that the RGB color space has finer granularity in the highlight range compared to the shadow range.
Image noise, particularly in shadows. To mitigate this, I have relied upon heavy-handed post-processing. While noise reduction in Adobe Lightroom is very good, there is a price to pay – higher levels of noise reduction can deteriorate details throughout the brightness range.
With high magnification, images lack sharpness. In post-processing, I have found it necessary to apply twice as much sharpening compared to my hand-held cameras.
Color from RAW images is typically worse than any other camera I have used (except perhaps GoPro Hero3) and the images require heavy-handed post-processing. Of course, RAW images from any camera will always require some degree of post-processing.
Blue/red chromatic aberrations. I commonly see this around white baluster railings. Lightroom’s ability to mitigate chromatic aberration typically fails to resolve the problem.
In summary, the Mavic 2 Pro does achieve small improvements in all of these problem areas. So let’s look at some actual images from the new Mavic 2 Pro compared to the original Mavic Pro.
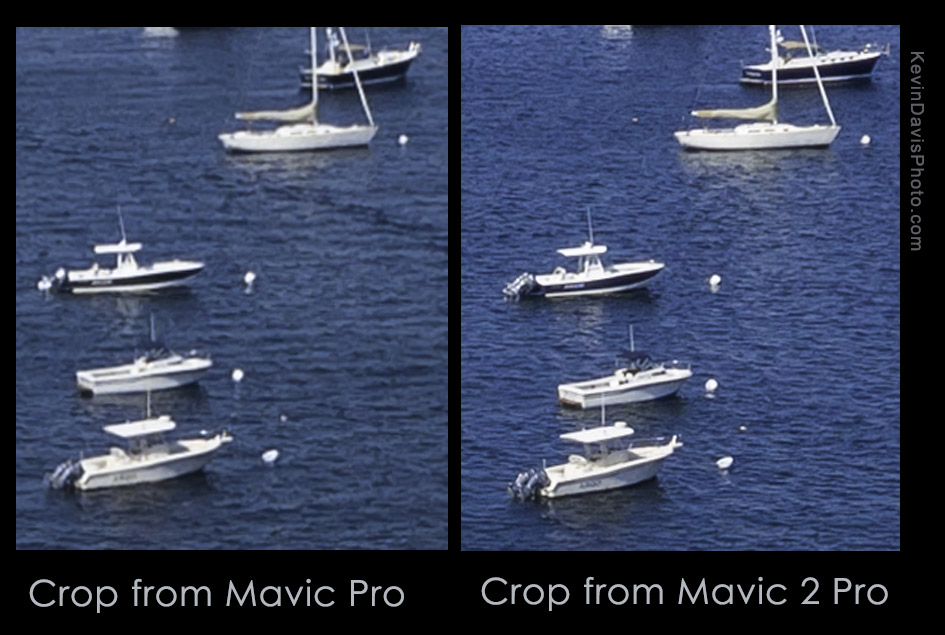
Harbor photographed with both drones
In high-contrast situations such as this scene with white boats and white houses, Mavic 2 Pro still has difficulty retaining detail in the highlights, but is not so bad that it requires HDR techniques to overcome it. It is still necessary to reduce the exposure by 1/3 stop to protect the highlights (this does not jeopardize shadow details) and also apply highlight reduction in post-processing.
[Click on an image to see the full resolution.]
[Images shown here are all RAW and individually post-processed to the very best of my ability using Adobe Lightroom.]
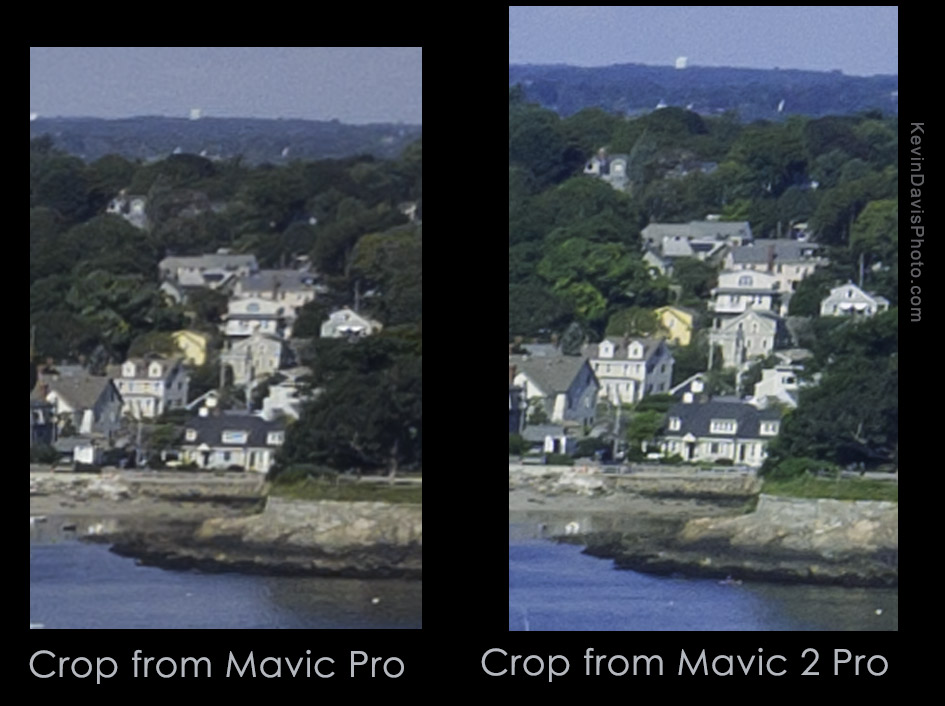
Detail in highlight areasImage sharpness
Noise reduction is still necessary but far less than with the original Mavic Pro.
Color of RAW images is much better, requires less correction.
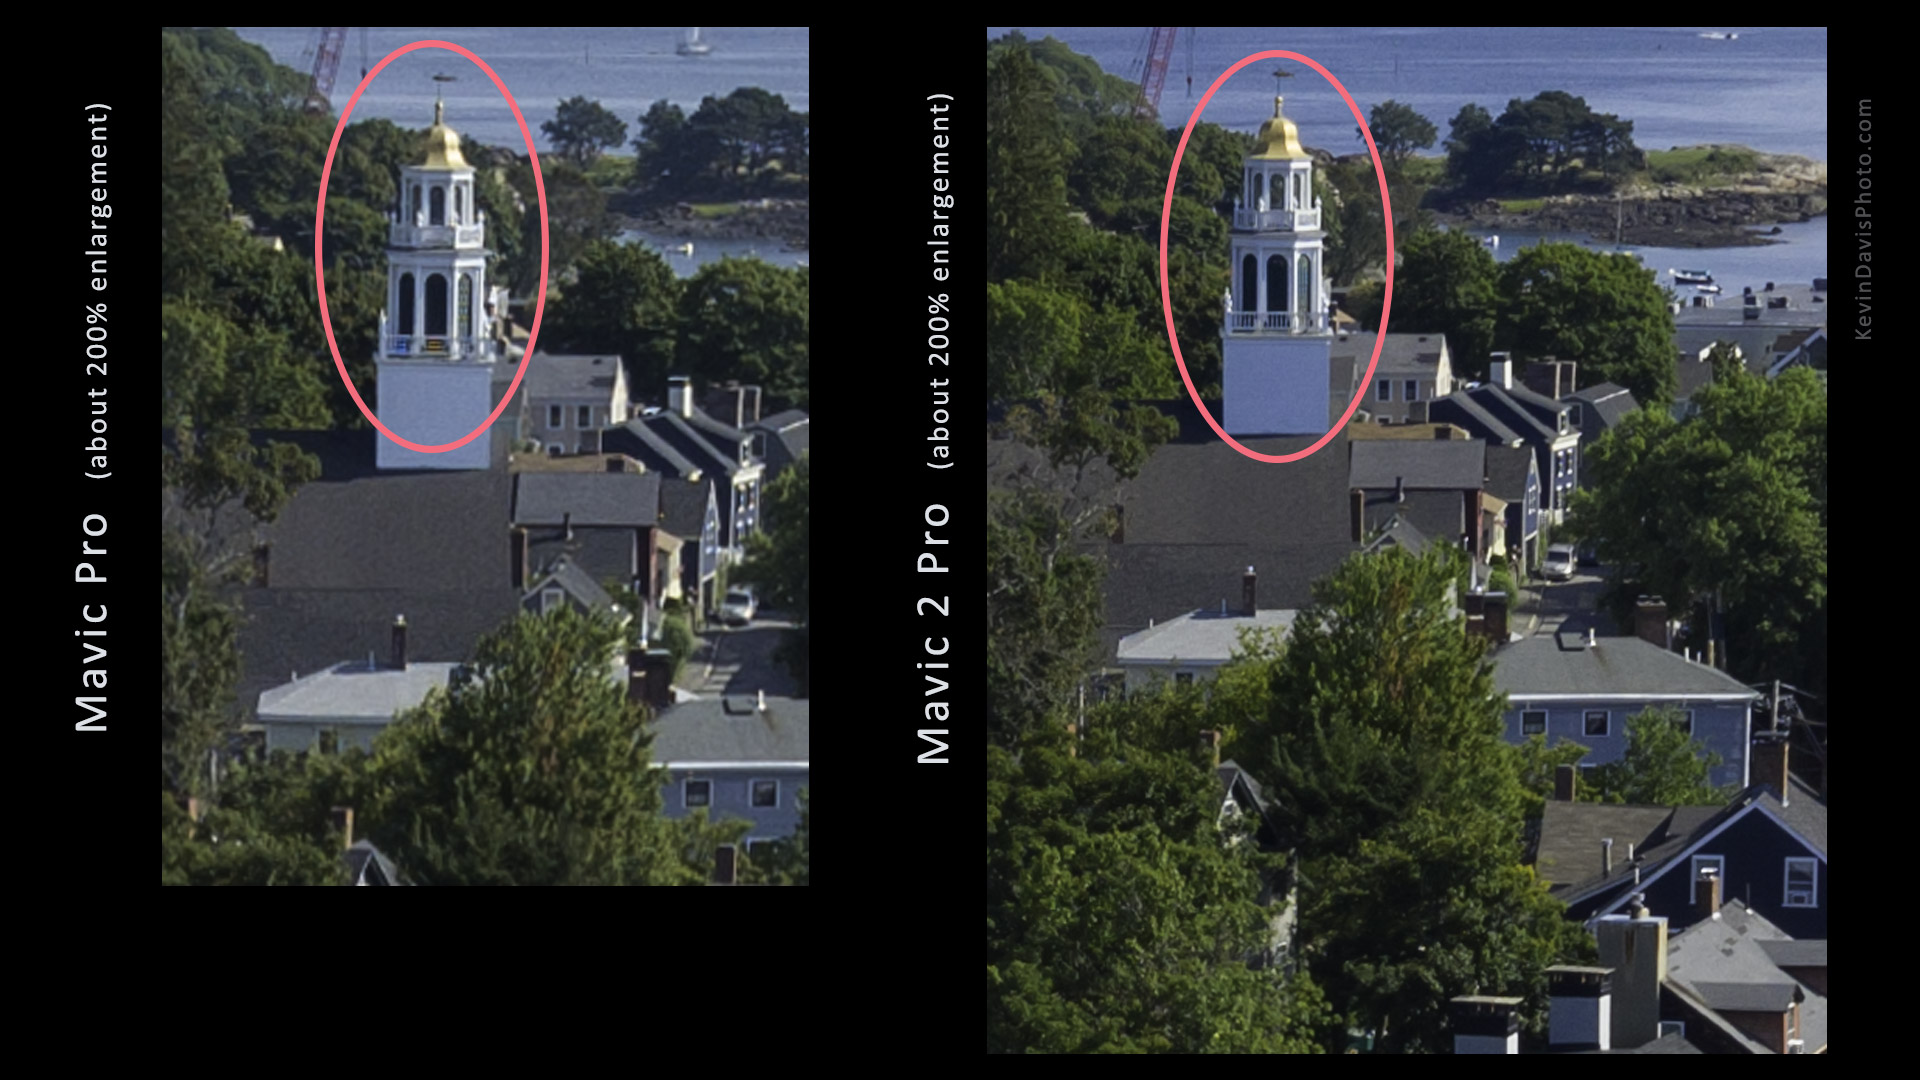
Here’s an example (not a particularly good one) that shows Mavic Pro was unable to resolve the balusters and suffered chromatic aberration. Mavic 2 Pro did not exhibit either of these problems.
Click on the image to see larger version
Finally, a few notes that do not regard image capture.
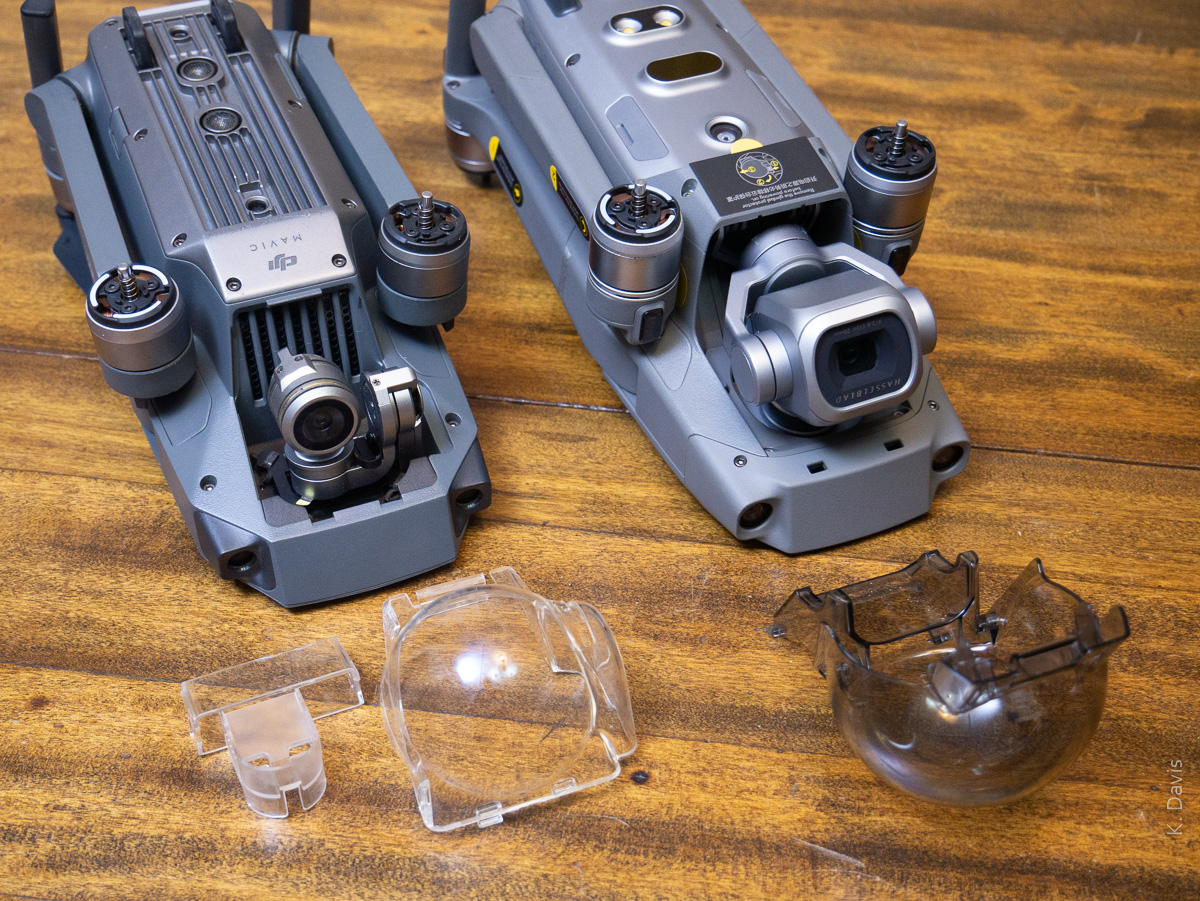
If you’ve ever fumbled with the gimbal clamp on the original Mavic Pro, or worse yet have forgotten to remove the clamp before powering on the drone, rest assured that the new Mavic 2 Pro does provide an improvement. The gimbal clamp is integrated into the protective dome cover – remove the dome necessarily removes the gimbal clamp. See the photo below showing both the Mavic Pro and the Mavic 2 Pro.
Gimbal clamp
Unlike the original Mavic Pro, the Mavic 2 includes 8GB on-board memory in addition to a micro SD slot. To access this memory from another device, connect a USB cable (included) to the Mavic 2 USB-C port and turn on power to the Mavic 2. (Remember to remove the gimbal clamp before turning on the Mavic.) After having inserted a micro SD card, the DJI GO app prompted whether to use that instead of the on-board memory. I am assuming that we must select one or the other and automatic switch-over is not supported, but I don’t know that for certain.
The transmission system between the drone and the controller is theoretically the most robust of any DJI product to date. Mavic 2 utilized second generation Occusync 2.0, while the Phantom line has yet to adopt the Occusync transmission system. Although Occusync 2.0 reportedly can operate at distances up to five miles, I personally have no need of that. Increased robustness of the signal is welcome, as I have seen unexplainable video signal loss when using the original Mavic Pro.
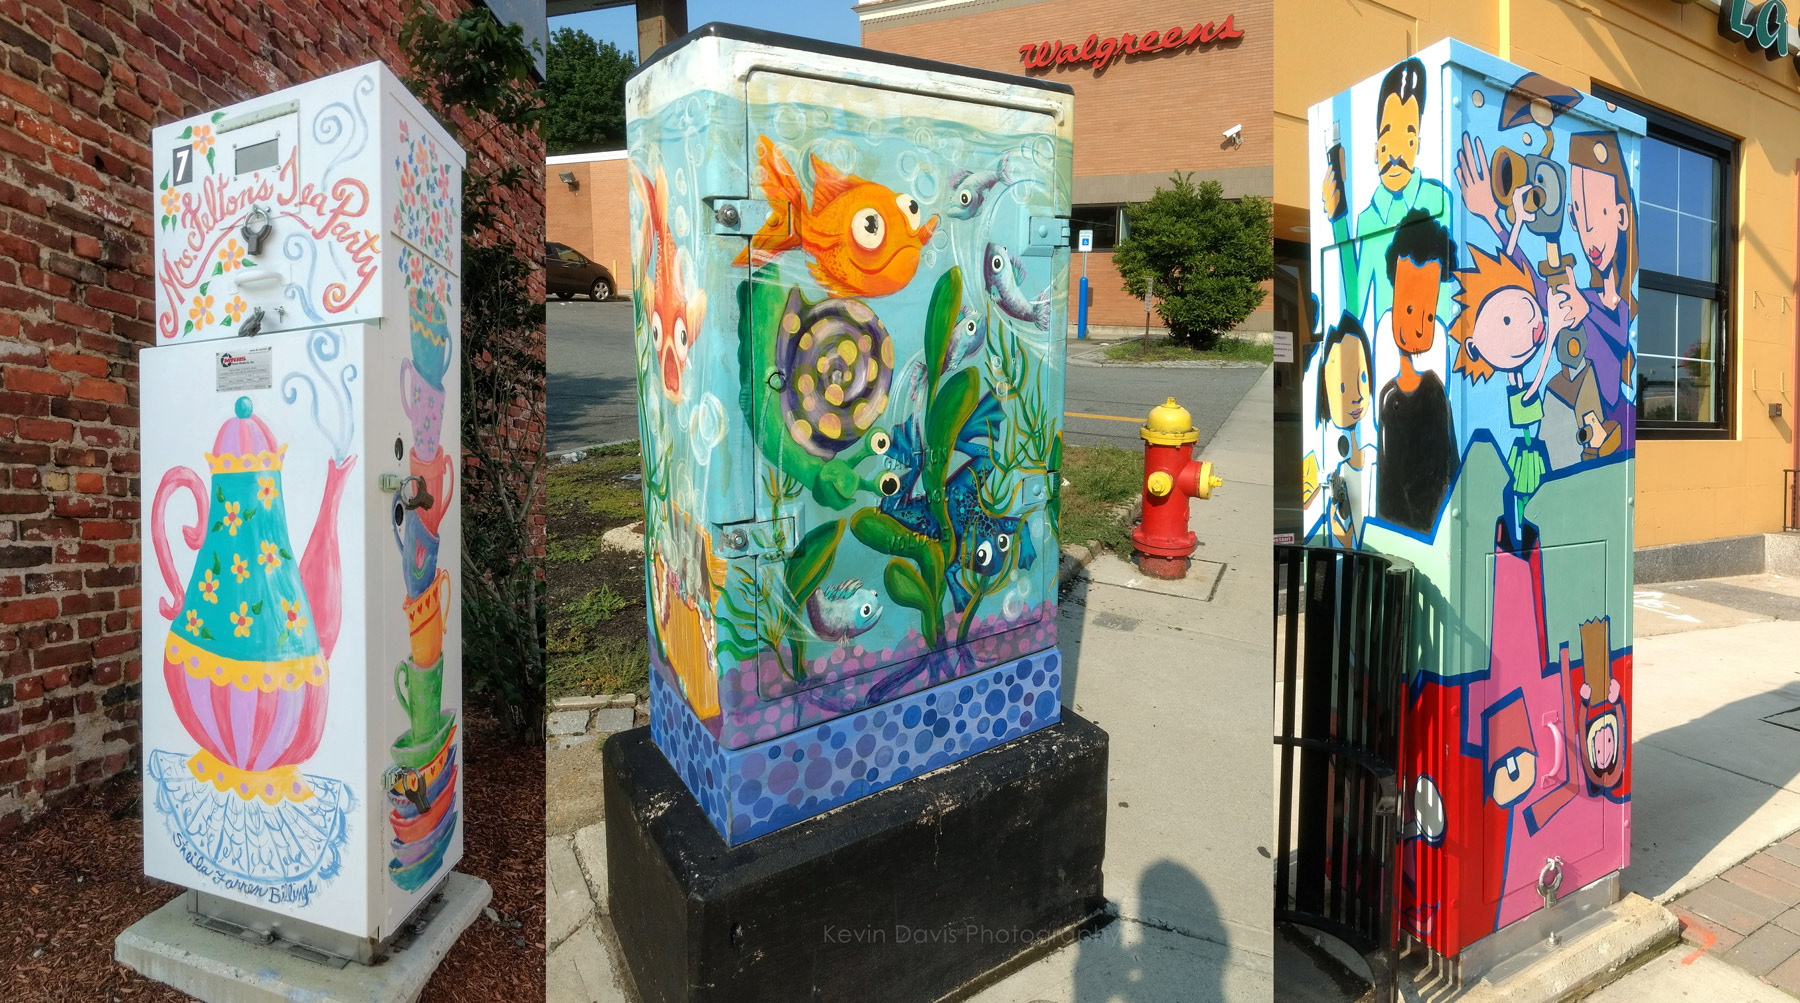
Stopping at a coffee shop downtown, I put a quarter in the parking meter. When I returned, 20 minutes remained on the meter, so I took a short walk. That’s when I happily discovered art on a utility box … and another … and another.
While I prefer a camera with interchangeable lenses, at times like this I am happy to have a mobile phone with a camera. My phone-camera is not a great camera, but as the saying goes … the best camera is the one you have with you.
I must also note that Android / Google Photos includes some photo post-processing functions that I rarely use but did use here. The leftmost image was badly overexposed. The problem was very well solved by applying “auto”.
(No, I’m not giving up my big interchangable-lens cameras.)
In a recent on-line discussion, someone offered a very confused (wrong) explanation of electronic flash options for photographic lighting. To straighten out the confusion, here’s a very brief overview of light sources for photography.
Light sources that strobe/flash
Studio strobe : Generally requires power from an AC wall-outlet
More power (more than batteries) enables more light and shorter recycle time.
Most studio strobes include a modeling light, which is a low-power continuous light that helps a photographer setup the light.
Monolight (a.k.a monoblock) : Self-contained studio strobe (does not have an external power pack). Some have an option to operate from battery.
Speedlight : a small battery-powered strobe with hot shoe; can be used on or off camera
Small strobe like a Speedlight but without hot shoe … is there a term for that?
Camera built-in flash
Light sources that do Not strobe/flash
Natural light, a.k.a. available light, ambient light … light not supplied by the photographer.
Continuous light (a.k.a. video light) … is a light source that does not strobe/flash.
Absolutely necessary for video applications, but can also be useful for still photography.
Hot light … a “continuous light” that generates much heat.
Tungsten and HMI (a.k.a. arc light) are examples of hot light technologies.
LED is an example of continuous light technology that is Not hot.
Flashlight / Light painting … this is a bit obscure, but some photographers have used a simple hand-held flashlight to “paint” light onto a subject during a very long exposure.
Light modifiers
Umbrella (There are reflective umbrellas and shoot-through umbrellas.)
Soft box
Beauty dish
etc.
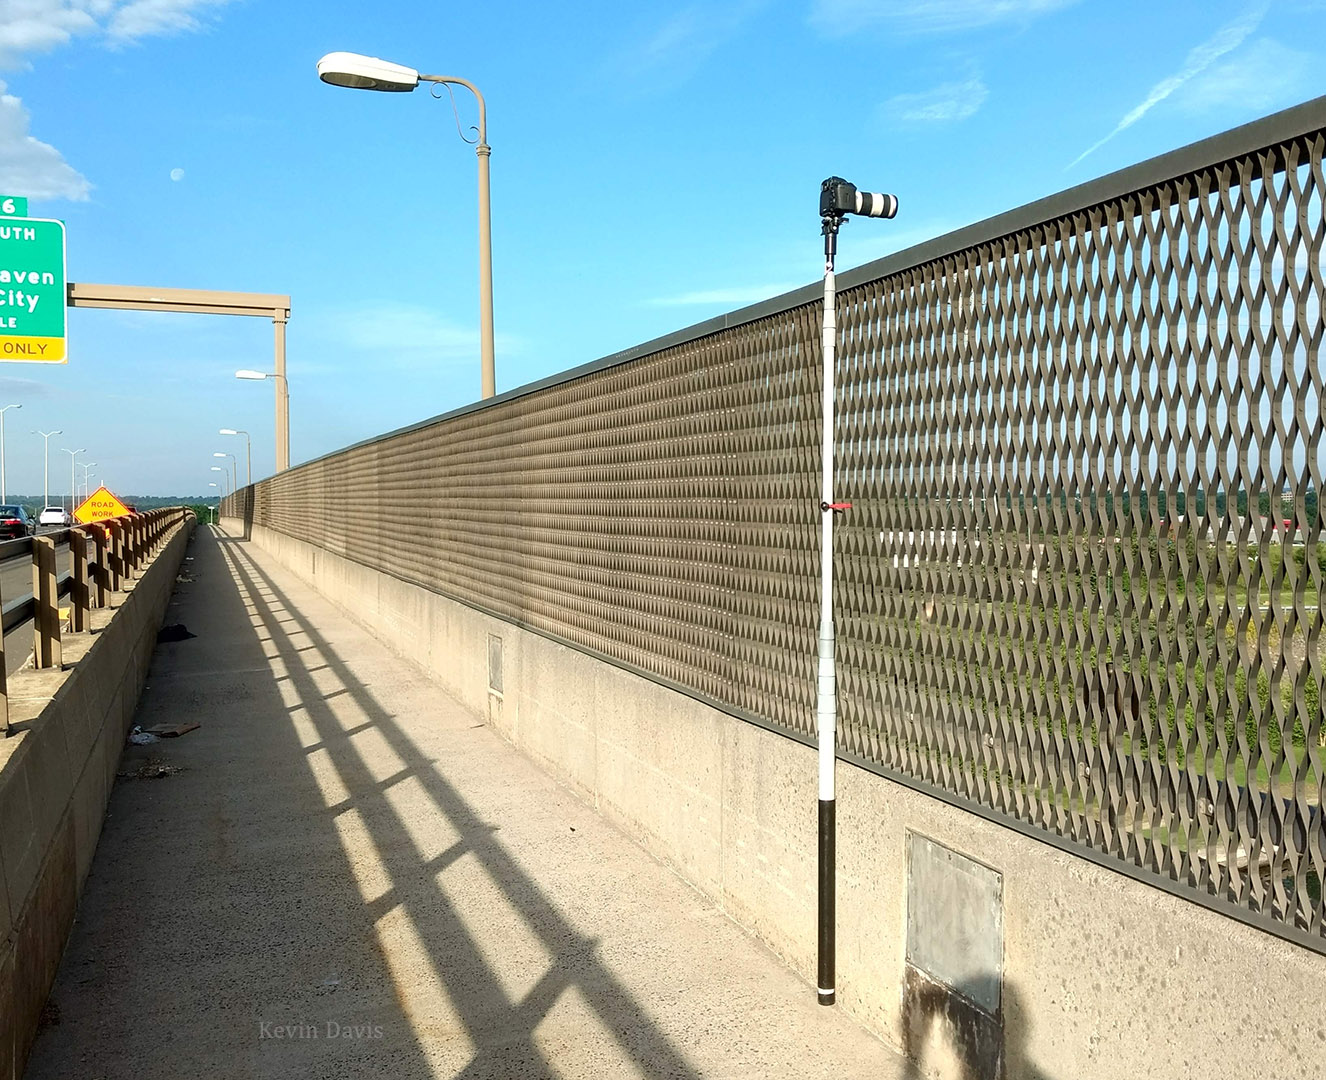
Why would you want to trigger your camera when the camera is not in your hand? The most common reason is to make a selfie … where the resulting image doesn’t look like you are holding the camera at arm’s length. Here’s another example from personal experience about one month ago. On a pedestrian walkway that crossed a highway, my photo opportunity was inhibited by a tall fence; to make the photo, I placed the camera atop a telescoping pole and extended it above my head and above the height of the fence. (See the photo at the end of this article.)
Camera control via mobile app
Here are four methods to make a photo while the camera is not in your hand, beginning with the most rudimentary and finishing with the most sophisticated
1) Self-timer (Old-fashioned method #1)
Most people are likely familiar with this. Place the camera on a stable surface, push the button, then run away from your camera to join your family and friends in the captured photograph. Self-timer is a relatively ubiquitous feature, though it may be seldom used today by your average selfie photographer who doesn’t mind the look inherent in holding a camera with an outstretched arm. Every camera I have ever owned has included a self-timer,; he Android camera app in my smartphone is no exception.
This is a physical cable that must be connected to the camera. Although this is inexpensive and is still available for many cameras, it has fallen out of favor because it is inherently limited by the length of the cable.
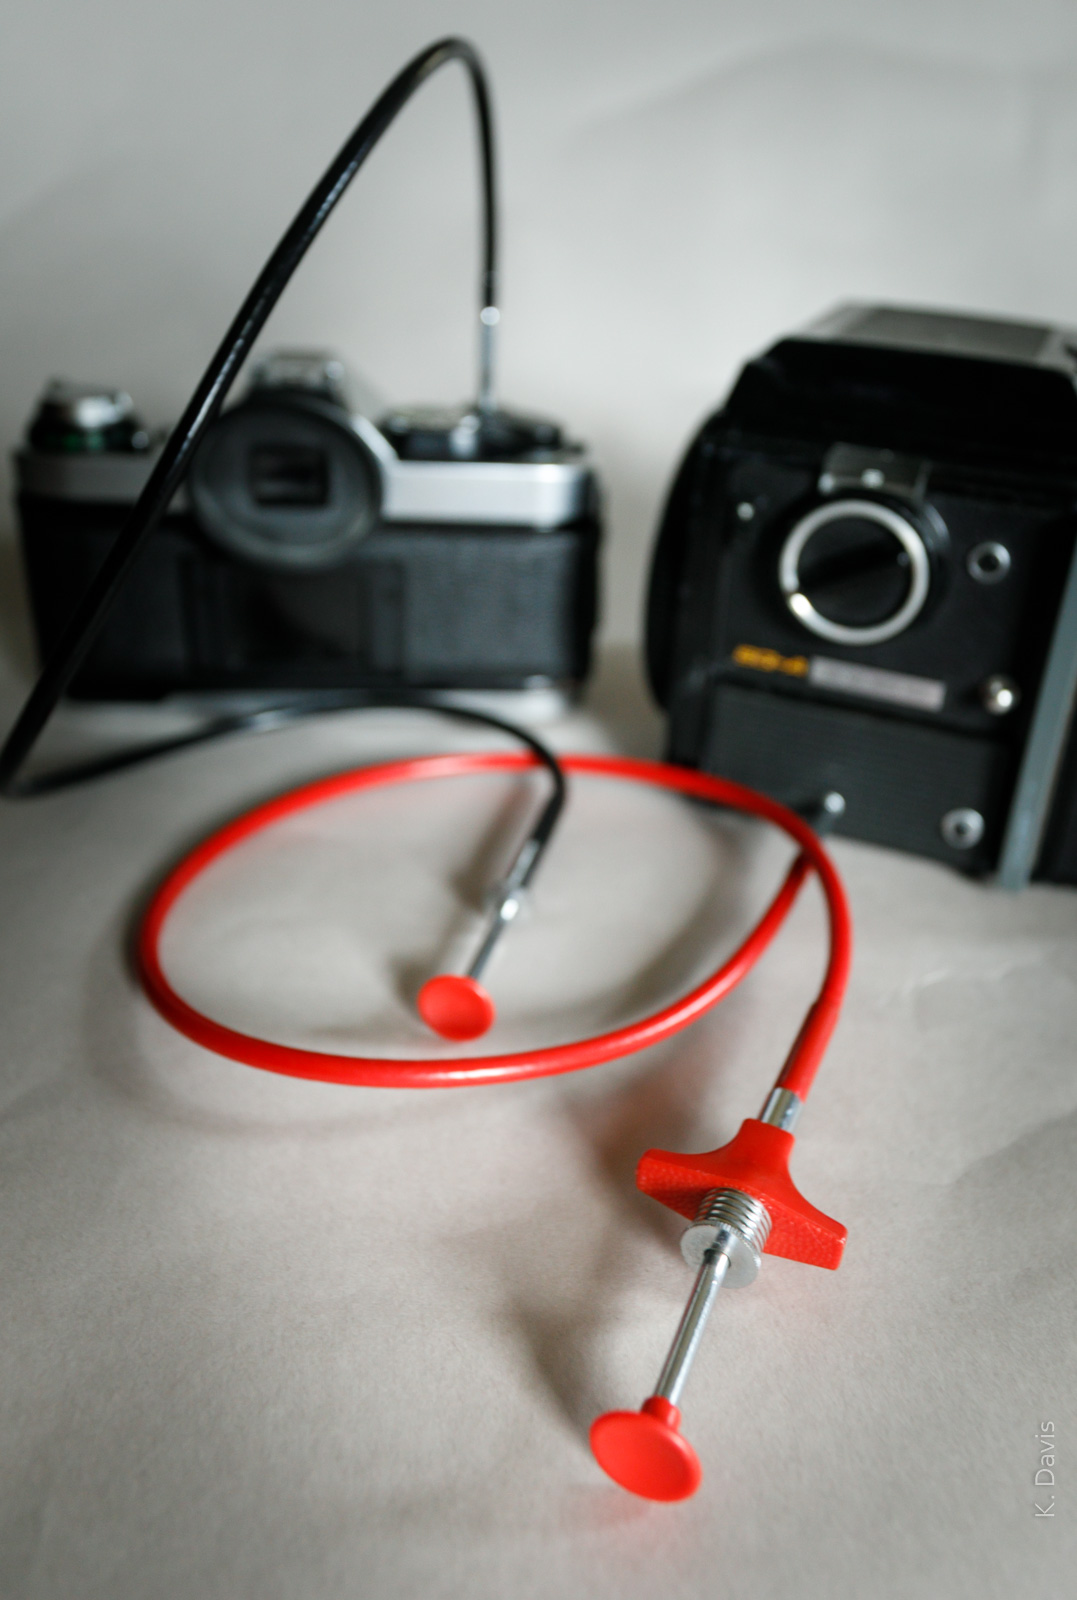
Mechanical cable release
Before the digital camera revolution, most professional cameras included a threaded hole to accept a universal cable release. It was a simple mechanical plunger. Experienced photographers carried a spare release cable because sooner or later the threaded connection to the camera was likely to break
While the mechanical cable release was both universal (compatible with most cameras) and ubiquitous, it was largely supplanted by an electronic cable release. The design is more like a light switch – the cable contains electrically conductive wires as part of an open circuit and pushing the button closes the circuit. This allows for longer cables and sophisticated external triggers (e.g. intervalometer, motion-activated trigger, etc). Unlike the universal mechanical cable, the connection to the camera is specific to the particular camera manufacturer; you need a cable designed to fit your camera.
For making selfie photographs with your smartphone, some selfie sticks include an electronic shutter release cable that connects a handle-mounted trigger button to the phone/camera. However, as the cable is subject to some physical stress, a wireless trigger is preferable and we consider that next.
3) Wireless shutter release
This achieves all the same goals as an electronic cable release but without the limitation of cable. These devices are widely available today for many cameras.
Some cameras include an infrared sensor and can be triggered using a remote infrared trigger. Some cameras can be controlled by a universal infrared trigger (not camera-specific) which may cost less than $15. Other cameras require use of a remote trigger specifically from the camera manufacturer. In either case, because the communication uses infrared light, it generally requires unobstructed line-of-sight between the remote and the camera.
Some cameras include wi-fi and and the ability to trigger the camera from a remote device via wi-fi. This does not have the line-of-sight limitation of infrared.
Similarly, if your camera supports Bluetooth, you may find a remote trigger that uses Bluetooth. For making selfies with a smartphone camera, some selfie sticks include a wireless Bluetooth trigger mounted in the handle. The distance limit for Bluetooth is typically far less than wi-fi. A Bluetooth remote might function at a maximum distance of 30 feet (9 meters), while a wi-fi remote might function at ten times that distance.
If your camera does not include infrared, wi-fi, or Bluetooth, you may be able to use a radio trigger, which consists of two parts, a transmitter and a receiver. I’ve used at least two different types. One is designed only to trigger the camera. The other (which I still use) is designed primarily a flash trigger, where one device mounts on the camera hot-shoe and a second mounts underneath a remote flash/strobe. However, a third device (all three are identical) can be used as a remote trigger for both the camera and the flash. As a prerequisite, the camera must have a special port/socket to connect an external trigger (the same port used in method #2 above) and the device mounted to the hot-shoe must also connect to the trigger socket.
In some cases, you may be able to wirelessly control camera functions far beyond basic shutter trigger. The GoPro Hero (versions 3, 4, 5, and 6) includes a smart remote that provides limited control of some camera features.
4) Smartphone or tablet app
An application for a smartphone (or other mobile device) can provide the ultimate remote control, including a live video image exactly as you would see if you were looking at the display screen on the camera. While this is only supported by specific camera models, the feature is becoming more common. I have one camera that supports this feature using wi-fi and another that can use either wi-fi or Bluetooth.
Some cameras may allow you to connect to an existing wi-fi network. More typically, you activate independent wi-fi within the camera; then, on your mobile device, use network selection to connect to the camera. (When connecting to your camera’s wi-fi, your mobile device will likely warn you that no Internet is available; this is normal.) After the connection is established, then launch the camera control application on your device.
As some cameras do not include this capability, you may be able to add this feature through a device such as the CamRanger Wireless Remote Control or the Case Air Wireless Tethering System.
Photo/picture frames bought from a retail store often include a sheet of clear plastic. This may be the cheapest material possible and you may want to replace it with higher quality glazing.
In photo/picture framing, “glazing” is a generic term meaning a clear sheet protecting the artwork. It may be glass or acrylic, but I have never heard of clear plastic referred to as glazing.
When preparing a photo exhibit last year, some of the frames I purchased included clear plastic sheets and I opted to replace them with non-glare acrylic. However, at the last minute, I ran short of acrylic sheets and shipped two pieces with just the plastic that came with the picture frames.
If you try to buy glazing from a local frame shop or art-supply frame shop, be prepared for sticker shock; it can be very expensive. I buy clear acrylic sheets on-line.
The introductory photo here shows a recent delivery that included some Acrylite P99 and Acrylite OP3 P99. The shipping packages were ruggedly constructed with solid wood edges and built to the exact sizes for the sheets that I ordered.
Glass
Glass can be great, but has limitations. It typically offers the highest level of light transmission and the best resistance to scratches. However, it is both heavy and famously brittle – likely to break if dropped. Shipping framed artwork with glass is quite problematic.
Your local hardware store may sell sheet glass; some stores will cut it to any size you need. But this is typically thin glass for windows. Hardware stores do not generally sell non-glare or UV-resistant varieties intended for framing.
Anti-reflection (non-glare) glass
To reduce reflections/glare, AR glass may either have a surface coating or be laser-etched. Single-sided AR glass is conditioned on one side only. You place that side outward toward the room, while the smooth size faces your artwork. Therein lies the possibility of internal reflections, the artwork reflecting off the glass. Double-sided AR glass is conditioned on both sides; it is typically very expensive.
I have used double-sided etched glass, which was superb; but I later abandoned it because of the expense. For a single-sided AR glass, the brand name I trust is Tru Vue. (Tru Vue offers both glass and acrylic glazing products.)
UV-resistant glass
This protects your art from fading and discoloration due to UV light. This can be important if you intend to display the art in a location exposed to sunlight. It may also be important to protect old documents; it is commonly used in museum displays.
Clear Acrylic
Compared to plastic, acrylic will not turn yellow or brittle with age. Compared to glass, acrylic is less weight and very resistant to breaking. Acrylic is often sold as trade names such as Plexiglass, Lucite, Perpex, and Acrylite. (The technical name is PMMA … polymethyl 2-methylpropenoate or polymethyl methacrylate.)
Each acrylic sheet (weather purchased individually or as part of a complete frame) is typically coated on both sides with a thin protective skin that you must peel off. As this protective skin may be transparent, you may not initially know that it is present. Be sure to remove it before final assembly of your photo/picture frame; if you forget until after the sheet is in the frame, you will have to disassemble everything in order to peel the skin off.
As with glass, your local hardware store may sell clear acrylic sheets, but not non-glare and not UV-resistant varieties.
Clear acrylic sheets are available in different thicknesses. I’ve used 0.098” (1/10th inch) and 0.080”. The latter works perfectly well for sizes up to 20×30. I don’t really see the need for 1/10 inch.
Anti-reflection (non-glare) acrylic
Under the Acrylite brand, the anti-reflection version is called P99.
UV-resistant acrylic
Under the Acrylite brand, anti-reflective sheet products include FF3, UV3 and OP3. FF3 is manufactured with a casting process (not extruded) that is less expensive than the other two. OP3 filters out a bit more UV light than does UV3. Some third-party vendors neglect to inform you which specific product they are selling.
For a combination of both anti-reflection and UV-resistance – that is OP3 P99. I believe FF3 is only available with high-gloss surface, not non-glare.
Acrylic photo prints
A photograph can be directly printed onto a sheet of clear acrylic. This requires a unique sheet product with adhesion properties. Under the Acrylite brand, this is DP MR1.
Here is a little help for organizing batteries for your photo/video equipment.
If your camera bag has an available pocket, perhaps you dedicate that pocket to loose batteries. If not, then maybe batteries haphazardly occupy nooks and crannies at the bottom of your bag. While I have often bundled four or more batteries using a simple elastic band, it has been unreliable; the band eventually breaks and the batteries randomly spill about.
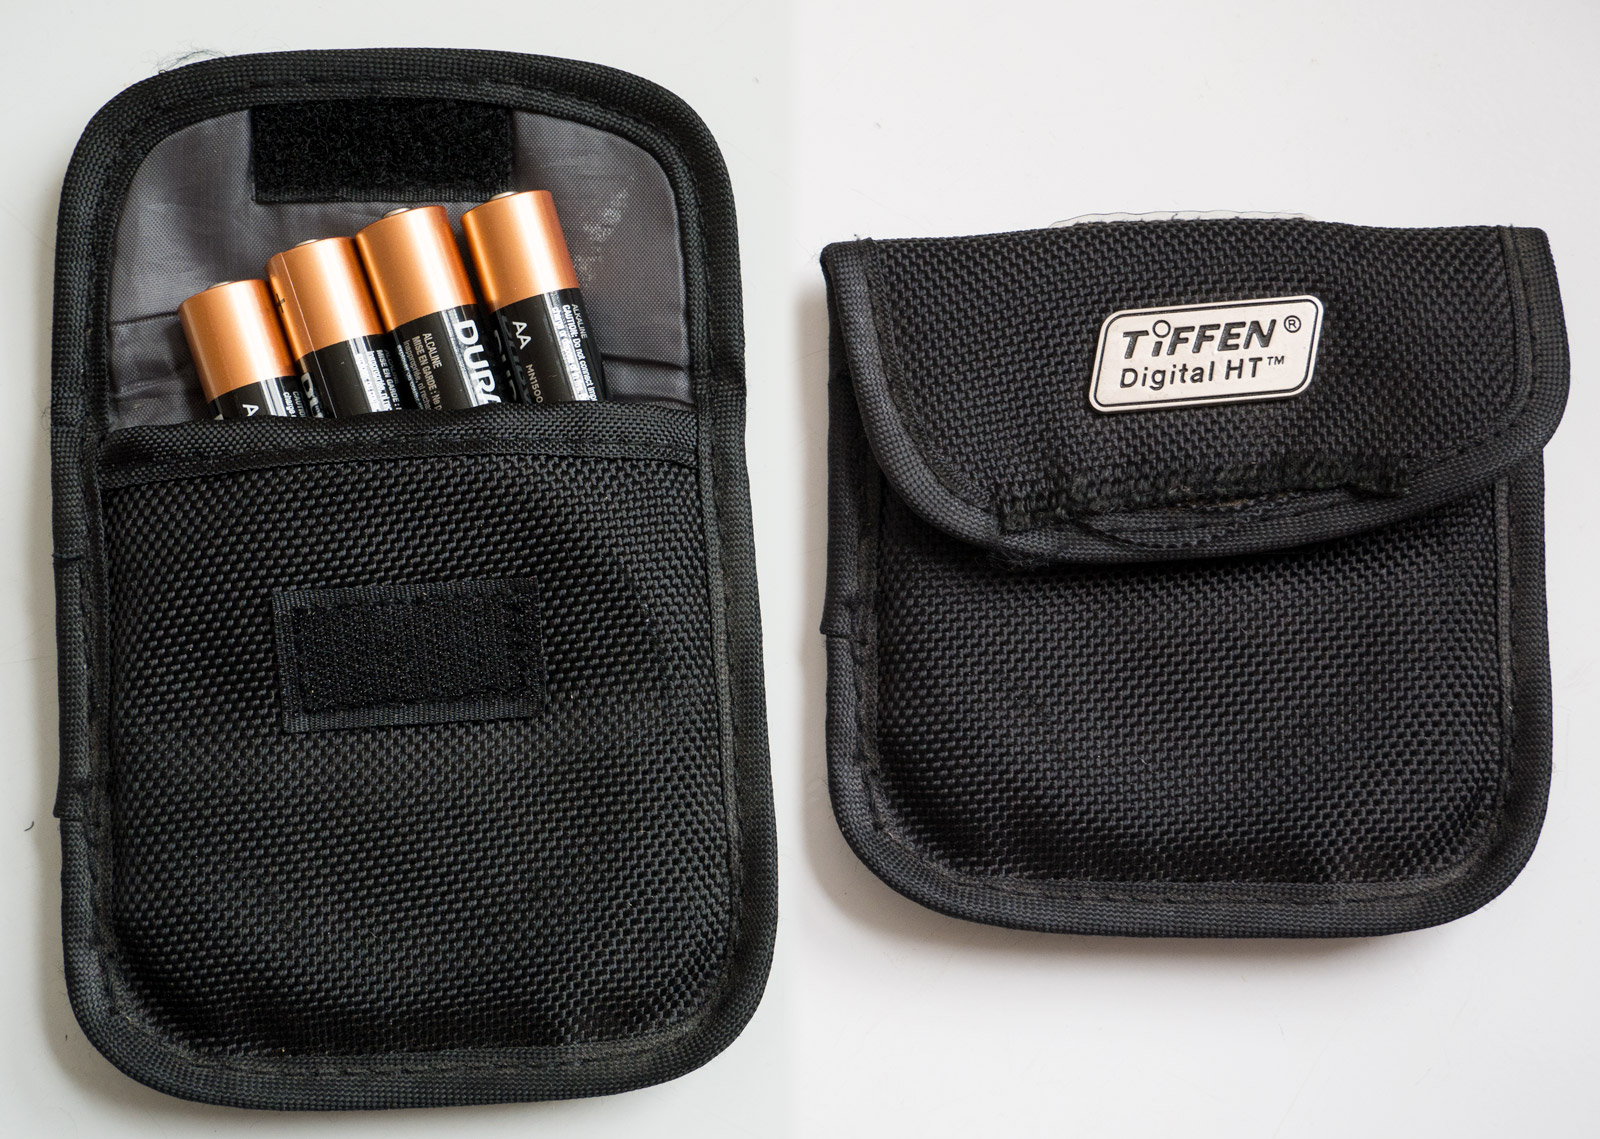
My first solution is a filter pouch, which originally was included with a lens filter. Though the filter manufacturer never intended this little fabric pouch to hold a set of batteries, it functions well for that purpose. When empty, the pouch occupies almost no space in a pocket or in a bag. When full of eight Eneloop rechargables, it is still possible to loose the pouch entirely … which is my current dilemma. (I know it’s around here somewhere.)
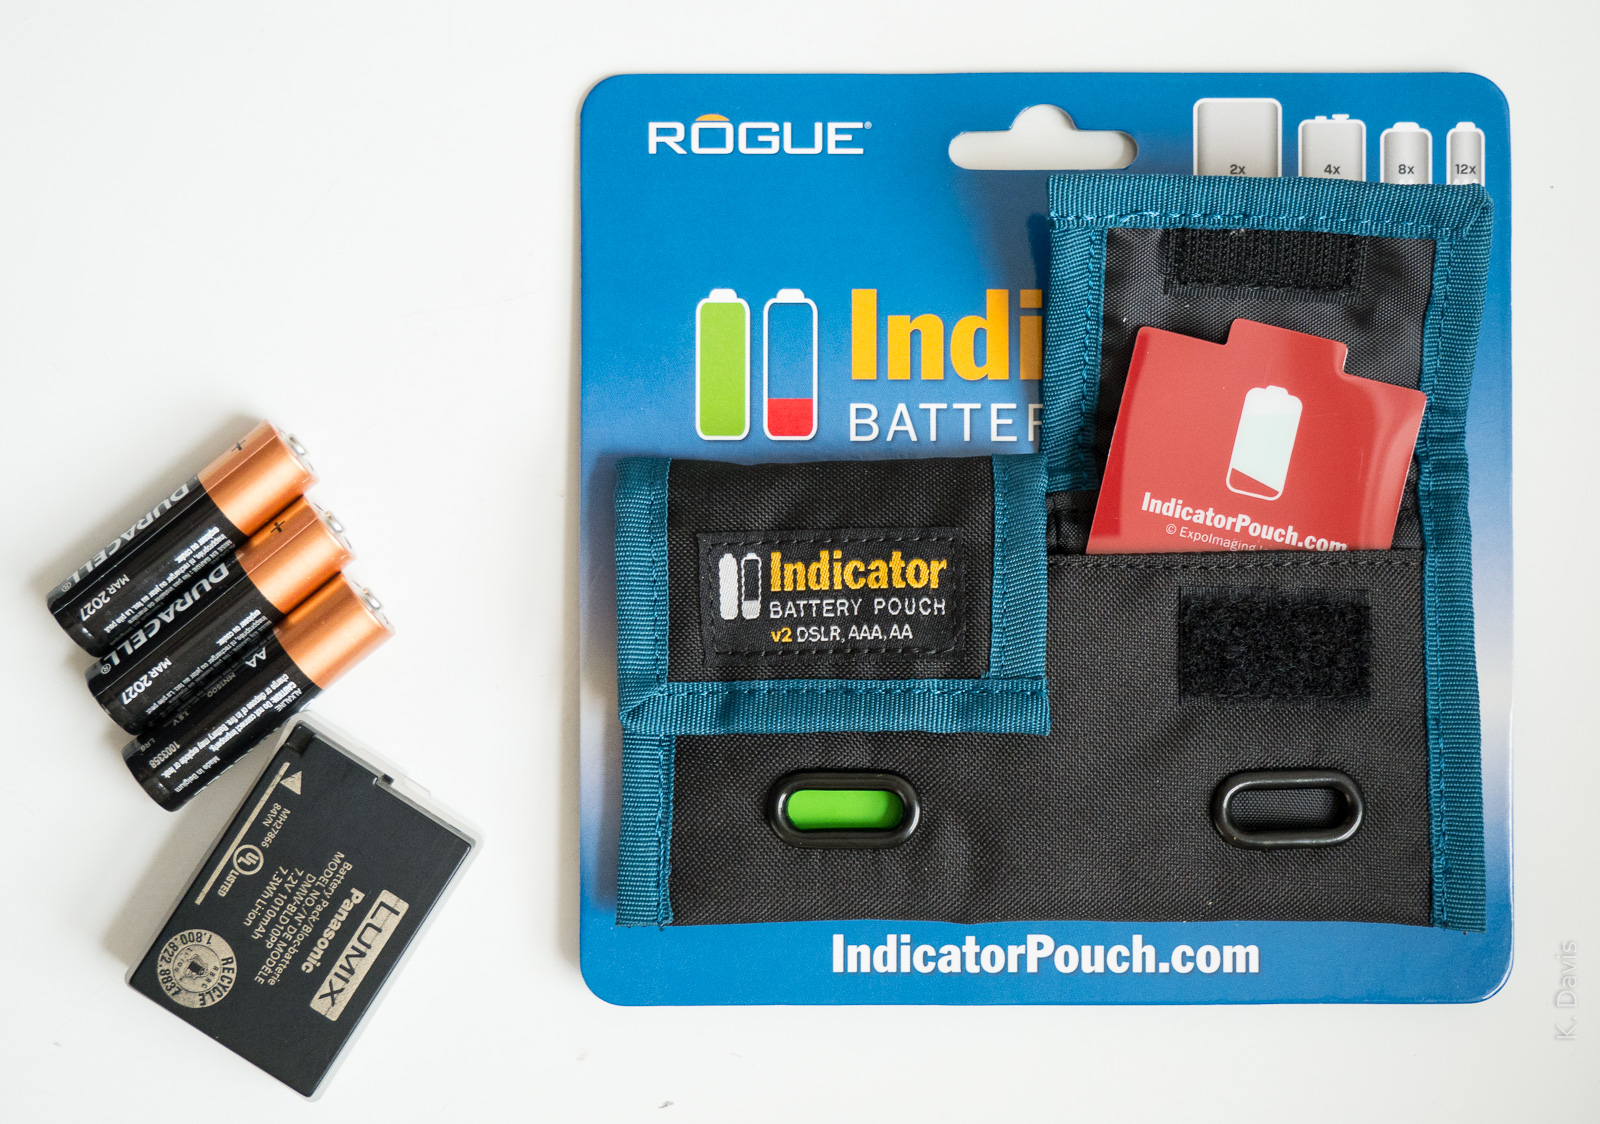
The second solution is similar, but specifically designed to hold a set of batteries. The Indicator Pouch is divided into two compartments; each will hold four AA batteries or one camera battery, but a DSLR battery might be big enough that the Velcro closure isn’t entirely secure. Optionally, the green or red tag may be used to remind you whether the batteries are charged or discharged. Unlike my old filter pouch, the Indicator Pouch has belt loops on the back side.
Finally, I like Storacell plastic battery holders; see the introductory photo. Different models are designed specifically for different size batteries. Available in a variety of colors, I use orange for AAA and yellow for AA. The 12-cell AA holder is the perfect size to supply three speedlites.
A solution that I have not personally used is a plastic clamshell box for batteries. Vaguely, I imagine opening the clasp and then all the batteries simultaneously fall to my feet and roll across the floor.
January 23, 2018 – DJI officially announced the new Mavic Air, which again raises the bar for ease of use and safety for aerial drones. Having watched the announcement live this morning, here are the essential details I have noted (somewhat filtered according to what I find most interesting). So, for those interested in aerial drones or aerial photo/video with drones, here is what you need to know in 60 seconds.
Physical
Half the size of Mavic Pro and 41% lighter
Antennas concealed within the landing legs (away from the body)
8GB internal storage + SD card slot
USB type C port
Controller is pocketable, removable control sticks
Available in black, white, or red
Camera
1/2.3″ image sensor (same size as Mavic Pro and Phantom 3 Pro)
4K video
12MP still photos
HDR capture mode
360-degree panorama, auto stitching up to 25 images
New 3-axis gimbal, improved vibration dampening, better image stabilization
Flight control
Intelligent flight modes, including improved auto-tracking moving subject and two new quick-shot modes
Controllable with hand gestures (up to 19 feet)
Advanced pilot assist can automatically go around obstacles
More stable, can withstand wind speeds up to 22 mph
Fly Safe geo system – information about airspace restrictions
Pricing
$799 complete
$999 with accessories (extra battery, extra propellers, carrying case, etc)
Availability
Shipping Jan.29, 2018.
(I am guessing that demand will be high for this product and it will take some time for DJI to fulfill all the orders.)
(Left) Panasonic Lumix G3, and (right) Panasonic Lumix G85
Panasonic has long maintained two similar MFT camera lines, DMC-G series and DMC-GH series. In general, the G series has been intended as mid-level cameras while the GH series has been a bit more high-end, but the differences have not always been obvious. All of the G and GH series cameras are system cameras with interchangeable lenses and hot shoe for external flash.
While I do own and use DSLR cameras, I have used Panasonic Lumix cameras as smaller alternatives. My typical day kit (less gear than a multi-day kit) includes a camera body, two lenses, and minor accessories. My Lumix G series kit is half the size of my DSLR kit.
While camera features improve with each generation, the MFT image sensors in the Lumix cameras seems to not change very much. The resolution has remained 16 MP up until the new G9, which introduces 20MP in the same FT/MFT format. In low-light, the RAW image noise is less than excellent but isn’t bad. Comparing the G3 to the G85, I see a small improvement in the newer camera, but it is small. It effectively gives me one more stop; the G85 noise at ISO 3200 is comparable to the G3 at 1600.
Features
After considerable study, here are the notable feature changes (notable in my opinion) starting with the G3 and moving to the very latest G9 (which I believe will ship later this month).
The G5 camera layout and handling is essentially the same as the G3
9 fps vs 6 fps
“Live MOS” image sensor has technical speed improvements, but same resolution.
Video recording supports MP4
Higher resolution in both the LCD display and the EVF
Eye-sensor below the EVF
Larger handgrip
The G7 layout and handling is significantly updated (compared to the G5)
4K video recording
OLED touch screen
4K photo mode
Wi-fi
The G85 camera layout and handling is essentially the same as the G7. Here are the important feature enhancements in the G85.
In-body image stabilization (sensor-shift type)
9 fps vs 6 fps
49 focus pts vs 27
Higher resolution in both the LCD display and the viewfinder display
The G9 camera layout and handling is new and includes an monochrome LCD info screen on top of the camera. This is a breakout camera that exceeds the G series moniker.
20mp MFT sensor
20 fps
225 autofocus points
Much larger viewfinder (EFV)
UHD/4K video up to 60 fps
6K photo mode
80MP image achieved by shifting the sensor 1/2 pixel and then combining the two images together.
Optional battery grip (for better handling in vertical orientation)
USB 3.0
Both Wi-fi and Bluetooth
More than 5 ounces heavier than the G85; a bit smaller and lighter than GH5


 Mavic Pro")


")