Giant Pumpkin Festival

At the tail end of September this year, I photographed a couple of events where giant pumpkins were weighed in competition.  I overheard a fellow make a comment about one particular giant, “There’s something weird about that one.”  I leaned over and offered my own uninvited follow-up comment “There’s something weird about all of those pumpkins.”  The guy grinned and enthusiastically agreed, “Yeah, they’re all huge!”

Giant fruits and vegetables are generally peculiar.  But a crowd of a hundered people eagerly watching pumpkins get weighed on scales, that’s peculiar too.  Even more surprising is the uproar and applause when a new contender puts up a number (on the scale) bigger than any other.  Stranger still, some people carve out the giant pumpkins, float it in water, climb inside and paddle it as a boat.  I love New England!

(click on any image to see a larger view)

Damariscotta Pumpkin Festival


Damariscotta Pumpkin Festival & Regatta


Motion Blur Sports Photography

Most sports photography employs fast shutter speeds, to freeze the action.  But where there is motion, I want to show that.  A slow shutter speed allows movement to blur.  Here are a couple examples from a bicycle race last weekend in Boston.

(click on either image for a larger view)

While it is tempting to quote specific shutter speeds that I use, it really doesn’t work that way.  The shutter speed depends upon (1) the speed of the moving subject, (2) the angle at which the subject is approaching, and (3) how much blur I want.  So I might start out somewhere between 1/30 to 1/100 second and then chimp the back of the camera to see what it looks like.

(Chimping means frequently reviewing captured images on the camera display panel. If it looks really good, you scream like a chimp.)

To get basic motion blur, you lock down the camera such that the background is sharp and the moving subject shows blur.  Alternativley, you can pan the camera to follow the the subject, such that the subject does not blur but the background does. Another technique is to actively zoom the lens during the exposure, which you see in the first image here, using a shutter speed of 1/4 second.  A shutter speed of 1/4 is quite long, but the subject here is moving head-on towards me.  Compare that to the second image, the subject is moving side-to-side perpendicular to the camera and the shutter speed is 1/30 second.

The blur effects shown here is achieved entirely in the camera.  As the subject does not stay in one spot, the light reflecting off the subject is diminished.  In post-processing (e.g. Photoshop or Lightroom), it is typically necessary to selectively restore brightness, contrast, and color saturation.  In the second image here, I have intentionally over-stated the contrast and color saturation.

With a bit of experimenting, you can get some interesting abstract results.  Motion blur photography is not new, but it is a bit unusual.  It has been said, if you want to excel, if you want to stand out in a crowd of talented people, don’t simply mimic what everyone else is doing.


Custom Photo Wallpaper

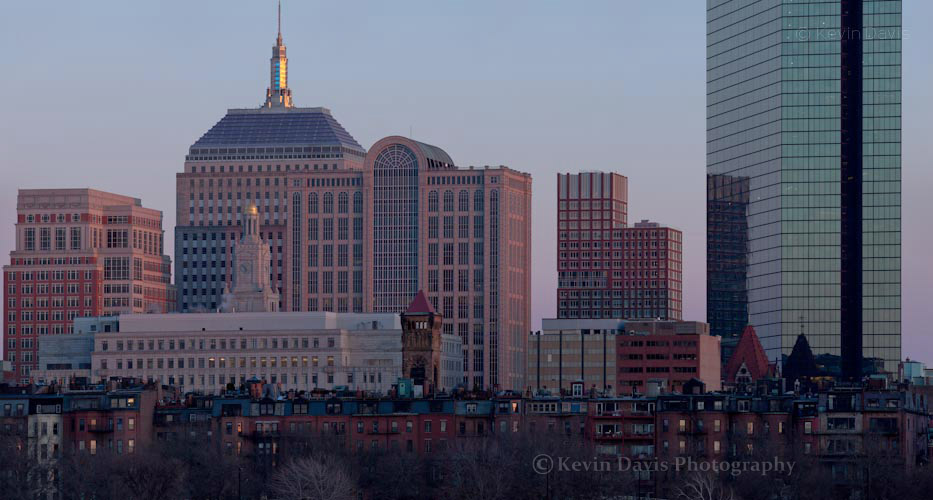
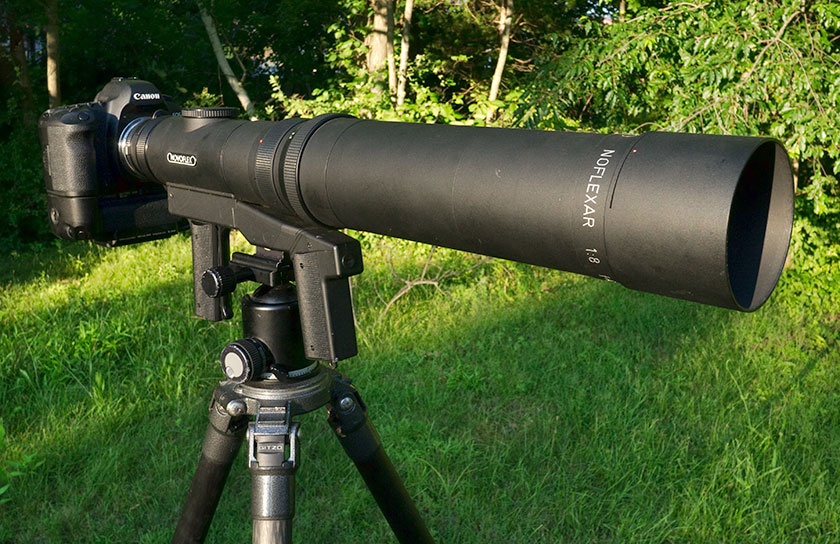
The image of the Boston skyline was created with a full-frame DSLR, a 400mm lens, and a tripod.  Twelve separate frames were stitched together (using Adobe Photoshop) into a single image.

The final result was a single image 16,000 x 8600 pixels (137 megapixels).   Cropping this to fit my wall, the JPEG that I submitted for wallpaper was 12,320 x 8726 pixels.  When printed to a size of 119.5” x 86.5”, that implies a resolution just above 100 dpi.  But the wallpaper vendor will interpolate this higher, to the native resolution of the printer.

The wallpaper

After a bit of research on the internet, I selected three possible vendors to print my wallpaper.  My first vendor choice ended in a confusing experience with their website.  I abandoned that vendor and then selected Blue River Digital (www.blueriverdigital.com).  BRD offers several substrate choices; the choice depends largely upon two factors, (1) exposure to direct sunlight and (2) longevity of the intended display.  I chose premium vinyl wallpaper and the cost was about $400.  (This was a year ago; today’s options and prices have surely changed.)  Depending upon the vendor and the material you choose, the cast generally ranges from $3 to $9 per square foot.

Sharpness, color, … the image quality of the final printed wallpaper is excellent.

In terms commonly used to describe photographic paper, this wallpaper has surface that is perhaps between matt and satin.  Side light from a window causes a glare on the surface of the wallpaper.

For my wallpaper, the side-to-side ordering was obvious.  However, depending upon the particular image, maybe with a repeating pattern, the sequence of the separate panels might not be obvious.  Because of this, Blue River Digital includes a number on the back side of each panel.

The installation

You can hire a professional wallpaper installer or do it yourself.  I have hung wallpaper myself on a few occasions (not recently), so opted to install the photo mural myself.  A professional could have installed it in far less time than I … and with less cursing.  (To install any wallpaper yourself and avoid the cursing, it’s a good idea to have help from a second person.)

As with any wallpaper installation, the wall does need to be properly prepared before installing the wallpaper.

After applying paste the back of a panel, the panel is folded in half and allowed to sit for a bit.  (This is called Booking and is standard practice for wallpaper.)  Blue River Digital provides a list of name brand wallpaper pastes that they have actually tested.  I took that list to my local hardware store and found that they did carry one of those paste products.  My local big-box home improvement warehouse stocked only a generic brand; I expect that would suffice, but I chose to use a paste that was Blue-River-tested.

My print consists of four panels, each 30” wide.  At the edge of a panel, the image on a panel overlaps with the image on the adjacent panel, by about one inch.  So, when applying each panel to the wall, the panels overlap by one inch.

Because my particular image has some strong vertical and horizontal lines, I was very particular about getting that first piece level and plumb.  I removed that first panel from the wall and re-applied it probably three times before I was satisfied.  Then I applied the remaining panels, which were easier to install than the first, but still can be difficult to get the two panels exactly aligned.

Pixel RW-221 wireless remote camera trigger

Some situations require remotely triggering a camera.  The RW-221 is an inexpensive remote trigger.  It looks well made and worked well in my initial testing, however … the first time I ever used the RW-221 for a real shoot, it broke.

There was a dense crowd of people in Boston that day and someone tried to squeeze between me and the shrubbery … I lost balance and pushed hard on the button of the RW-221.  The button slid into the plastic case such that it could not pop-up (the normal un-pressed state).  I was on location and had no backup for this tool.

Upon taking it apart, I found that the plastic button is supported by a very small plastic pin, which easily snapped under pressure.   Although I repaired it with a bit of glue, I have to conclude the following:
1) due to a design flaw, the RW-221 is not robust/reliable; be gentle.
2) always have a backup for your equipment
2) anyone who has this device or is purchasing it new, take it apart and re-inforce the pin with a bit of epoxy


Novoflex Super-Telephoto Lens

Recently, my friend Tom loaned me a vintage Novoflex super-telephoto lens.  Since he already had adaptors for both Nikon and Canon EOS, we had no trouble fitting it to my full-frame Canon DSLR.

The Novoflexar pistol-grip lens, originally made in Germany, is a bit obscure here in the USA.  There were a few different models; one version has a single pistol grip, while this one here has two pistol grips. Focus control is built in to the rear pistol grip and a shutter release button on the front pistol grip (requires a cable that connects to the camera).  Theoretically, this allows an agile “run and gun” type of photography, but I used it on a tripod.

The main body of the lens is simply hollow with no glass. The glass is fully contained in a front tube that threads on to the main body.  Tom’s kit included a 400mm and a 600mm (some models have a 640mm instead of 600). Because there is not a lot of glass, the total package is relatively lightweight compared to some other super-telephoto lenses.

Squeezing the focus trigger moves the front tube forward and back.  (Novoflex called this “Rapid Focus” or “Super Rapid Focus”.) There is no focus ring (typical on most lenses); the focus mechanism does not involve any rotation of anything.  There is a focus lock, to lock the focus in one spot, which I used frequently because the distance to my subject often was very far away and unchanging.  Constantly squeezing the trigger with your fingers can be quite tiring.

The focus trigger only covers part of the focus range.  The trigger will not get you from minimum focusing distance to infinity. You first have to adjust one other thing, to get the focus “in the ballpark”.  In some situations, perhaps this would be problematic.  But on the positive side, the focus trigger is close to the camera, so you don’t have to extend your arm in order to reach a focus ring (as is true with some big super-telephoto lenses).

(click on any image for a larger view)

400mm
Crop from previous image

I used this lens wide-open.  That means f\5.6 for the 400mm and f\8 for the 600mm. The 600mm showed some color fringing at hightlight edges, particularly where highlight directly overlapped a dark area. This chromatic aberation gets worse with use of the Novoflex 2x multiplier.

The lens accepts a drop-in polarizing filter.  Although I tried to exchange this with a Nikon lens, the Novoflex filter and the Nikon filter were different thicknesses, so are not interchangable.

600mm
Crop from previous image.
Note the color fringe on the white shirt sleeve.

 The Novoflex aperature uses 24 blades, more than double most lenses. This is probably not significant to most people.  If you do get into a situation with flare, the flare will look more round, compared to the pentagram shape that occurs with a 5-blade aperature.

Conclusions

Pro

  • The pistol grip design may be well-suited for a mobile/agile type of photography
  • Price. Potentially, you might find one for less than $700 (US), but they are rare.
    (If you can borrow one, as I did, then free is great.)
  • Weight. Not very heavy because it does not use much glass and because you get two lenses in one
  • Sharpness of the 400mm is good (not great)

Con

  • This lens dates back to the 1970s, so it is manual focus and has no image stabilization. (That’s OK when using a tripod and photographing subjects that are far away.  In these situations, the pistol grip design is mostly unnecessary.)
  • The squeeze focus is a bit odd; I never quite warmed up to that feature.
  • The 600mm shows chromatic aberation (that is amplified by a 2x multiplier)
  • Sharpness: the 600mm seemed a bit soft to me
  • The pistol grip design makes this lens look like a bazooka.  Particularly with the 600mm front tube, it will turn heads … possibly security or law enforcement.

If you’re looking for a super-telephoto for less than $1000.  I suspect there are better options available.  Specifically, the Tamron 200-500 SP AF Di LD and the Sigma 150-500 APO DG OS HSM.  Both Photozone.com and BobAtkins.com have published detailed reviews of the Tamron zoom.  Both Kenrockwell.com and CameraLabs.com have published detailed reviews of the Sigma zoom.  (Note that the Sigma includes optical image stabilization and the Tamron does not.)


Ultimate Lens for Sports & Wildlife

There are telephoto lenses and there are telephoto zoom lenses.
Then there are tele-extenders which increase the magification of a lens.
And … then there is this; three telephoto zooms in one lens.

However, it is still not available today, though originally planned for release in mid-2011.
Price tag (yet to be announced) may cause shock or heart arythmia.

http://www.the-digital-picture.com/Reviews/Canon-EF-200-400mm-f-4-L-IS-USM-Extender-1.4x-Lens-Review.aspx

http://cpn.canon-europe.com/content/news/telephoto_zoom_lens.do

latest update:  http://www.canonrumors.com/tag/200-400/


(I would like to include the photo from Canon, but their website states: protected by copyright, kindly do not copy.)

Essential Photo Gear

Among my photo equipment, perhaps the most critical accessory is also the simplest …  something to clean lenses and filters.  For this purpose, the microfiber cloth is the preferred tool. 

Microfiber cleaning cloth for optical usage (cameras, eyeglasses, electronic display screens, etc) have become ubiquitous. Lint-less, will not scratch, washable, and reusable. Technically, the term “microfiber” simply means the fabric is woven from thread having a diameter smaller than 1 denier, smaller than silk thread.  (Different brands may use different size threads.)


Microfiber cleaning cloths are availabe in patterns, colors, and even with detailed images on the cloth. You can get your own image custom printed onto the cloth.

Tip#1 – Use plain white.  It shows dirt and you will visibly see when it needs to be cleaned.  Anything other than white will obscure dirt.

Tip#2 – Select a cloth that has no hems or tags.  Potentially dirt can get trapped in the stitching.

Tip#3 – Hand wash.  You can try machine washing, just place the cloth in a lingerie bag so it does not get sucked down the drain.  However, my experience is that this does not do a very good job.  Hand wash with a light detergent such as Woolite.  Rinse multple times to ensure all detergent is removed.

Tip#4 – Have more than one available in your photo bag.  They are small and inexpensive.  If one cloth seems dirty, maybe not cleaning well, you will have another available as back-up.


Giving (maybe seems a little crazy?)

This morning, I gave away ten copies of my book Wildflowers of RiverPark.  When I completed this book, a bit more than two months ago, I gave away a dozen copies.  All totaled, this is more than $300 out of my pocket.  But from the start of this project, I knew this cost would be on me and I chose to do it.

The first give-away was done by limited email invitation to a group of individuals, before leaving my employment at this business park.  The response was strong; I had far more requests for the book than actual copies available.  One friend refused a free copy and insisted on purchasing it!  

This morning’s give away was deposited on coffee tables in lobbies.  One of the companies in the park did not have a visitors’ entrance; the only way in was through a locked employees’ entrance.  That probably means that there is no lobby or waiting room.

I gave one copy to a dental office across the street from the park.  After explaining, to the receptionist, what the book was and that I was giving it for free, she was very appreciative.  “Just leave it here on the table?” I asked.  But a man sitting in the waiting room had overheard the conversation, stopped me, and reached out his hand.  He wanted to read it immediately.  (Perhaps he had already read all the magazines that were there.)

In small part, this is marketing.  Somebody will see the book, visit my website, and that will plant the seed of some business opportunity in the future.  In large part, this book was inside me and it had to come out.  Sometimes we do what we do, for reasons that are intangible and difficult to articulate.  And the smile on a person’s face when you give them a free book … is definitely rewarding.

Book: Wildflowers of RiverPark

Although I have mentioned my book project regarding local wildflowers, apparently I neglected to annouce that it was done. 
It is available from Blurb, here: Wildflowers of RiverPark

For more information, go to the navigation panel for this blog and click on “Book”.  That will show you all my blog posts about books.

There are a couple of minor errors in the book.  Specifically, my notes regarding the Eastern Redbud tree state that this tree does not produce legume seed pods.  Actually, it does.

Interest in RiverPark is extremely local, people who work at this buisiness park.  However, during one of my evening photo sessions at the park, I did encounter a couple people who walk around the park, but do not work there.

For all the people who are employed at RiverPark
who get out and walk around the park.
(You know who you are.)

Flowers are listed first according to color. Each section of the book has the color marked at the top right corner. (White isn’t clearly marked because the page background is typically white.) If you want to look up a particular flower, you can quickly locate the appropriate color-coded section.

Within any section, pertaining to a color, plants are listed more or less alphabetically by the common name (rather than the scientific name). However, the alphabetic rule is not strictly applied. Two different species having a similar appearance may be shown on the same page.

Total disclosure:  If anybody buys a copy of this book, $20 goes to Blurb (the printer) and $5 goes to me.  The printing fee charged by Blurb is not negotiable (though they do sometimes offer discount coupons).  I tacked on just $5 for myself because I could not imagine anyone paying more than $25 for a small book that is just 7 inches square and 80 pages.   . . .  Checking Blurb just now, it seems their prices have increased by $3, meaning the book is now $27.95.  

Wildflowers in the White Mountains

Purple Trillium, Painted Trillium, and Trout Lilly are just a few of the wildflowers in bloom in the White Mountains of NH this weekend. 

Purple Trillium is tricky to photograph because it has a nodding presentation (the flower faces downward).  In the first photo here, I propped up the one flower with a stick (just a couple inches) so that it was not nodding.   I love the soft background in this image; there is a strong sense of location yet without sharp details. (f\10 @ 1/50 sec)

In the second image (with the sun shining through it), the flower was on a slight rise and I shot up at it as I lay flat out on forest floor.  Sometimes you have to get dirty.
(f\7 @ 1/250 sec)

In both cases here I used a reflector to kick a bit of light up into the face of the flower.  This helps the first image simply because the flower is much darker than the background. In general, this is not true in the second image, but it does help specific areas that are dark (for example the center of the flower).

Click on either image to see a larger view.