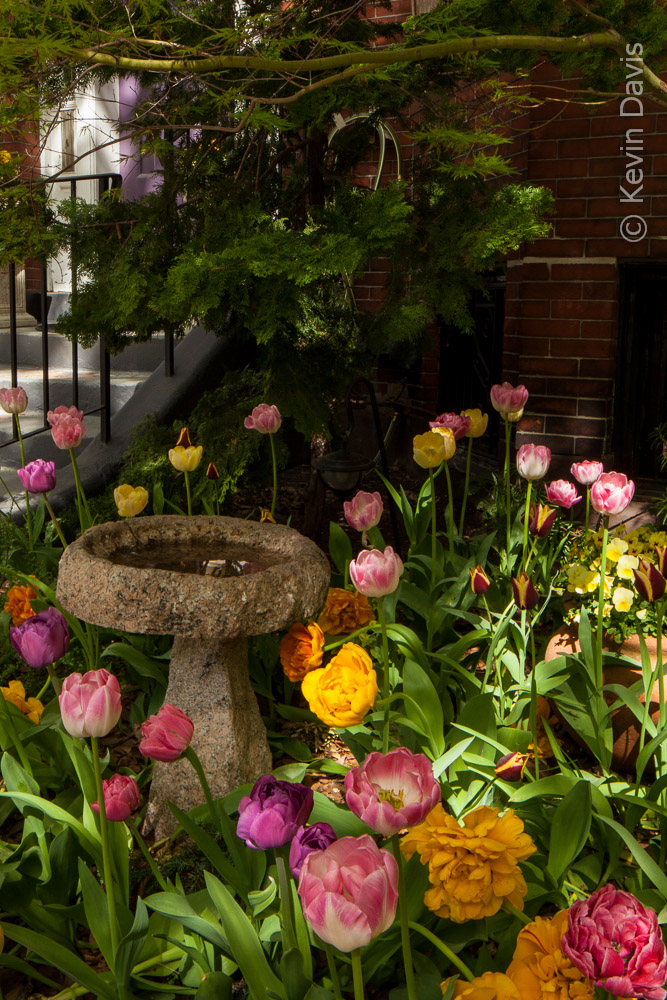
Boston is buzzing with the bright colors of flowers and flowering trees. Hands down my favorite time of year in Beantown.
Boston Spring Blooming
The crown jewel is probably Boston Public Gardens, but there is much more. The Esplanade along the Charles River is bursting with flowering trees … and B.U. students out enjoying the sunshine.
In the narrow streets of Beacon Hill, you can find some surprising small displays. For photography, be aware that the light changes dramatically in these tight spaces sheltered by tall brownstones.
A long winding stretch of busy roadway known as The Riverway skirts along the edge of the Emerald Necklace. At the northern end, close to Kenmore Square, are the Kelleher Rose Garding and Fenway Victory Gardens. (Though, there’s not much to see right now at the Rose Garden; too early for roses.) Heading south into Jamaica Plain, an hour or two at the Arnold Arboretum is always nice.
My friend Charlie drives a taxi in the city of Boston; he doesn’t much care for the busy heart of the city. But as I occaisionally make time to walk the streets, I am frequently surprised by gems of natures splendor, whether planted by the city or by residents tending what small patch of ground is available to them.
Last month, I shot video of a stage performance (link: Videography of a Stage Performance). To edit the video and create a video disc, I have been using new software (different than what I have used in the past), Sony Vegas.
For editing video, there are several software applications that cost less than $200. For example, I used Pinnacle Studio for many years. (I began doing this before Blu-ray discs ever existed.) Then there are a half dozen professional software applications that cost more than $1000. In the middle price range, there seems to be only one; that is Sony Vegas. (Vegas is currently available only for 64-bit Microsoft Windows.)
I’ve been learning to use Vegas and its companion application DVD Architect. This has not been easy because the tutorial help is a bit lacking and it uses some terminology that wasn’t entirely in my vocabulary. For example, it was not clear to me exactly what Vegas means by an “event” or an “envelope”.
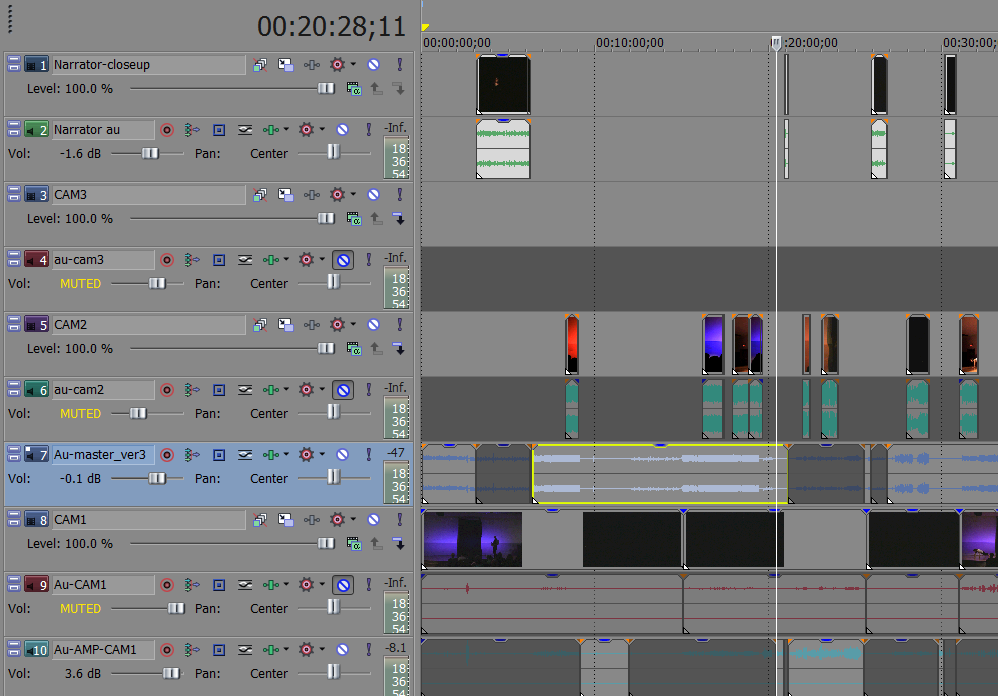
Snapshop of the timeline in Sony Vegas
In editing, I encountered a particular difficulty trying to nudge a video clip (push it earlier in time or later in time). Vegas built-in help doesn’t fully explain this, but searching for the word “move”, I did find the answer under “keyboard shortcuts”. To nudge a clip, use keys on the numeric keypad. That’s not possible on my laptop computer, because it does not have a full-size keyboard; there is no numeric keypad on the right side. To solve this, I bought an accessory keypad that simply attaches via USB; cost $16.
The screen-capture above shows several video tracks and audio tracks in my project. (This example is perhaps a bit over-complicated and could have been done differently.)
After assembling various video clips and audio variations, “render” will create a single video/audio file. (In some cases, you may have to output a video file and a separate audio file.) In my first six attempts to render my project, Sony Vegas crashed three times. (Perhaps it was not Sony Vegas, but rather the encoder plug-in.)
After laying out the disc content and building menus with DVD Architect, the disc must be rendered. At this point, DVD Architect may present helpful error messages and warning messages. One example is that two menu buttons overlap. A very common warning is that video or audio will be compressed (or re-compressed). Because I had very carefully selected my video output parameters within Sony Vegas, I had every confidence that the video would not need to be re-encoded by DVD Architect. However, DVD Architect reported that re-compressing the video would in fact be necessary. From here after, I have been rendering only HD resolution from Vegas (whether intended for standard def DVD or high def BluRay) with the assumption that DVD Architect is always going to re-render it. But maybe I will continue to poke at this, because re-rendering can take a long time. Reducing HD down to SD takes twice as long compared with re-rendering without changing the resolution (e.g. re-rendering HD to a different form of HD with different encoding properties).
DVD Architect is a bit easier to learn than Vegas. DVD Architect does support professional disc features such as multiple languages, sub-titles, audio setup options, and multiple camera angles. However, those are all features that I have not used yet.
Inserting a “scene selection” menu was very easy. Place a marker at the beginning of each scene and then choose “insert scene selection menu”.
Well, I have only dented the surface of Sony Vegas. It has been a bit difficult to learn the first time, but the end result is a success.
A few weeks ago, I did photography and videography of a stage performance. Most of the still photos were shot during rehearsals, so that I had freedom to move around and use electronic flash. Most of the video was shot during live performance with an audience present in the chairs.
The main video camera angle was captured by a camcorder on a tripod at the back of the room. This camera captured 90% of the stage, but failed to sufficiently adapt the exposure for an individual person lit by a spotlight. While I left this camera alone, I captured additional angles using a DSLR. One angle was from a seat in the front row, right side. A second angle was from center aisle. A third angle was from the back of the right aisle (because dancers came off-stage and down the aisle). A fourth angle was just the band pit. To do this well would require at least three camera operators, but there was only me because this was a volunteer pro-bono job and no video-savvy operators came to light.
Audio was recorded at the sound control booth. Unfortunately, one microphone was not recorded, so important monologues were lost. Additionally, one song with vocal and instruments seemed to only record the vocalist. I partially recovered the missing audio from the camcorder, but had to amplify it to an unreasonable amount; it does not sound good, but it’s better than no sound at all.
In the end, I had three separate audio recordings. You would think that duration, from first utterance to the last, would be identical … but it was not. One recording was three seconds longer. (I can only presume that the clocking devices inside the different recorders are not very precise.) That means that synchronization of the audio and video (lip synch) is lost. After several attempts, I did manage to compress that audio such that it aligned with the others.
Lessons
When using multiple cameras, use the same make/model if possible
(so the color is the same). And if you are borrowing a camera from a friend, absolutely test it first under the same conditions that you will rely upon it.
With a DSLR, set the color saturation to low.
(You can always boost it later during edit.)
If you have access to audio & video equipment that supports Time Code,
that can save you a lot of headaches during subsequent editing.
Have a dedicated operator for every camera.
Redundancy. Shoot every scene from two camera angles.
For smooth panning, use a tripod with a “fluid head”.
Record your own master audio; don’t assume the sound board will capture it perfectly. Unless you have a professional-grade video camera with a good quality audio pre-amp, use a separate audio recorder (don’t use the mic that is built-in to the camera).
An electronic flash strobe, powered by AA batteries, will slow down sooner than you or I expect. Recycle time, the time from one flash to the next, will become longer as power is drained from the batteries. (And if you use rechargeable batteries, those usually do not hold out quite as long as standard alkaline batteries.) How can we prolong optimum power for a flash? The short answer is: a better power source.
If you’re using a flash that’s built-in to your camera, then you are probably stuck. The only thing you can do is carry an extra supply of charged batteries and change the battery more frequently. The good news is you may be able to use a more powerful external flash, even though your camera already has a built-in flash. But to answer that for your particular camera, you have to check the owner’s manual.
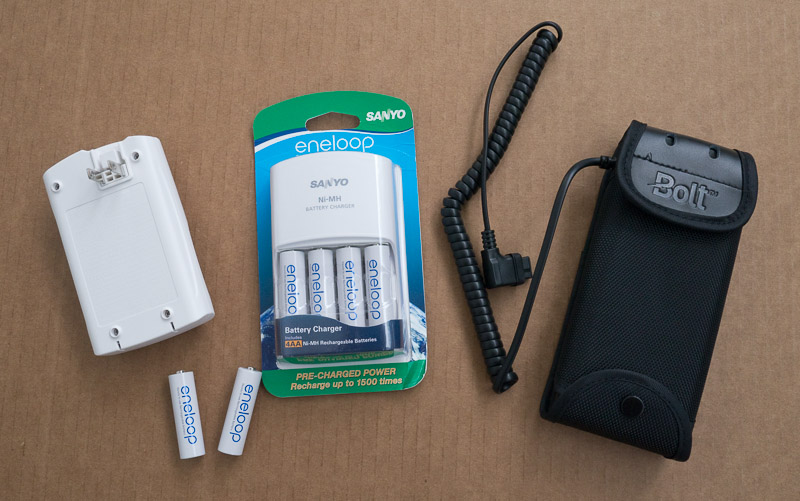
If you’re using an external flash, powered by standard AA batteries, many flash strobes will allow you to use an alternate power source, instead of the the battery compartment built in to the strobe. There are a variety of possibilities and some can have a price tag much greater than the strobe.
External battery pack for Canon flash
Typically, I am using a Canon 580EX2 strobe, which has a power socket allowing for an external power source. Canon sells an external battery pack CP-E4, which holds 8 AA batteries, twice as many as the built-in battery compartment of the 580EX2. However, with a retail price tag around $150, the CP-E4 seems over-priced. Seriously, it is a simple battery holder, no fancy electronics involved.
Thankfully, there are less-expensive 3rd-party equivalents. If you use one of these, it likely invalidates your Canon warranty and Canon will not guarantee that their products will function with a non-Canon battery pack. The 580EX2 instruction manual states: “If non-Canon, external power pack is used, it may cause malfunction.” Does that scare you? It shouldn’t. Canon is simply protecting themselves from liability if you happen to connect a defective power supply.
I’ve been using a Bolt CBP-C1 battery pack; like the Canon battery pack, the Bolt holds 8 AA batteries, but the price tag is half that of the Canon. It has proved to be durable and reliable for photographing sports, weddings, and stage performances. I have been using rechargable Sanyo Eneloop batteries (NiMH). Using just one set of batteries, I have not yet run out of power during any shoot.
One little trick to be aware of regarding the use of an external battery pack with the Canon 580EX2 strobe. When an external battery pack is connected, the strobe may rely in-part upon the external batteries and in-part upon batteries installed directly in the flash. If you have particularly weak batteries installed directly in the flash, the flash may fail when those batteries fail. You can change this. Among the cryptic custom function settings, you will find custom function 12. Set custom function 12 equal to 1 (on) and the flash will exclusively use the external battery pack.
Having a need to get some prints done quickly, I employed a print lab that offered the paper I wanted at a good price. Unfortunately, they overcharge for 2-day shipping and also charge a $25 fee for a rush order. Really? $70 for rush processing + shipping? One of these cost penalties is understandable, but the sum of these two penalties was disturbing. Maybe a different lab would do the job without one of these two penalties?
I returned to a lab that I had used a month ago. Speaking with the lab via telephone, they told me I must upload the file within 60 minutes to get it into the processing queue. After consulting the shipper’s web site (UPS), they quoted me only $20 for 2-day shipping and no apparent surcharge for rush processing! But the paper choices are different and the print cost is significantly higher, compared to lab#1. In the end the total cost would be just a bit less, not much. I did login and upload the file, but then I could not seem to place an order. Their website allowed me to upload the file, but then the site navigation was confusing and I could not figure it out. (Which is odd because I had used this site just one month ago.) At this point, I was experiencing a lot of anxiety because of the time pressure.
Returning to lab#1, I completed the ordering process. Then sent a courtesy email to lab#2 because they were watching to receive my rush order (which I abandoned). Ten minutes later, someone from lab#2 telephoned me because he saw the upload and called to help. Sorry, but it was too late.
Lesson 1: When push comes to shove, never ever underestimate website ease-of-use.
Lesson 2: For rush jobs like this, I need to print myself rather than outsource to a print lab (incurring shipping delays, shipping costs, and rush processing fees).
Having sent out two sets of images, each to a different lab for printing, I have received both sets of prints. They all look great. Both sets were printed on archival inkjet paper, but two different brands … Epson Premium Luster for the sports images and Museo Silver Rag for nature/landscape. Premium luster is a lightly coated paper with a very slight pearl texture. Although I have seen Museo Silver Rag referred to as luster, I am inclined to say that it is semi-matte (one notch below luster), with a subtle sheen and subtle paper texture. The density of black color is not as good on Silver Rag (compared to the Epson Premium Luster), but is quite good considering this is an uncoated paper. In retrospect, I am very happy with both choices.
Acadia National Park
For sports images, I mounted each to a pure black presentation board. The presentation boards were pre-cut to size and are solid black through the core. From the print lab, each print had a broad white border; I trimmed down the borders to maybe 1/16 inch before mounting to boards.
For nature images, I did not want black or white, so I selected an off-white color mat board. General-purpose mat board can be inexpensive, but depends upon the particular board. Sheets 32×40” may cost less than $9. But this is only practical if you have the tools to easily and accurately cut the boards.
All said and done, including shipping, 32 prints cost me more than $400. Mounting boards cost an additional $1.20 – $2.00 per print. A spray-can of adhesive can cost as little as $10 for non-archival and as much as $20 for acid-free archival. Because a portfolio is not meant to last forever, there is no point in spending extra dollars for acid free adhesive or acid-free mounting boards.
If you have a set of images, is that a gallery or a portfolio? To my thinking a gallery can be any set of images, they need not even be related in any strong way. In contrast, a portfolio is a very closely edited collection of 20-30 images, your very best.
A portfolio can be presented in many ways, but foremost in my mind are these four: contained in a book, individual prints, digitally on a web site, or digitally on a tablet computer. Today, a professional photographer probably needs at least two of these four. Most recently, I have been working on a print portfolio. The last time I did this was years ago. (I should probably burn those old prints because they cannot hold a candle to my recent work.)
The last time I created a print portfolio, the prints were all made on chromogenic paper … chemically treated paper that is light-sensitive and processed with chemicals to permanently fix the image onto the paper. These types of prints are still very common, can be very inexpensive, and can create stunning images. The image can be projected onto the paper either using traditional film enlargers or digital enlargers, such as a LightJet. Chromogenic prints are continuous tone, unlike inkjet/giclée prints.
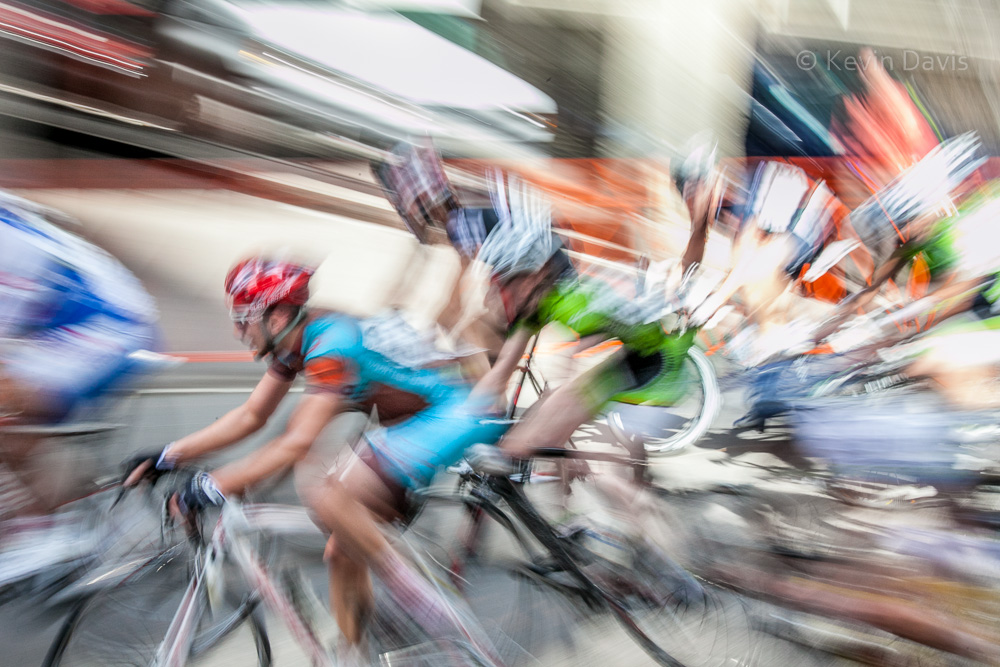
Bicycle race
For my new portfolio, I am employing only giclée (a.k.a. inkjet) prints. These types of prints offer far more options with regard to the paper. There are dozens of paper manufactures, each offering a variety of surfaces, textures, and contrast characteristics. It’s all very confusing. Photographers, who print often, have experience with several papers and have learned a few favorites for different types of images. But that’s not me.
After a ton of research, I selected a specific paper and a lab that offered this paper at a reasonable price. But before uploading my images to a print lab, I thought to check the image via soft proofing. Because printed images are dramatically different than images displayed on a computer monitor, soft proofing is a software feature that compensates for paper and ink, then shows on a computer monitor an approximation of what the print will look like. I downloaded a color profile specifically for the paper I had intended to use, then displayed the soft proof using Adobe Lightroom. The result was absolutely awful. My best efforts were not enough to make the image look good, and I ultimately abandoned the paper, did more research, and selected a different paper.
Very briefly, let me say that a single print 11×14” or 8×12” can cost anywhere from $13 to $60, depending upon the particular lab, how much personalized care they give to each print, and the particular paper you choose. (If you buy multiples of the same print, the additional copies typically cost less than the price for the first one.) Compare this to a print on chromogenic photo paper, which might cost only $4 to $15.
When I began to place my order for prints, they informed me that my preferred paper was no longer available. Again, I returned to research and selected a third paper. Because the lab offered a specific set of papers, I limited myself to just those papers that this lab supported. Having already uploaded my images to the lab, I spoke directly with someone at the lab, to confirm that my paper choice was right for these particular images. (Specifically, I did not want glossy or matte, but rather something in between that would provide very good color saturation and contrast.) Unfortunately, the lab also informed me that the prices advertised on their web site had all been changed recently (they had neglected to update the web site). Despite the paper changes and price increases, I chose to stick with this particular lab rather than go back to research and look for another lab that might possibly be less expensive.
Very excited to photograph freestyle ski jumping this week!
For photography, winter can be dull, particularly if there is no snow … the grey season, the season of sticks without leaves. But NOT this week. This is an international event sponsored by FIS, the international skiing authority. The ORDA has authorized official Press credentials, which allows me a bit more freedom of movement than regular spectators, to achieve shooting angles I need to create good images.
Because the freestyle ski jump competition is preceded by a mogul competition, I will arrive a day early in order to catch the mogul competition. Although I don’t “need” this shoot, I’m going to be right there and it could be fun (I simply haven’t thought about it much). One extra night’s lodging is all it takes … and maybe rent a pair of skis so I can reach the top & middle of the slope.
Logistical arrangements have required a significant investment of time.
Lens selection & rent
A couple of (smaller) equipment purchases
Contact ORDA for official Press credentials
Find a place to stay (difficult because I made a reservation only 1wk prior to the event)
Couple minor things regarding my car (before driving 500 miles)
(The weather forecast for Friday is *COLD*.)
I have selected a 70-200mm f4 zoom lens and the Canon EF 400mm f4 DO lens. Having never used the DO lens before, this is a bit of a gamble. However, at 4.27 lbs, the DO is significantly less weight than the 400mm f2.8 or even the 300mm f2.8.
While the weight of the 400mm DO is hand-holdable, I want a monopod so that I do not have to hand-hold it. But my cheap old monopod (really cheap) is not enough for this task. So I purchased a new monopod (Feisol). With this particular item in mind, I went to my local photography shop (Hunt’s Photo & Video) and looked at the other options (Benro, Induro, etc). Lucky for me they did stock the Feisol and that is ultimately the item I had in-hand when I left the store.
When used on snow, a monopod (or even a tripod) will punch a narrow hole in the snow and sink, because of the very narrow footprint. A few monopods do have an expanded “foot”, but the model I selected does not have this feature. So I cut up the plastic lid to a peanut butter jar and attached that to the bottom of the monopod.
Cleaning out my file cabinet, I found 15-yr-old receipts regarding film. I discarded them today, but it is interesting to note how much it cost to shoot medium format film (120 and 220 rolls). I did not look at current pricing for comparison.
Each frame cost about $0.30 plus another $0.38 for processing plus tax.
That was $0.72 each time I pressed the shutter button.
Some photographers are very brand-loyal and biased, particularly regarding Nikon and Canon. All I can say is … thank goodness for Canon AND Nikon, competetively driving each other to create excellent cameras.
Here are a few highlights from the history of DSLR cameras.
(intentionally ignoring digital backs for medium format cameras)
1991 Kodak DCS-100 … first DSLR (based on a modified Nikon body)
1995 Canon/Kodak DCS 3 … Kodak digital camera back on a modified Canon body
1999 Nikon D1 ………. first practical/affordable DSLR for mass market
2001 Canon 1D ……… landmark for sports photography; 8 fps and reduced shutter lag
2002 Canon 1Ds …….. first DSLR with a full-frame sensor
2004 Fujifilm FinePix S3 Pro… first DSLR with live preview
2007 Nikon D3 …………. Nikon’s first Fx (full-frame) DSLR
2007 Canon 1DS mkIII .. 21 megapixels, first DSLR to exceed 18Mp
2008 Nikon D90 ……….. first DSLR to shoot 720 HD video
2008 Canon 5D mkII …. first DSLR to shoot 1080 HD video
2012 Nikon D3200 ……. 24 megapixels, Nikon’s first DSLR to exceed 18Mp